显示标签为“ADF 无废话”的博文。显示所有博文

2013年9月25日星期三

ADF_240:Session 过期时的处理方法之二:Redirect 到其它页面

开发运行环境:JDeveloper 11.1.2.4 + Oracle XE Database 11gR2

在前一个实验的基础上,只要修改web.xml中的WARNING_BEFORE_TIMEOUT值就可以,比如默认的120秒。

其它的地方都不需要修改。

1. web.xml

<context-param>
    <param-name>oracle.adf.view.rich.sessionHandling.WARNING_BEFORE_TIMEOUT</param-name>
    <param-value>120</param-value>
</context-param>

<filter>
    <filter-name>SessionTimeOutFilter</filter-name>
    <filter-class>view.SessionTimeOutFilter</filter-class>
    <init-param>
        <param-name>SessionTimeoutRedirect</param-name>
        <param-value>index.jsf</param-value>
    </init-param>
</filter>

<filter-mapping>
    <filter-name>SessionTimeOutFilter</filter-name>
    <servlet-name>Faces Servlet</servlet-name>
</filter-mapping>

2. 运行效果
session过期前两分钟弹出“失效警告”窗口,如果没有理会,那么session过期后,警告窗口自动关闭,然后弹出“页面失效”窗口,点击确定后,会Redirect到你指定的页面,我这里是index.jsf。

我的实验结果发现,后台会报出一个异常:
java.lang.IllegalStateException: HttpSession is invalid
at weblogic.servlet.internal.session.SessionData.getAttributeNames(SessionData.java:483)
at view.SessionTimeOutSessionListener.sessionDestroyed(SessionTimeOutSessionListener.java:30)
at weblogic.servlet.internal.EventsManager.notifySessionLifetimeEvent(EventsManager.java:276)
at weblogic.servlet.internal.session.SessionData.remove(SessionData.java:971)
at weblogic.servlet.internal.session.MemorySessionContext.invalidateSession(MemorySessionContext.java:69)
Truncated. see log file for complete stacktrace
这是因为我定义了一个SessionListener,用来监听session何时创建,何时失效。
但我不知道为何sessionDestroyed时,会抛出这个异常,不过页面没有受到影响。

3. SessionTimeOutSessionListener 

package view;

import java.util.Enumeration;

import javax.servlet.http.HttpSession;
import javax.servlet.http.HttpSessionEvent;
import javax.servlet.http.HttpSessionListener;

public class SessionTimeOutSessionListener implements HttpSessionListener {
    private HttpSession session = null;

    public void sessionCreated(HttpSessionEvent event) {
        System.out.println("%%%%%%%%%%%%%%%%%%%%%%%%% Session Created at " + new java.util.Date());
        session = event.getSession();

        String name = null;
        Object value = null;
        for (Enumeration enu = session.getAttributeNames(); enu.hasMoreElements(); ) {
            name = (String)enu.nextElement();
            value = session.getAttribute(name);
            System.out.println("%%%%%%%%%%%%%%%%%%%%%%%%% name = " + name + ",  value= " + value);
        }
    }

    public void sessionDestroyed(HttpSessionEvent event) {
        System.out.println("%%%%%%%%%%%%%%%%%%%%%%%%% Session Destroyed at " + new java.util.Date());
        String name = null;
        Object value = null;

        for (Enumeration enu = session.getAttributeNames(); enu.hasMoreElements(); ) {
            name = (String)enu.nextElement();
            value = session.getAttribute(name);
            System.out.println("%%%%%%%%%%%%%%%%%%%%%%%%% name = " + name + ",  value= " + value);
        }
    }
}

ADF_239:Session 过期时的处理方法之一:禁止弹出窗口

开发运行环境:JDeveloper 11.1.2.4 + Oracle XE Database 11gR2

访问ADF页面时,如果超过在web.xml中的设置session-timeout的时间,没有任何动作的话,会弹出如下窗口:
图1

点击后,会重新刷新当前页面。
如果,在web.xml中增加oracle.adf.view.rich.sessionHandling.WARNING_BEFORE_TIMEOUT设置如下:

<context-param>
    <param-name>oracle.adf.view.rich.sessionHandling.WARNING_BEFORE_TIMEOUT</param-name>
    <param-value>120</param-value>
</context-param>

会在session过期之前的2分钟(120秒)时自动弹出如下窗口:

 图2
点击确定,会重新刷新当前页面,并且session不会过期。
如果没有理会该警告,那么在session过期之后,该窗口会自动关闭,然后弹出图1的窗口。

以上两个提示窗口是ADF默认提供的功能,一般来说,用户尚可接受。

如果把WARNING_BEFORE_TIMEOUT设置为0,那么session过期后,不会弹出任何窗口。
当用户在页面上进行任何操作时,会弹出如下窗口:

 图3
点击确定后,页面显示如下:
图4
这当然不是我们所希望的。

在实际需求中,用户可能不希望session过期时弹出任何窗口,而是重新刷新当前页面,那该怎么做呢?

我尝试了很多种办法,比如使用SessionListener,PhaseListener,Filter,ExceptionHandler。
最后发现,使用Filter可以解决用户的这个需求。

1. SessionTimeOutFilter.java

package view;


import java.io.IOException;

import javax.servlet.Filter;
import javax.servlet.FilterChain;
import javax.servlet.FilterConfig;
import javax.servlet.ServletException;
import javax.servlet.ServletRequest;
import javax.servlet.ServletResponse;
import javax.servlet.http.HttpServletRequest;
import javax.servlet.http.HttpServletResponse;

public class SessionTimeOutFilter implements Filter {
    public SessionTimeOutFilter() {
        super();
    }
    private FilterConfig filterConfig = null;

    public void init(FilterConfig filterConfig) throws ServletException {
        this.filterConfig = filterConfig;
    }

    public void destroy() {
        filterConfig = null;
    }

    public void doFilter(ServletRequest request, ServletResponse response, FilterChain chain) throws IOException,
                                                                                                  ServletException {
        System.out.println("%%%%%%%%%%%%%%%%%%%%%%%%% doFilter");
        String requestedSession = ((HttpServletRequest)request).getRequestedSessionId();
        String currentWebSession = ((HttpServletRequest)request).getSession().getId();
        boolean sessionOk = currentWebSession.equalsIgnoreCase(requestedSession);
        // if the requested session is null then this is the first application
        // request and "false" is acceptable
        if (!sessionOk && requestedSession != null) {
            System.out.println("%%%%%%%%%%%%%%%%%%%%%%%%% session has expired or renewed. Redirect request.");
            // the session has expired or renewed. Redirect request
            ((HttpServletResponse)response).sendRedirect(filterConfig.getInitParameter("SessionTimeoutRedirect"));
        } else {
            chain.doFilter(request, response);
        }
    }
}

2. 在web.xml中增加如下配置

<context-param>
    <param-name>oracle.adf.view.rich.sessionHandling.WARNING_BEFORE_TIMEOUT</param-name>
    <param-value>0</param-value>
</context-param>

<filter>
    <filter-name>SessionTimeOutFilter</filter-name>
    <filter-class>view.SessionTimeOutFilter</filter-class>
    <init-param>
        <param-name>SessionTimeoutRedirect</param-name>
        <param-value>index.jsf</param-value>
    </init-param>
</filter>

<filter-mapping>
    <filter-name>SessionTimeOutFilter</filter-name>
    <servlet-name>Faces Servlet</servlet-name>
</filter-mapping>

3. 运行效果
当session过期后,不会有任何窗口弹出,用户在页面上进行任何操作时,会重新刷新当前页面。
我实验的结果还发现,后台会报出一个错误:
<RichExceptionHandler> <_logUnhandledException> ADF_FACES-60098:Faces 生命周期在阶段RESTORE_VIEW 1中接收到未处理的异常错误
java.lang.IllegalStateException: null windowId

查了一下,没找出原因,页面上没有任何影响,以后有时间再研究一下。

Project 下载:ADF_SessionTimeout.7z

参考文献:
1. http://www.baigzeeshan.com/2010/12/how-to-set-session-time-out-in-adf.html
2. http://www.baigzeeshan.com/2011/05/how-to-run-java-code-on-every-page-load.html
3. http://maverickshyam88.wordpress.com/2013/01/30/handling-session-time-out-in-adf/
4. http://www.baigzeeshan.com/2011/07/how-to-automatically-redirect-to.html
5. https://forums.oracle.com/thread/549724
6. https://cwiki.apache.org/confluence/display/MYFACES/Access+FacesContext+From+Servlet
7. http://www.coderanch.com/t/467358/JSF/java/access-faces-context-backing-beans
8. http://blog.olrichs.nl/2013/05/support-for-multiple-session-timeouts.html
9. http://adfdevelopers.blogspot.ch/2009/06/detecting-and-handling-user-session.html
10. http://prsync.com/oracle/tips-on-dealing-with-session-time-out-popup-522231/
11. https://forums.oracle.com/message/4239840
12. https://forums.oracle.com/thread/2437276
13. http://ramannanda.blogspot.jp/2013/04/adf-exception-handling-scenario.html
14. https://forums.oracle.com/thread/2358909
15. http://stackoverflow.com/questions/2543094/how-to-redirect-to-index-page-if-session-time-out-happend-in-jsf-application

2013年8月2日星期五

ADF_238:ADF 12.1.2新特性

ADF 12.1.2 与WebLogic 12.1.2 同时发布,这个版本包含很多激动人心的新特性。

1.ADF View

1.1 新增的特性
(1)支持 JSF 2.0: Facelets,Ajax,Get,合成组件,带批注的Managed Beans,新的变量范围,条件导航,直接在页面中显示EL表达式内容,EL表达式中的方法可以带参数,系统事件等等。
(2)新组件:Treemap,使用不同颜色、不同大小的矩形方块表示数据的层级关系。

(3)新组件:Sunburst,使用放射状的布局显示数据的层级关系。

(4)新组件:Timeline,一个交互式的可视化组件,允许用户按照时间顺序查看事件。

(5)新组件:List View,一个用于显示集合的可视化组件。

(6)新组件:Code Editor,一个代码编辑器,增加行号,并可以高亮显示代码。
(7)新组件:Panel Drawer,在容器组件的左边或右边增加一个Tabs,一个用于显示集合的可视化组件。
(8)新组件:Panel Springboard,类似工具栏的一个可视化组件。

(9)支持Chrome 浏览器(Android 4.0)。

1.2 增强的特性
(1)Hierarchy Viewer 组件:支持拖放。
(2)Pivot Table 和 Gantt 组件:支持分页。
(3)新增皮肤:Skyros Skin。新组件:Sunburst,使用放射状的布局显示数据的层级关系。
(4)运行时可以修改皮肤。
(5)Table 组件:支持从右向左冻结列,支持分页。
(6)Calendar 组件:支持时长15分钟的任务。
(7)inputDate、inputText、inputColor组件:支持框内文字提示。

(8)File Upload 组件:支持大文件上传,支持多文件同时上传。

(9)Skin 编辑器:更容易定制自己的皮肤。


2.ADF Controller
(1)简洁的URL:原来的状态信息不再显示在URL中。
(2)未授权的Region Taskflow:针对那些没有权限的用户显示一个未授权的Taskflow,增加界面的友好性。

3.ADF Model
增强的特性有:
(1)ADF Logger
(2)Bean Data Control

(3)Web Service Data Control:支持REST。

4.ADF Business Components
(1)支持离线数据库。
(2)支持RowFinder特性。
(3)支持为一个View Object创建多个必须的View Criteria。

参考文献:
1. http://www.oracle.com/technetwork/developer-tools/jdev/documentation/1212-nf-1964675.html

2013年6月28日星期五

ADF_237:实现Table数据自动填充功能之一:修改

开发运行环境:JDeveloper 11.1.2.4 + Oracle Database XE 11gR2

前一个实验使用的是Form,实际情况中,还可能会使用Table。
考虑以下场景:用户修改一行记录时,修改其中某个字段后,希望能够带出其它字段值,即自动填充。

1. 为了不影响其它VO,新建一个VO:EmployeesDetailsView。
注意,为了演示自动填充的功能,这里手工添加了一个Transient Attribute:JobTitle。
也就是说,这个JobTitle并不是从Jobs EO中关联过来的。
我是为了演示输入JobId,自动把JobTitle带出来。

2. 修改JobsView,增加一个View Criteria:GetJobTitleByJobIdViewCriteria,用于根据JobId获取JobTitle。

3. 修改JobsViewImpl.java,增加一个方法:,用于根据JobId获取JobTitle,并将其暴露到Client。

    public void getJobTitleByJobId(String jobId) {
        this.setApplyViewCriteriaNames(null);
        ViewCriteria criteria = this.getViewCriteria("GetJobTitleByJobIdViewCriteria");
        this.setRangeSize(10);
        this.applyViewCriteria(criteria);
        this.setbv_job_id(jobId);
        this.executeQuery();

    }

4. 修改页面,在JobId上增加ValueChangeListener
完成后的页面代码如下:
<af:inputText value="#{row.bindings.JobId.inputValue}"
              label="#{bindings.EmployeesDetailsView1.hints.JobId.label}"
              required="#{bindings.EmployeesDetailsView1.hints.JobId.mandatory}"
              columns="#{bindings.EmployeesDetailsView1.hints.JobId.displayWidth}"
              maximumLength="#{bindings.EmployeesDetailsView1.hints.JobId.precision}"
              shortDesc="#{bindings.EmployeesDetailsView1.hints.JobId.tooltip}"
              autoSubmit="true" id="it6"
              valueChangeListener="#{viewScope.myBackingBean.onJobIdValueChange}">
    <af:autoSuggestBehavior maxSuggestedItems="10"
                            suggestItems="#{viewScope.myBackingBean.onJobIdSuggest}"/>
    <f:validator binding="#{row.bindings.JobId.validator}"/>
</af:inputText>

对应的Managed Bean中的方法代码如下:

    public void onJobIdValueChange(ValueChangeEvent valueChangeEvent) {
        String newValue = (String)valueChangeEvent.getNewValue();
        System.out.println("################################# 1 " + newValue);
        OperationBinding binding = ADFUtils.findOperation("getJobTitleByJobId");
        binding.getParamsMap().put("jobId", newValue);
        binding.execute();

        DCIteratorBinding it = ADFUtils.findIterator("JobsView1Iterator");
        Row[] allRowsInRange = it.getAllRowsInRange();
        if (allRowsInRange.length > 0) {
            Row row = allRowsInRange[0];
            String jobTitle = (String)row.getAttribute("JobTitle");
            System.out.println("################################# 2 " + jobTitle);
            ADFUtils.setBoundAttributeValue("JobTitle", jobTitle);
        }
    }

这里有一个问题要注意:就是何时会触发InputText上的ValueChange事件。
答案是:当输入内容和以前的内容不一样时,并且焦点离开当前InputText时。
所以,自动提示功能发生在前,用户选择和以前不同的某个选项后,才会发生ValueChange事件。
因此,不要担心ValueChange事件会调用多次,其实只有一次。

5. 修改页面的Bindings,这一点和前一个实验一样。
不同的地方是,还要多增加一个Attribute Binding:JobTitle和一个methodAction Binding:getJobTitleByJobId。

6. 运行
修改某行记录,选择某个JobId: 

选定后,JobTitle会自动带出来:


Project 下载:ADF_AutoComplete(2).7z

2013年6月27日星期四

ADF_236:使用AutoSuggest Behavior实现自动提示功能

开发运行环境:JDeveloper 11.1.2.4 + Oracle Database XE 11gR2

自动提示功能是页面上非常常见的一个功能。
本文以InputText组件为例,来说明如何实现自动提示功能。与网上的其它实现不同,本文介绍的实现方式具有一定的普遍性。

需求很简单:实现Employee的JobId字段的自动提示功能。

1. 选择Departments、Employees、Jobs表生成EO和VO。

2. 在JobsView上增加一个View Criteria:queryJobsByJobIdViewCriteria,根据JobId查询Jobs。

3. 定制JobsViewImpl.java,增加一个方法:queryJobsByJobId,并暴露到Client。
    public void queryJobsByJobId(String partOfJobIdStr) {
        this.setApplyViewCriteriaNames(null);
        ViewCriteria criteria = this.getViewCriteria("QueryJobsByJobIdViewCriteria");
        this.setRangeSize(10);
        this.applyViewCriteria(criteria);
        this.setbv_JobId(partOfJobIdStr);
        this.executeQuery();
    }

4. 拖放Employees Data Control生成Form
(1)在JobId上增加AutoSuggest Behavior
(2)设置AutoSubmit=true
完成后的代码如下:
<af:inputText value="#{bindings.JobId.inputValue}" label="#{bindings.JobId.hints.label}"
              required="#{bindings.JobId.hints.mandatory}"
              columns="#{bindings.JobId.hints.displayWidth}"
              maximumLength="#{bindings.JobId.hints.precision}"
              shortDesc="#{bindings.JobId.hints.tooltip}" autoSubmit="true" id="it6">
    <f:validator binding="#{bindings.JobId.validator}"/>
    <af:autoSuggestBehavior maxSuggestedItems="10"
                            suggestItems="#{viewScope.myBackingBean.onJobIdSuggest}"/>
</af:inputText>
(3)对应的Managed Bean中的方法:onJobIdSuggest,代码如下:
    public List onJobIdSuggest(FacesContext facesContext, AutoSuggestUIHints autoSuggestUIHints) {
        String param = autoSuggestUIHints.getSubmittedValue();
        OperationBinding binding = ADFUtils.findOperation("queryJobsByJobId");
        binding.getParamsMap().put("partOfJobIdStr", param);
        binding.execute();

        DCIteratorBinding it = ADFUtils.findIterator("JobsView1Iterator");
        it.setRangeSize(10);
        Row[] allRowsInRange = it.getAllRowsInRange();
        ArrayList selectItems = new ArrayList();
        for (Row o : allRowsInRange) {
            String var = (String)o.getAttribute("JobId");
            String desc = (String)o.getAttribute("JobTitle");
            selectItems.add(new SelectItem(var, var + " " + desc));
        }

        return selectItems;
    }

5. 修改页面的Bindings
(1)手工在Executables中增加Iterator:JobsView1Iterator


 (2)手工在Bindings中增加methodAction:queryJobsByJobId


6. 运行
当修改JobId时,会根据用户的输入自动提示相应的下拉选项。


Project 下载:ADF_AutoComplete.7z

2013年6月26日星期三

ADF_235:Groovy在ADF BC中的常见用法之三

开发运行环境:JDeveloper 11.1.2.4

前面介绍的都是在EO中使用Groovy,在VO中和在EO中使用Groovy的方法基本一样,同样支持
 (1)访问同一个VO中的Attribute
 (2)访问其它VO中的Attribute
 (3)定义Transient Attribute验证规则
 (4)调用ViewRowImpl中的自定义方法
 (5)使用集合功能
VO比EO更灵活的地方是,还支持
 (6)在Binding Variable中使用Groovy
在Binding Variable中的Groovy上下文默认是ViewObjectImpl,而不是单一的Row对象,所以无法访问每行的Attribute。
另外,Groovy可以调用对应的Java类中的自定义方法,在EO中是EntityImpl,在VO中是ViewRowImpl,而不是ViewImpl。
因为ViewImpl代表的是整个集合,而ViewRowImpl代表的是集合中每一行对象。

我以一个常见的一个需求为例来说明如何在Binding Variable中使用Groovy:
客户登录之后,显示员工详细信息,其中Manager一项使用LOV实现下拉列表,并且要求只显示和登录员工所在同一部门的其它员工。

1. 为了不影响原有的Employees VO,新增一个Employees VO:EmployeesGroovyView

2. 增加一个Binding Variable:bvDepartmentId
其中的Value为adf.userSession.userData.DeptId,也就是说,从session中获取一个叫DeptId的值。

3. 增加一个ViewCriteria:EmployeesGroovyViewCriteria


4. 为ManagerId 增加一个LOV


使用一个指向自己的VO作为Accessors:


选中先前定义的EmployeesGroovyViewCriteria:


5. 还有一个问题没解决,如何设置session中的DeptId的值呢?
当然你可以在用户成功登录后,获取标准的Http Session对象,然后写代码设置。
这个例子只是了为了测试Groovy,所以我通过重写Application Module中的prepareSession方法来设置,并且设定DeptId=80。
 @Override
 protected void prepareSession(Session session) {
        session.getUserData().put("DeptId",new Number(80));
 }

prepareSession方法是用来做一些与特定用户session相关的一些初始化工作,比如调用一个存储过程初始化数据,或者设置一些应用级的配置参数。
该方法在创建新用户session时被调用,就是从AM Pool获取AM实例时被调用。

6. 运行效果


可以看出,ManagerId的下拉列表只显示DepartmentId=80的员工列表。


Project 下载:ADF_Groovy(3).7z

参考文献:
1. http://www.jobinesh.com/2011/03/initializing-bind-variables-in-query.html
2. http://www.jobinesh.com/2009/08/tips-on-lov-runtime.html
3. http://andrejusb.blogspot.jp/2012/01/how-to-access-session-scope-in-adf-bc.html
4. http://blog.csdn.net/qingqingxuelang/article/details/5784943
5. https://forums.oracle.com/thread/975097
6. http://adfcodebits.blogspot.jp/2010/06/bit-21-overriding-preparesession-to-do.html

2013年6月19日星期三

ADF_234:Groovy在ADF BC中的常见用法之二

开发运行环境:JDeveloper 11.1.2.4

1. 访问其它EO中的Attribute
以Departments和Employees为例,二者是一对多的关系。
现在想在Employees中的AnnualSalary中引用Departments中的locationId。
首先,要看一下Departments和Employees之间的Assocation关系定义。
可以看到,在Employees中暴露了Departments Accessor。


那么AnnualSalary的Expression可以这样写:adf.object.getDefaultSalaryForGrade(Departments.LocationId)。

方法getDefaultSalaryForGrade(Integer locId)是定义在EmployeeImpl中的自定义方法:   
public static BigDecimal getDefaultSalaryForGrade(Integer locId) {
    System.out.println(" ################### " + locId);
    return new BigDecimal(20000);
}

2. 内置的属性:adf.currentDate 和 adf.currentDateTime
比如,你可以为Hiredate定义一个验证规则:
return (newValue < adf.currentDate)

3. 集合功能
<Accessor>.sum(Groovyexpression)
<Accessor>.count(Groovyexpression)
<Accessor>.avg(Groovyexpression)
<Accessor>.min(Groovyexpression)
<Accessor>.max(Groovyexpression)

(1)对于Departments的SalarySum,你可以使用Employees.sum("Salary")来统计该部门员工的工资和。
其中,Employees是Departments中的Accessor,Salary是Employees中的Attribute。
你甚至可以这样写:Employees.sum("Salary + 1000"),为每个员工涨1000元。
因为参数"Salary + 1000"将被首先解析,即获取每一个Employees EO上的Salary,然后加1000。
同样,你也可以在参数中再调用一个方法,比如:Employees.sum("Salary + adf.object.getBenefitsValue(JobId)")。
注意,方法getBenefitsValue是定义在EmployeesImpl中的。

(2)对于Employees的Salary,你可以增加一个验证规则:return newValue > Departments.Employees.min("Salary"),即要求用户的工资必须大于这个部门工资最低的员工工资。
这里,Departments是Employees EO中reference的对象,而Departments.Employees是Deparments EO中reference的对象。
注意,使用这个验证规则时,如果一个部门的员工很多,比如上千名员工,会有性能问题。

4. 更复杂一些的Groovy验证规则
(1)(JobId != "SALESMAN" ? newValue > 100 : newValue > 0)
(2)Employees.sum("CommissionPct != null ? CommissionPct : 0")
(3)Employees.count("CommissionPct != null && CommissionPct > 300 ? CommissionPct : null")

5. 使用adf.error抛出异常或警告
if (newValue > 1000){
if (newValue > 5000){
adf.error.raise("SALARY_TOO_HIGH_ERROR")
return false
}
adf.error.warn("SALARY_LIMIT_WARNING")
return true
}else{
       return true
}

Project 下载:ADF_Groovy(2).7z

2013年6月18日星期二

ADF_233:Groovy在ADF BC中的常见用法之一

开发运行环境:JDeveloper 11.1.2.4

1. 设置EO或VO的Attribute值
(1)在Employees EO上增加一个Attribute:AnnualSalary,Expression: (Salary != null ? Salary : 0 ) * 12。

(2)如果需要引用EntityImpl类中的自定义方法,需要加前缀:adf.object。
比如:adf.object.getDefaultSalaryForGrade()。
这里,adf.object指向的是当前EntityImpl。

2. 定义在EO的Attribute上的验证规则
(1)在Employees EO的Salary Attribute增加一个验证规则:

if (JobId == "SA_REP"){
 return newValue < 1000
} else
return true

在验证规则中reference一个Attribute时,Attribute-level的验证规则首先被触发,验证该Attribute的newValue值。newValue是用户输入后改变的值,oldValue是改变之前的值。

(2)在Employees EO的Salary Attribute增加另一个验证规则,其中调用了EntityImpl类中的自定义方法:getMaxSalaryForGrade。

if (JobId == "SA_MAN"){
 return newValue < source.getMaxSalaryForGrade(JobId)
} else
return true

注意,reference方法前要加前缀“source”。

3. 访问EntityImpl类的自有方法
(1)Override create方法
    /**
     * Add attribute defaulting logic in this method.
     * @param attributeList list of attribute names/values to initialize the row
     */
    protected void create(AttributeList attributeList) {
        super.create(attributeList);
        SequenceImpl seq = new SequenceImpl("EMPLOYEES_SEQ", getDBTransaction());
        oracle.jbo.domain.Number seqNextVal = seq.getSequenceNumber();
        setEmployeeId(Integer.valueOf(seqNextVal.intValue()));
    }
这样修改后,EmployeeId的值将从Sequence中获取。

(2)如果你不想Override create方法,也可以直接使用Groovy表达式来获取Sequence的下一个值。
设置EmployeeId的Expression:(new oracle.jbo.server.SequenceImpl("EMPLOYEES_SEQ",adf.object.getDBTransaction())).getSequenceNumber()
 注意,这里必须写全类SequenceImpl的路径名。

(3)如果你觉得(2)的方式有些不直观,可以在EntityImpl中定义一个Help方法。
    public oracle.jbo.domain.Number nextVal(String sequenceName) {
        SequenceImpl s = new SequenceImpl(sequenceName, getDBTransaction());
        return s.getSequenceNumber();
    }
然后,设置EmployeeId的Expression:adf.object.nextVal("EMPLOYEES_SEQ")。

4. 访问hints属性
(1)如果想访问LastName的label属性,可以这样写:adf.object.hints.LastName.label。
(2)如果在error message中想访问LastName的label属性,可以这样写:source.hints.LastName.label。

Project 下载:ADF_Groovy.7z

2013年5月27日星期一

ADF_232:使用HTTP Basic Authentication Server作为ADF Mobile 应用的Login Server

开发运行环境:JDeveloper 11.1.2.4 + Android SDK r21.1

目前,ADF Mobile应用可以使用Oracle Access
Management (OAM)作为验证服务器,也可以使用HTTP Basic Authentication Server作为验证服务器。
本文介绍后一种的配置方法。

1. 开发并部署运行一个简单的Enable ADF Security的ADF Web 应用:SampleBasicAuthenticationServer,作为HTTP Basic Authentication Server
(1)该应用只有一个welcome.jsf页面。
(2)Enable ADF Security时,选择HTTP Basic Authentication。
(3)把welcome.jsf授予角色authenticated-role。注意,为了能够授权,需要为welcome.jsf生成pageDef。

2. 创建ADF Mobile 应用,并配置安全,这里使用ADF Mobile自带的例子HelloWorld。
(1)打开adfmf-feature.xml,为Feature配置安全


(2)打开adfmf-application.xml,为应用配置Login Server


这里的Login/Logout URL指向的就是SampleBasicAuthenticationServer应用中的受保护页面:
http://10.191.4.237:7101/SampleBasicAuthenticationServer/faces/welcome.jsf。
增加Cookies:JSESSIONID,这是WebLogic Server要用到的,所以要配置。


配置完成后的样子


3. 部署并运行HelloWorld应用
(1)首先显示的是登录画面


 (2)登录成功后,才会显示Feature画面。


Project 下载:ADF_Mobile_Auth(HTTP Basic).7z

参考文献:
1. http://andrejusb.blogspot.jp/2012/10/adf-mobile-login-functionality.html

2013年5月23日星期四

ADF_231:ADF Mobile 11.1.2.4 Samples 介绍(17):JSExtend

开发运行环境:JDeveloper 11.1.2.4 + Android SDK r21.1

JSExtend演示了如何在.amx页面中调用定制的Javascript方法。
这种技术非常有用,特别是在调用那些没有暴露在DeviceFeatures DataControl中的Cordova方法。
你也可以增加自己的Javascript方法,然后用这种方式去调用。
JSExtend还演示了如何在Javascript中回调Java方法。

1. MyClass.java 代码

package mobile;

import java.io.FileInputStream;

import java.io.FileNotFoundException;

import java.io.IOException;

import javax.el.ValueExpression;

import oracle.adfmf.amx.event.ActionEvent;
import oracle.adfmf.framework.api.AdfmfContainerUtilities;
import oracle.adfmf.framework.api.AdfmfJavaUtilities;

public class MyClass {
    public MyClass() {
    }

    // This method calls the "doAlert" javascript function in the "Javascript" feature and passes in a variable number of params
    public void FireAlerts(ActionEvent actionEvent) {
        AdfmfContainerUtilities.invokeContainerJavaScriptFunction("Javascript", "doAlert", new Object[] {});

        AdfmfContainerUtilities.invokeContainerJavaScriptFunction("Javascript", "doAlert", new Object[] {"arg1"});

        AdfmfContainerUtilities.invokeContainerJavaScriptFunction("Javascript", "doAlert", new Object[] {"arg1", "arg2"});

    }

    // This method calls the "fetchPic" javascript function in the "Javascript" feature with no params
    public void FetchPic(ActionEvent actionEvent) {
        AdfmfContainerUtilities.invokeContainerJavaScriptFunction("Javascript", "fetchPic", new Object[] {});
    }

    // This method calls the "fetchVideo" javascript function in the "Javascript" feature with no params
    public void FetchVideo(ActionEvent actionEvent) {
        AdfmfContainerUtilities.invokeContainerJavaScriptFunction("Javascript", "fetchVideo", new Object[] {});
    }


    // This method will be called by the Javascript method so we show 2-way communication  
    public void FetchCallback(String path) {
        /* Now you have the full path to the file so you can use code like the following to read it
        FileInputStream file;
        try {
        file = new FileInputStream(path);
            int bytesread = 0;
            byte[] b = new byte[1000];
            do {
                bytesread = file.read(b);
                // now do something with the byte array like copy it somewhere, stream it over a web service, etc
            } while (bytesread < 1000);
         
        } catch (FileNotFoundException e) {
            e.printStackTrace();
        } catch (IOException e) {
            e.printStackTrace();
        }
        */

        // We'll simply set a scoped variable that we are displaying on the page
        ValueExpression ve = AdfmfJavaUtilities.getValueExpression("#{pageFlowScope.picpath}", String.class);
        ve.setValue(AdfmfJavaUtilities.getAdfELContext(), path);
     
    }
}

2. methods.js 代码

(function () {

    // This method shows you how to use variable args and prints out the results
    doAlert = function () {
        var args = arguments;

        var str = "doAlert, argCount:" + args.length + ", arguments:";

        for (x = 0;x < args.length;x++) {
            if (x > 0) {
                str += ", ";
            }
            str += arguments[x];
        }

        alert(str);
    };

    // This method uses PhoneGap and calls the getPicture method to get a picture from the photo library
    fetchPic = function () {
        navigator.camera.getPicture(onSuccess, onFail,{quality : 50, destinationType : navigator.camera.DestinationType.FILE_URI, sourceType : navigator.camera.PictureSourceType.PHOTOLIBRARY});
    };

    // Once a valid picture returns, it calls back to java with the result
    function onSuccess(URI) {
        adf.mf.api.invokeMethod("mobile.MyClass", "FetchCallback", URI, onInvokeSuccess, onFail);
    };

    function onFail() {
        alert("It failed");
    };

    function onInvokeSuccess(param) {
    };

    // This method uses PhoneGap and calls the getPicture method to get a picture from the photo library
    fetchVideo = function () {
        navigator.device.capture.captureVideo(captureSuccess, captureFail, {limit : 1});
    };

    function captureSuccess(mediaFiles) {
        var i, len;
        for (i=0, len=mediaFiles.length; i
            adf.mf.api.invokeMethod("mobile.MyClass", "FetchCallback", mediaFiles[i].fullPath, onInvokeSuccess, onFail);
        }
    };

    function captureFail() {
        alert("It failed.  Note: This is not supported on the simulator");
    };


})();

ADF_230:ADF Mobile 11.1.2.4 Samples 介绍(16):RESTDemo


开发运行环境:JDeveloper 11.1.2.4 + Android SDK r21.1

RESTDemo演示了如何使用REST风格的Web Service。
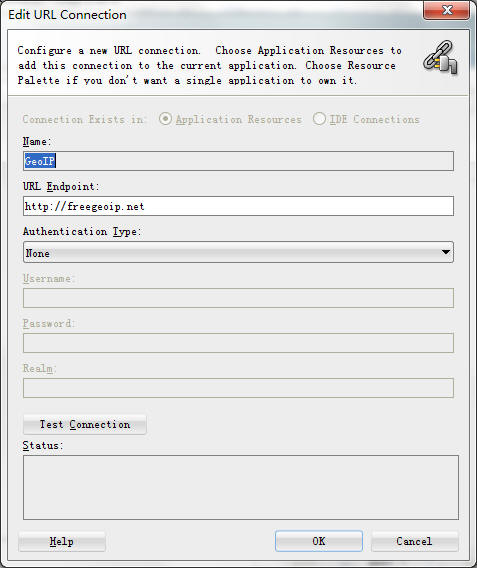
这里展示了两种使用方法:REST-XML和REST-JSON,去调用一个公共的Web Service:http://freegeoip.net/,获取当前机器的地理位置。
REST-XML使用了一个XSD,并创建了一个URL Service Data Control去访问结构化的数据,UI层直接绑定到这个DC上。
REST-JSON使用了一个帮助类:RESTServiceAdapter去获取Web Service的URL connection,然后使用帮助类:JSONSerializationHelper解析返回结果(非结构化的数据)。UI层是间接绑定到一个Managed Bean生成的DC。


1. RESTJSONBean.java 代码

package mobile;

import oracle.adfmf.dc.ws.rest.RestServiceAdapter;
import oracle.adfmf.framework.api.JSONBeanSerializationHelper;
import oracle.adfmf.framework.api.Model;
import oracle.adfmf.java.beans.PropertyChangeListener;
import oracle.adfmf.java.beans.PropertyChangeSupport;

public class RESTJSONBean {

    private transient PropertyChangeSupport propertyChangeSupport = new PropertyChangeSupport(this);

    public RESTJSONBean() {
    }

    private String searchIp = "oracle.com";
    private String jsonResponse = "";
    private RESTJSONResponse response = null;

    public void setSearchIp(String searchIp) {
        String oldSearchIp = this.searchIp;
        this.searchIp = searchIp;
        propertyChangeSupport.firePropertyChange("searchIp", oldSearchIp, searchIp);
    }

    public void addPropertyChangeListener(PropertyChangeListener l) {
        propertyChangeSupport.addPropertyChangeListener(l);
    }

    public void removePropertyChangeListener(PropertyChangeListener l) {
        propertyChangeSupport.removePropertyChangeListener(l);
    }

    public String getSearchIp() {
        return searchIp;
    }

    public void setJsonResponse(String response) {
        String oldResponse = this.jsonResponse;
        this.jsonResponse = response;
        propertyChangeSupport.firePropertyChange("jsonResponse", oldResponse, response);
    }

    public String getJsonResponse() {
        return jsonResponse;
    }

    public void setResponse(RESTJSONResponse response) {
        RESTJSONResponse oldResponse = this.response;
        this.response = response;
        propertyChangeSupport.firePropertyChange("response", oldResponse, response);
    }

    public RESTJSONResponse getResponse() {
        return response;
    }

    public void loadData() {
        RestServiceAdapter restServiceAdapter = Model.createRestServiceAdapter();

        // Clear any previously set request properties, if any
        restServiceAdapter.clearRequestProperties();

        // Set the connection name
        restServiceAdapter.setConnectionName("GeoIP");

        // Specify the type of request
        restServiceAdapter.setRequestType(RestServiceAdapter.REQUEST_TYPE_GET);

        // Specify the number of retries
        restServiceAdapter.setRetryLimit(0);

        // Set the URI which is defined after the endpoint in the connections.xml.
        // The request is the endpoint + the URI being set
        restServiceAdapter.setRequestURI("/json/" + getSearchIp());

        setJsonResponse("");

        // Execute SEND and RECEIVE operation
        try {
            // For GET request, there is no payload
            setJsonResponse(restServiceAdapter.send(""));
            
            // Now create a new RESTJSONResponse object and parse the JSON string returned into this class
            RESTJSONResponse res = new RESTJSONResponse();
            res = (RESTJSONResponse)JSONBeanSerializationHelper.fromJSON(RESTJSONResponse.class, getJsonResponse());
            setResponse(res);
        } catch (Exception e) {
            e.printStackTrace();
        }
    }

}

代码中的连接"GeoIP" 定义来自于URL Connection:


参考文献:
1. https://blogs.oracle.com/mobile/entry/adf_mobile_rest_json_xml
2. http://www.youtube.com/watch?v=HOesFpjBz2M
3. http://biemond.blogspot.com/2012/10/using-json-rest-in-adf-mobile.html

2013年5月22日星期三

ADF_229:ADF Mobile 11.1.2.4 Samples 介绍(15):Weather3

开发运行环境:JDeveloper 11.1.2.4 + Android SDK r21.1

Weather3与Weather2基本实现相同,除了点击查询按钮时,实现了异步调用。

知识点:

1. 新增ForecastWorker.java,作为多线程任务类

package mobile;

import oracle.adfmf.framework.api.AdfmfJavaUtilities;

public class ForecastWorker implements Runnable {
    CityInformation ci = null;
    String zip = "";

    public ForecastWorker() {
        super();
    }

    public ForecastWorker(CityInformation ci, String zip) {
        this.ci = ci;
        this.zip = zip;
    }

    public void run() {
        ci.retrieveForecastAsync(zip);
        AdfmfJavaUtilities.flushDataChangeEvent();
    }
}

注意这行代码:AdfmfJavaUtilities.flushDataChangeEvent();,有了这行代码,界面才能刷新。

2. CityInformation.java中的相关方法

    public synchronized boolean retrieveForecast(String zip) {
        // First lets clear the cityForecast
        cityForecast.setSuccess((Boolean)Boolean.FALSE);
        cityForecast.setResponseText((String)"Running...");
        cityForecast.setCity((String)"");
        cityForecast.setState((String)"");
        cityForecast.setWeatherStationCity((String)"");
        cityForecast.clearForecast();
     
        ForecastWorker fw = new ForecastWorker(this, zip);
        Thread t = new Thread(fw);
        t.start();
     
        return true;
    }
 
    public synchronized boolean retrieveForecastAsync(String zip) {
        // Before we get any forecast, we get the WeatherInfo if it's not retrieved yet
        weatherInfo.retreiveWeatherInfo();

        boolean ret = false;

        List pnames = new ArrayList();
        List params = new ArrayList();
        List ptypes = new ArrayList();

        pnames.add("ZIP");
        ptypes.add(String.class);
        params.add(zip);

        try {
            // This calls the DC method and gives us the Return
            GenericType result =
                (GenericType)AdfmfJavaUtilities.invokeDataControlMethod("WeatherDC", null, "GetCityForecastByZIP",
                                                                        pnames, params, ptypes);

            // This will give us the CityForeCast object from the result
            GenericType cfgt = (GenericType)result.getAttribute(0);

            // Read the attributes from the GenericType returend from the getCityForecastByZip call          
            cityForecast.setSuccess((Boolean)cfgt.getAttribute("Success"));
            cityForecast.setResponseText((String)cfgt.getAttribute("ResponseText"));
            cityForecast.setCity((String)cfgt.getAttribute("City"));
            cityForecast.setState((String)cfgt.getAttribute("State"));
            cityForecast.setWeatherStationCity((String)cfgt.getAttribute("WeatherStationCity"));

            // This will give us the ForecastResult which is a collection of Forecast objects
            GenericType frgt = (GenericType)cfgt.getAttribute("ForecastResult");


            // fcgt is a collection of Forecast objects, get all those in a loop
            int count = frgt.getAttributeCount();
            for (int i = 0; i < count; i++) {
                // Get each individual WeatherDescription object
                GenericType fgt = (GenericType)frgt.getAttribute(i);

                // Now make a real WeatherDescription java object out of this GenericType
                Forecast f = (Forecast)GenericTypeBeanSerializationHelper.fromGenericType(Forecast.class, fgt);
                f.weatherInfo = weatherInfo;

                // Now get the Temperature subobject
                GenericType tempgt = (GenericType)fgt.getAttribute("Temperatures");

                // Now set the high and low temps
                f.setDaytimeHigh((String)tempgt.getAttribute(0));
                f.setMorningLow((String)tempgt.getAttribute(1));
                // Now add this to our holder of all WeatherDescriptions
                cityForecast.addForecast(f);
             
            }
            ret = true;
        } catch (AdfInvocationException e) {
            Trace.log(Utility.ApplicationLogger, Level.SEVERE, CityInformation.class, "retrieveForecastAsync",
                      ">>>>>> AdfInvocationException=" + e.getMessage());
            AdfException ex = new AdfException("Error Invoking Web Service.  Please try later", AdfException.WARNING);
            throw ex;

        } catch (Exception e2) {
            Trace.log(Utility.ApplicationLogger, Level.SEVERE, CityInformation.class, "retrieveForecastAsync",
                      ">>>>>> Exception=" + e2.getMessage());
            AdfException ex = new AdfException("Error Invoking Web Service.  Please try later", AdfException.WARNING);
            throw ex;
        }
        return ret;
    }

3. 部署,运行
(1)可以看到点击查询按钮后,会马上进入到下一个页面,但是数据并没有完全得到。
这时,并不会Block用户可以做其他事情。


(2)获取数据后,界面自动刷新。


参考文献:
1. https://blogs.oracle.com/mobile/entry/web_service_example_part_3

ADF_228:ADF Mobile 11.1.2.4 Samples 介绍(14):Weather2

开发运行环境:JDeveloper 11.1.2.4 + Android SDK r21.1

与Weather1不同,Weather2演示了如何使用Java调用Web Service,并且通过解析 "GenericType" 返回对象生成最终的Java对象。用户界面组件是绑定到Java Bean上,而不是直接绑定到Web Service上。
这样做最大的好处是:可以尽可能地控制服务的访问,比如缓存结果数据,这样,即使服务不在线,仍然可以快速提供响应。
这种实现方式的目的让应用与网络尽可能地“绝缘”。


知识点:

1. 点击天气查询按钮,调用的是WeatherBean.java中的方法callForecast,后者会调用CityInformation.java中的方法retrieveForecast

    public boolean retrieveForecast(String zip) {
        // Before we get any forecast, we get the WeatherInfo if it's not retrieved yet
        weatherInfo.retreiveWeatherInfo();

        boolean ret = false;

        Trace.log(Utility.ApplicationLogger, Level.INFO, WeatherBean.class, "retrieveForecast",
                  ">>>>>> Inside retrieveForecast");

        List pnames = new ArrayList();
        List params = new ArrayList();
        List ptypes = new ArrayList();

        pnames.add("ZIP");
        ptypes.add(String.class);
        params.add(zip);

        // First lets clear the cityForecast
        cityForecast.setSuccess((Boolean)Boolean.FALSE);
        cityForecast.setResponseText((String)"");
        cityForecast.setCity((String)"");
        cityForecast.setState((String)"");
        cityForecast.setWeatherStationCity((String)"");
        cityForecast.clearForecast();

        try {
            Trace.log(Utility.ApplicationLogger, Level.INFO, WeatherBean.class, "retrieveForecast",
                      ">>>>>> Before invokeDataControlMethod");

            // This calls the DC method and gives us the Return
            GenericType result =
                (GenericType)AdfmfJavaUtilities.invokeDataControlMethod("WeatherDC", null, "GetCityForecastByZIP",
                                                                        pnames, params, ptypes);

            // This will give us the CityForeCast object from the result
            GenericType cfgt = (GenericType)result.getAttribute(0);

            // Read the attributes from the GenericType returend from the getCityForecastByZip call          
            cityForecast.setSuccess((Boolean)cfgt.getAttribute("Success"));
            cityForecast.setResponseText((String)cfgt.getAttribute("ResponseText"));
            cityForecast.setCity((String)cfgt.getAttribute("City"));
            cityForecast.setState((String)cfgt.getAttribute("State"));
            cityForecast.setWeatherStationCity((String)cfgt.getAttribute("WeatherStationCity"));

            // This will give us the ForecastResult which is a collection of Forecast objects
            GenericType frgt = (GenericType)cfgt.getAttribute("ForecastResult");


            // fcgt is a collection of Forecast objects, get all those in a loop
            int count = frgt.getAttributeCount();
            for (int i = 0; i < count; i++) {
                // Get each individual WeatherDescription object
                GenericType fgt = (GenericType)frgt.getAttribute(i);

                // Now make a real WeatherDescription java object out of this GenericType
                Forecast f = (Forecast)GenericTypeBeanSerializationHelper.fromGenericType(Forecast.class, fgt);
                f.weatherInfo = weatherInfo;

                // Now get the Temperature subobject
                GenericType tempgt = (GenericType)fgt.getAttribute("Temperatures");

                // Now set the high and low temps
                f.setDaytimeHigh((String)tempgt.getAttribute(0));
                f.setMorningLow((String)tempgt.getAttribute(1));
                // Now add this to our holder of all WeatherDescriptions
                cityForecast.addForecast(f);
            }
            ret = true;

            Trace.log(Utility.ApplicationLogger, Level.INFO, WeatherBean.class, "retrieveForecast",
                      ">>>>>> After invokeDataControlMethod");
        } catch (AdfInvocationException e) {
            Trace.log(Utility.ApplicationLogger, Level.SEVERE, WeatherBean.class, "retrieveForecast",
                      ">>>>>> AdfInvocationException=" + e.getMessage());
            AdfException ex = new AdfException("Error Invoking Web Service.  Please try later", AdfException.WARNING);
            throw ex;

        } catch (Exception e2) {
            Trace.log(Utility.ApplicationLogger, Level.SEVERE, WeatherBean.class, "retrieveForecast",
                      ">>>>>> Exception=" + e2.getMessage());
            AdfException ex = new AdfException("Error Invoking Web Service.  Please try later", AdfException.WARNING);
            throw ex;
        }
        return ret;
    }

说明:
(1)使用AdfmfJavaUtilities.invokeDataControlMethod调用Data Control中的方法,也就是真正的Web Service。
(2)返回值的类型是GenericType,后面是解析GenericType的逻辑,其中包括城市信息和城市未来5天的天气预报信息。
(3)异常的处理使用的是AdfException,如果调用出错,在界面会显示该错误。

2. 查询结果页面也不是绑定到Web Servcie Data Control上的,而是CityInformation.java生成的Data Control。

3. 这个例子中,模型层的基本设计是这样的
(1)CityInformation->CityForecast->Forecast,生成CityInformation Data Control,用于城市天气查询结果页面绑定。
(2)WeatherInformation->WeatherDescription,生成WeatherInformation Data Control,用于天气类型页面绑定。
(3)Web Service Data Control依然通过WSDL生成,不过不直接绑定到页面按钮上,而是在代码中,通过AdfmfJavaUtilities.invokeDataControlMethod调用。
(4)更进一步设想,如果需要缓存数据,可以修改相应的CityInformation.java和WeatherInformation.java,这正是这种模型层设计的好处。

参考文献:
1. https://blogs.oracle.com/mobile/entry/web_services_example_part_2

ADF_227:ADF Mobile 11.1.2.4 Samples 介绍(13):Weather1

开发运行环境:JDeveloper 11.1.2.4 + Android SDK r21.1

Weather1演示了如何调用Web Service。这里通过Web Service Data Control访问一个公共的天气预报Web Service:http://wsf.cdyne.com/WeatherWS/Weather.asmx?WSDL。

该Web Service提供了很多方法,这里使用GetCityForecastByZIP和GetWeatherInformation。

直接使用Web Service Data Control生成Data Control的方式好处是无需写任何Java代码,但是不好的地方也很明显:就是用户无法在调用Web Service之前或之后加入自己的逻辑。

所以这种方式只适合于简单的Demo演示。

实际使用中,还要考虑到异常处理:比如网络断了,服务无法访问。


参考文献:
1. https://blogs.oracle.com/mobile/entry/web_services_example_part_1

ADF_226:ADF Mobile 11.1.2.4 Samples 介绍(12):PrefDemo


开发运行环境:JDeveloper 11.1.2.4 + Android SDK r21.1

PrefDemo演示了如何使用应用级的和Feature级的用户设置。

知识点:

1. 应用级的Preference设置


2. Feature级的Preference设置


 3. 运行效果