本实验前五步跟《使用SAML1.1配置SSO》一样,我从第六步开始介绍。
SAML2CredentialMapper的角色是SAML security assertions的Provider,即作为断言的提供方。
(1)创建SAML2CredentialMapper
选择myrealm,Providers,CredentialMapping,点击New,Type选择SAML2CredntialMapper
(2)配置Provider Specific
Issuer URI:http://www.oracle.com/demoSAML
Name Qualifier:oracle.com
Default Time To Live:120
Default Time To Live Offset:-5
Web Service Assertion Signing Key Alias:server
Web Service Assertion Signing Key Pass Phrase:123456
Enabled:勾上
Login URL:/saml2/idp/login
POST Binding Enabled:勾上
Redirect Binding Enabled:勾上
Artifact Binding Enabled:勾上
Contact Person Given Name:Ping
Contact Person Surname:Ma
Contact Person Type:technical
Contact Person Company:Oracle
Contact Person Telephone Number:
Contact Person Email Address:
Organization Name:
Organization URL:http://www.oracle.com
Published Site URL:http://localhost:7001/saml2
Entity ID:SAML2CredentialMapper
Recipient Check Enabled:勾上
Transport Layer Security Key Alias:server
Transport Layer Security Key Passphrase:123456
ConfirmTransport Layer Security Key Passphrase:123456
Only Accept Signed Artifact Request:勾上
Artifact Cache Size:10000
Artifact Cache Timeout:300
Single Sign-on Signing Key Alias:server
Single Sign-on Signing Key Pass Phrase:123456
Confirm Single Sign-on Signing Key Pass Phrase:123456
点击Publish Meta Data按钮,导出dev_metadata.xml。
(1)创建SAML2IdentityAsserter
选择myrealm,Providers,Authentication,点击New,Type选择SAML2IdentityAsserter
10. 在dev2_domain中,为Admin Server配置SAML 2.0 Service Provider
Always Sign Authentication Requests:勾上
Force Authentication:勾上
Only Accept Signed Assertions:勾上
Authentication Request Cache Size:10000
Authentication Request Cache Timeout:300
POST One Use Check Enabled:勾上
POST Binding Enabled:勾上
Artifact Binding Enabled:勾上
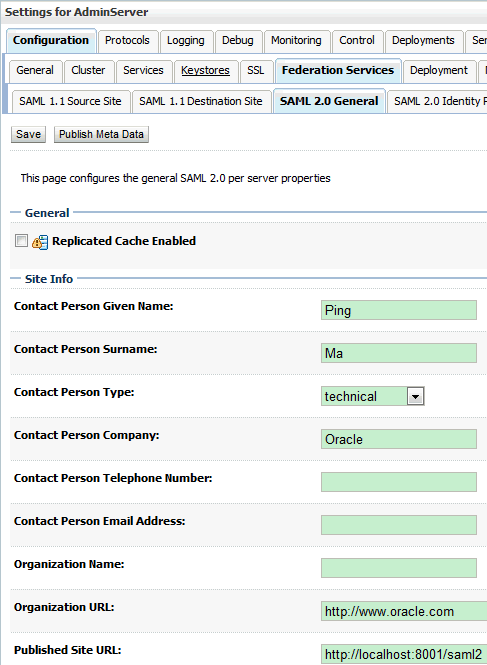
11. 在dev2_domain中,为Admin Server配置SAML 2.0 General
Contact Person Given Name:Ping
Contact Person Surname:Ma
Contact Person Type:technical
Contact Person Company:Oracle
Contact Person Telephone Number:
Contact Person Email Address:
Organization Name:
Organization URL:http://www.oracle.com
Published Site URL:http://localhost:8001/saml2
Entity ID:SAML2IdentityAsserter
Recipient Check Enabled:勾上
Transport Layer Security Key Alias:server
Transport Layer Security Key Passphrase:123456
ConfirmTransport Layer Security Key Passphrase:123456
Only Accept Signed Artifact Request:勾上
Artifact Cache Size:10000
Artifact Cache Timeout:300
Single Sign-on Signing Key Alias:server
Single Sign-on Signing Key Pass Phrase:123456
Confirm Single Sign-on Signing Key Pass Phrase:123456
点击Publish Meta Data按钮,导出dev2_metadata.xml。
12. 在dev_domain中,为SAML2CredentialMapper导入Service Provider Partners:dev2_metadata.xml
(1)点击New,选择New Web Single Sign-On Service Proider Partner
(2)选择dev2_metadata.xml
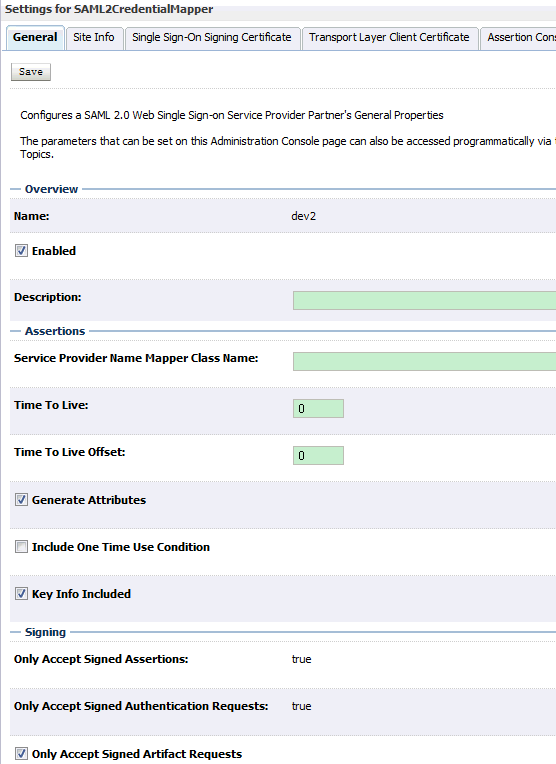
(2)点击dev2,配置如下:
Enabled:勾上
Key Info Included:勾上
Only Accept Signed Artifact Requests:勾上
13. 在dev2_domain中,为SAML2IdentityAsserter导入Identity Provider Partners:dev_metadata.xml
(1)点击New,选择New Web Single Sign-On Indentity Provider Partner
(2)选择dev_metadata.xml
(3)点击dev,配置如下:
Enabled:勾上
Redirect URIs:/appB/admin/services.jsp
Only Accept Signed Artifact Requests:勾上
14. 测试
(1)先访问http://localhost:8001/appB,会提示你将会到localhost:7001去验证用户名和口令:
在浏览器地址栏中,会显示http://localhost:7001/saml2/idp/sso/artifact?SAMLart=AAQAAJOmtVL6FtyvtF02ooeKW%2FAD3soLMJdjuZGJDRHo4cMvocoWDOQWKxg%3D。
输入ssouser/welcome1,显示 http://localhost:8001/appB/admin/services.jsp 。
说明:因为这里我没有使用SSL端口处理SAML2的请求,因此口令将以明文方式发送。
点击链接:Application - appB on domainB,会直接进入http://localhost:8001/appB/admin/services.jsp页面,无需再次提供用户名/口令。
参考文献:
1. http://biemond.blogspot.com/2009/09/sso-with-weblogic-1031-and-saml2.html


没有评论:
发表评论