2012年6月29日星期五

ADF_155:AM使用指南之五:在AM中执行SQL语句

开发环境:JDeveloper 11.1.2.2.0 + Oracle XE Database 10gR2。

在ADF中,AM负责与数据库连接打交道,开发人员最好不要直接操作数据库连接。
那么该如何通过AM执行用户自己的SQL语句呢?以下分三种情况说明:Statment、PreparedStatement、CallableStatement。

1. 调用CallableStatement需要先创建Procedure
CREATE OR REPLACE
PROCEDURE greeting_proc(text_param IN VARCHAR2, msg_text OUT VARCHAR2)
IS
BEGIN
msg_text := 'Hello ' || text_param;
END;

2. 定制AppModuleImpl.java类
完整的AppModuleImpl代码如下:

package model;

import java.math.BigDecimal;

import java.sql.CallableStatement;
import java.sql.Connection;
import java.sql.PreparedStatement;
import java.sql.ResultSet;
import java.sql.SQLException;
import java.sql.Statement;

import java.sql.Types;

import model.common.AppModule;

import oracle.jbo.JboException;
import oracle.jbo.server.ApplicationModuleImpl;
import oracle.jbo.server.ViewObjectImpl;
// ---------------------------------------------------------------------
// --- File generated by Oracle ADF Business Components Design Time.
// --- Fri Jun 29 16:03:32 KST 2012
// --- Custom code may be added to this class.
// --- Warning: Do not modify method signatures of generated methods.
// ---------------------------------------------------------------------
public class AppModuleImpl extends ApplicationModuleImpl implements AppModule {
/**
* This is the default constructor (do not remove).
*/
public AppModuleImpl() {
}

/**
* Container's getter for JobsView1.
* @return JobsView1
*/
public ViewObjectImpl getJobsView1() {
return (ViewObjectImpl)findViewObject("JobsView1");
}

private Connection getCurrentConnection() throws SQLException {
/* Note that we never execute this statement, so no commit really happens */
PreparedStatement st = getDBTransaction().createPreparedStatement("commit", 1);
Connection conn = st.getConnection();
st.close();
return conn;
}

public String testStatement() {
String result = null;
String sql = "SELECT COUNT(*) FROM jobs";
Statement st = null;
ResultSet rs;
try {
st = getDBTransaction().createStatement(this.getDBTransaction().DEFAULT);
rs = st.executeQuery(sql);
if (rs.next()) {
result = rs.getBigDecimal(1).toString();
}
rs.close();
} catch (SQLException ex) {
ex.printStackTrace();
} finally {
if (st != null) {
try {
st.close();
} catch (SQLException e) {
}
}
}
System.out.println("!!!!!!!!!!!!!!!!!! testStatement: " + result);
return result;
}

public String testPreparedStatement() {
String result = null;
String sql = "SELECT job_title FROM jobs WHERE job_id = ?";
PreparedStatement pst = null;
ResultSet rs;
try {
pst = getDBTransaction().createPreparedStatement(sql, this.getDBTransaction().DEFAULT);
pst.setString(1, "AD_VP");
rs = pst.executeQuery();
if (rs.next()) {
result = (String)rs.getObject(1);
}
rs.close();
pst.close();
} catch (SQLException ex) {
throw new JboException(ex);
} finally {
if (pst != null) {
try {
pst.close();
} catch (SQLException e) {
}
}
}
System.out.println("!!!!!!!!!!!!!!!!!! testPreparedStatement: " + result);
return result;
}

public String testCallableStatement() {
String result = null;
//String sql = "BEGIN greeting_proc(text_param=?,msg_text=?);END;";
String sql = "BEGIN greeting_proc(:text_param,:msg_text);END;";
CallableStatement cst = null;

try {
cst = getDBTransaction().createCallableStatement(sql, this.getDBTransaction().DEFAULT);
cst.setObject("text_param", "Ma Ping");
cst.registerOutParameter("msg_text", Types.VARCHAR);
cst.execute();
result = (String)cst.getObject("msg_text");
} catch (SQLException ex) {
ex.printStackTrace();
} finally {
if (cst != null) {
try {
cst.close();
} catch (SQLException e) {
}
}
}
System.out.println("!!!!!!!!!!!!!!!!!! testCallableStatement: " + result);
return result;
}
}


3. 把三个公共方法暴露在Client Interface中


4. 创建页面,把三个方法Binding到三个Button

5. 运行
先后分别点击按钮Test Statement、Test PreparedStatement、Test CallableStatement。
输出如下:
!!!!!!!!!!!!!!!!!! testStatement: 23
!!!!!!!!!!!!!!!!!! testPreparedStatement: Administration Vice President
!!!!!!!!!!!!!!!!!! testCallableStatement: Hello Ma Ping

Project 下载:ADF_AM_ExecuteSQL.7z

参考文献:
1. http://jjzheng.blogspot.com/2010/11/run-single-query-in-application-module.html
2. http://andrejusb.blogspot.com/2011/04/invoking-stored-procedures-and.html
3. http://lalitsuryawanshi.blogspot.com/2009/06/access-dbtransaction-from-managedbean.html
4. http://www.baigzeeshan.com/2010/05/calling-plsql-procedure-and-function-in.html
5. https://forums.oracle.com/forums/thread.jspa?threadID=855247
6. http://blog.csdn.net/luyushuang/article/details/6257516
ADF_154:AM使用指南之四:把AM中的方法发布为WebService

开发环境:JDeveloper 11.1.2.1.0 + Oracle XE Database 10gR2。

实际应用中,我们经常需要在AM中添加自己的方法,这些方法可以以Data Control的方式暴露出来,供ADF Faces使用。
但那些使用了非ADF技术开发的应用如何使用AM中的方法呢?
这里介绍最简便的一种方法:把AM中的方法暴露成WebService。

重要步骤说明:
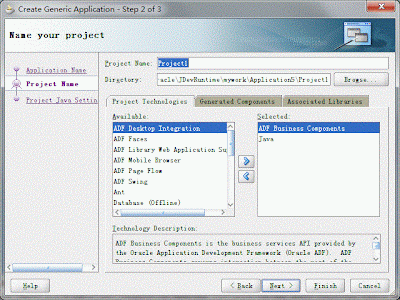
1. 创建应用时选择General Application,为Project1增加ADF BC Components。


2. Create Entities from Table: 选择Employee表。

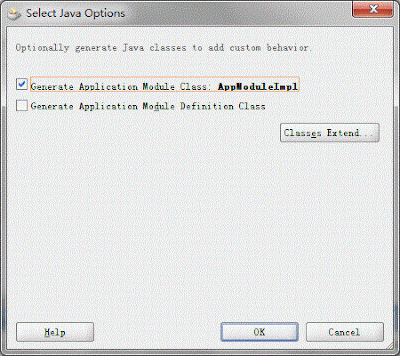
3. 生成 AM Impl类。


增加如下方法:

/* 更新员工的工资 */
public void updateSalary(Number employeeId, Number salary) {
Key key = new Key(new Object[] { employeeId });
Row row = this.getEmployeesView1().getRow(key);
row.setAttribute("Salary", salary);

try {
this.getDBTransaction().commit();
} catch (Exception ex) {
ex.printStackTrace();
}
}

/* 获取员工的工作的总时间(多少个月) */
public Number emplWorkLoad(Number employeeId) {
this.getJobHistoryView1().setNamedWhereClauseParam("bv_employeeId", employeeId);
this.getJobHistoryView1().executeQuery();

if (this.getJobHistoryView1().first() != null) {
return (Number)this.getJobHistoryView1().first().getAttribute("WorkLoad");
}

return null;
}

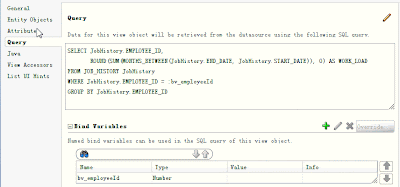
4. 手工创建JobHistory VO,选择Read-Only through SQL query。

别忘了在AM的Data Model中,手工加入JobHistoryView。

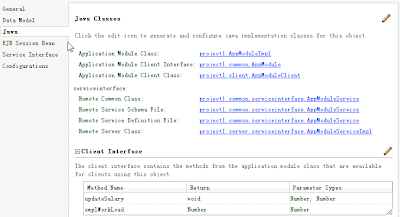
5. 修改AM的Java和Service Interface选项。
在Client Interface中加入updateSalary和emplWorkLoad方法,这两个方法将会在Data Control中显示出来。
在Service Interface中加入updateSalary和emplWorkLoad方法,这两个方法将会被发布为WebService。


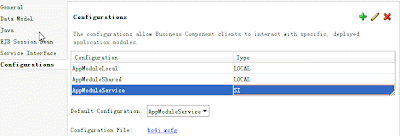
6. 修改AM的Configuration选项。
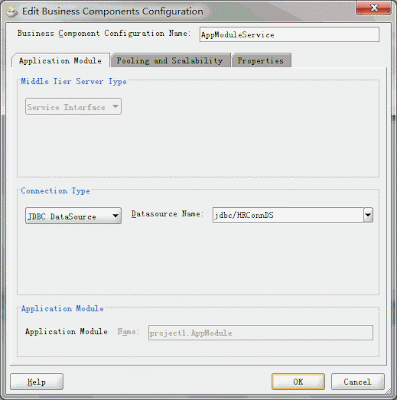
因为要发布到独立的WLS上,所以默认的Configuration要选择AppModuleService,以及JDBC DataSource形式的数据库连接。


要事先在WLS Console中配置该DataSouce。


7. 访问EM,找到发布的应用,测试两个方法。
http://localhost:7001/Application7-Project1-context-root/AppModuleService?wsdl。

Project下载:AM_WebService.7z

参考文献:
1. http://andrejusb.blogspot.com/2009/08/web-service-interface-for-adf-bc.html。

ADF_153:AM使用指南之三:如何在Managed Bean中获取AM实例?

AM是放置服务方法的地方,有时我们需要在Managed Bean中调用这些方法。
要调用这些方法,首先要在Managed Bean中获取AM实例。
这里要用到《ADF工具类:ADFUtil.java 源代码 》。

1. 获取默认的AM实例
如果Model项目中只有一个AM,可以这样获取:
ApplicationModule am = ADFUtils.getDCBindingContainer().getDataControl().getApplicationModule();

2. 获取指定的AM实例
如果Model项目中有多个AM,可以指定名称获取,例如:MyAppModuleDataControl
ApplicationModule am = ADFUtils.getApplicationModuleForDataControl("MyAppModuleDataControl");
MyAppModuleImpl service = (MyAppModuleImpl)am;
调用service上的方法。

3. 获取嵌套的AM实例
如果Model项目中有多个AM,且AM之间有嵌套关系,可以先获取父AM,再Get得到子AM:
ApplicationModule am =
ADFUtils.getApplicationModuleForDataControl("ParentAppModuleDataControl");
ParentAppModuleImpl parentService = (ParentAppModuleImpl)am;
NestedAppModuleImpl nestedService = (NestedAppModuleImpl)parentService .getNestedAppModule1();
调用nestedService上的方法。

4. 通过Configuration对象直接获取的AM实例
如果页面上没有绑定任何DC,也可以通过Configuration直接获取的AM实例。
import oracle.jbo.client.Configuration;
import oracle.jbo.ApplicationModule;

ApplicationModule am = Configuration.createRootApplicationModule("model.AppModule","AppModuleLocal");
AppModuleImpl amImpl = (AppModuleImpl)am;

其中"model.AppModule"指的是AM的package,"AppModuleLocal" 指的是所使用的AM Configuration。


参考文献:
1. http://oracleseeker.com/2009/12/12/adf_get_am_instance_dcbingdingcontainer_bindingcontext/

ADF_152:AM使用指南之二:Nested AM与Root AM之间的Transaction关系

开发环境:JDeveloper 11.1.2.2.0 + Oracle XE Database 10gR2。

在实际应用中,为了达到逻辑重用的目的,会使用嵌套的AM。
在Root AM和Nested AM中都有各自的VO,在一个页面中,可能同时用到了不同AM的不同的VO,那么当一个AM提交时,另一个AM是否也会提交呢?
其实,这个问题的产生来自于一个客户的真实情况:
在一个页面中,有多个Tab页签,每个Tab页签中都一个表单和保存按钮。
用户可以选择修改Tab页签中的表单,于是就出现了这种情况:
用户修改了某个Tab页签中的表单,没有马上提交,接着修改另一个Tab页签中的表单,并点击这个Tab页签中的保存按钮,结果发现前一个页签中的修改也被成功提交了。

为了更加清楚阐述这个问题,我做了一个实验。

实验步骤主要如下:

1. 创建并定制化AppModule,包含JobVO和EmployeeVO。
增加3个方法,代码如下:

public void createJob() {
JobsViewImpl jobVO = (JobsViewImpl)getJobsView1();
JobsViewRowImpl newJob = (JobsViewRowImpl)jobVO.createRow();
jobVO.insertRow(newJob);
newJob.setJobId("Oracle");
newJob.setJobTitle("CEO");
newJob.setMinSalary(new Integer(10000));
newJob.setMaxSalary(new Integer(50000));
getTransaction().commit();
}

public void deleteJob() {
JobsViewImpl jobVO = (JobsViewImpl)getJobsView1();
JobsViewRowImpl currentJob = (JobsViewRowImpl)jobVO.getCurrentRow();
jobVO.removeCurrentRow();
getTransaction().commit();
}

public void saveEmployee() {
getTransaction().commit();
}


2. 创建并定制化NestedAppModule,包含JobVO。
(1)创建


(2)定制化
增加2个方法,代码和AppModule前2个方法相同,略。

3. 把NestedAppModule加入到AppModule中。
(1)

(2)完成后的Data Control

4. 创建页面,内容如下:
(1)拖放root AM DC中的JobView1和EmployeeView1,都选择Form。
(2)为Job Form 添加两个Button: Create和Delete。代码如下:
public String rootAMCreate_action() {
ApplicationModule am = ADFUtils.getApplicationModuleForDataControl("AppModuleDataControl");
AppModuleImpl service = (AppModuleImpl)am;
service.createJob();
return null;
}

public String rootAMDelete_action() {
ApplicationModule am = ADFUtils.getApplicationModuleForDataControl("AppModuleDataControl");
AppModuleImpl service = (AppModuleImpl)am;
service.deleteJob();
return null;
}
(3)为Employee Form 添加一个Button: Save。代码如下:
public String rootAMSave_action() {
ApplicationModule am = ADFUtils.getApplicationModuleForDataControl("AppModuleDataControl");
AppModuleImpl service = (AppModuleImpl)am;
service.saveEmployee();
return null;
}

(4)拖放root AM DC中的NestedAppModule1中的JobView1,选择Form。

(5)同样也为这个Job Form 添加两个Button: Create和Delete。代码如下:
public String nestedAMCreate_action() {
ApplicationModule am = ADFUtils.getApplicationModuleForDataControl("AppModuleDataControl");
AppModuleImpl service = (AppModuleImpl)am;
NestedAppModuleImpl nestedService = (NestedAppModuleImpl)service.getNestedAppModule1();
nestedService.createJob();
return null;
}

public String nestedAMDelete_action() {
ApplicationModule am = ADFUtils.getApplicationModuleForDataControl("AppModuleDataControl");
AppModuleImpl service = (AppModuleImpl)am;
NestedAppModuleImpl nestedService = (NestedAppModuleImpl)service.getNestedAppModule1();
nestedService.deleteJob();
return null;
}

(6)直接拖放Nested AM DC中的JobView1,选择Form。
(7)同样也为这个Job Form 添加两个Button: Create和Delete。代码如下:
public String topNestedAMCreate_action() {
ApplicationModule am = ADFUtils.getApplicationModuleForDataControl("NestedAppModuleDataControl");
NestedAppModuleImpl service = (NestedAppModuleImpl)am;
service.createJob();
return null;
}

public String topNestedAMDelete_action() {
ApplicationModule am = ADFUtils.getApplicationModuleForDataControl("NestedAppModuleDataControl");
NestedAppModuleImpl service = (NestedAppModuleImpl)am;
service.deleteJob();
return null;
}

5. 运行

为了说明问题,我测试了如下场景:

(1)修改Employee表单的某个属性,但并不点击Save按钮提交,而是点击Nested AM inside Root AM中的Job表单的Create按钮提交。
现象:被修改的Employee 表单的属性被成功提交入库。
解释:Employee VO属于Root AM,选择的Job VO属于Nested AM inside Root AM,它们使用同一个Transaction。
因此当修改前一个表单后,虽然提交的是另一个表单,前一个表单的数据也被提交了。

(2)修改Nested AM inside Root AM中的Job表单的某个属性,但并不点击Create/Delete按钮提交,而是点击Root AM中的Employee表单的Save按钮提交。
现象:被修改的Job 表单的属性被成功提交入库。
解释:同(1)。

(3)修改Employee表单 的某个属性,但并不点击Save按钮提交,而是点击 Nested AM outside Root AM中的Job表单的Create按钮提交。
现象:被修改的Employee 表单的属性并没有被写入数据库。
解释:Employee VO属于Root AM,选择的Job VO属于Nested AM outside Root AM,相当于是一个Root AM,二者是平行AM的关系,各自管理各自的Transaction。
当修改前一个表单后,而提交的是另一个表单,前一个表单的数据并没有被提交。

(4)修改Nested AM outside Root AM中的Job表单的某个属性,但并不点击Create/Delete按钮提交,而是点击Root AM中的Employee表单的Save按钮提交。
现象:被修改的Job 表单的属性并没有被写入数据库。
解释:同(3)。

6. 结论
(1)Nested AM与Root AM 使用的是同一个Transaction,都是Root AM中的Transaction,无论使用哪个AM提交,另一个AM中的VO也会被提交。
(2)多个Root AM之间的Transaction互不干涉,各自管理自己的。
(3)所以,要想避免提交本不想提交的表单,该表单所对应的VO的AM必须是Root AM。

7. 补充说明
以上提交方法都是使用getTransaction().commit(); 。
经过进一步测试,使用DataControl提供的Commit操作(拖放到页面上),实验结果和上述测试相同。

Project 下载:ADF_NestedAM_Transaction.7z

ADF_151:AM使用指南之一:Transaction和DBTransaction的区别与联系

开发环境:JDeveloper 11.1.2.2.0 + Oracle XE Database 10gR2。

通过Application Module可以调用getDBTransaction().commit()来提交数据,实际上Application Module中还有另外一个方法:getTransaction()。
实际使用时,一般都直接使用getDBTransaction(),因此一直有一个疑问:如果使用getTransaction().commit(),数据库是否也提交了?

从API上来看,DBTransaction和Transaction都是接口,DBTransaction是Transaction的子类。
Transaction主要提供了一些事务常用到的方法:
(1)commit: Commits the transaction; saves all changes to the database. If the database connection is established, the transaction is implicitly started.
(2)connect: Attempts to establish a connection to the given database URL.
(3)disconnect: Disconnects the server from the database.
(4)getLockingMode: Gets the preferred locking mode for this transaction.
In ADF BC, the locking mode defaults to LOCK_PESSIMISTIC; however, Oracle Fusion applications use optimistic locking by default.
(5)rollback: Rolls back the transaction; discards all changes
(6)setLockingMode: Sets the preferred locking mode for this transaction. Changing the locking mode affects only subsequent locks that are placed.
DBTransaction继承了以上方法,并提供了一些针对EO的方法:
(1)findByPrimaryKey()
(2)getSession()
(3)getEnvironment()

实验主要步骤如下:
1. 根据表Jobs,建立相应的EO,VO,AM。
2. 定制化VO,AM,为AM类增加两个方法:createJob() 和deleteJob()
(1)createJob() 方法

public void createJob() {
JobsViewImpl jobVO = (JobsViewImpl)getJobsView1();
JobsViewRowImpl newJob = (JobsViewRowImpl)jobVO.createRow();
jobVO.insertRow(newJob);
newJob.setJobId("Oracle");
newJob.setJobTitle("CEO");
newJob.setMinSalary(new Integer(10000));
newJob.setMaxSalary(new Integer(50000));
// newJob.setMinSalary(new oracle.jbo.domain.Number(10000));
// newJob.setMaxSalary(new oracle.jbo.domain.Number(50000));
getTransaction().commit();
//getDBTransaction().commit();
}

(2)deleteJob() 方法

public void deleteJob() {
JobsViewImpl jobVO = (JobsViewImpl)getJobsView1();
JobsViewRowImpl currentJob = (JobsViewRowImpl)jobVO.getCurrentRow();
jobVO.removeCurrentRow();
getTransaction().commit();
//getDBTransaction().commit();
}

(3)saveJob() 方法

public void saveJob() {
JobsViewImpl jobVO = (JobsViewImpl)getJobsView1();
JobsViewRowImpl currentJob = (JobsViewRowImpl)jobVO.getCurrentRow();
getTransaction().commit();
//getDBTransaction().commit();
}


3. 创建页面,拖放JobsView1 Data Control,选择生成Form;再增加三个Button:Create、Delete和Save。
完整的Managed Bean代码如下:

package view;

import model.AppModuleImpl;

import oracle.adf.model.BindingContext;
import oracle.adf.model.binding.DCDataControl;

import oracle.jbo.ApplicationModule;

import view.util.ADFUtils;

public class MyBackingBean {
public MyBackingBean() {
}

public String delete_action() {
// DCDataControl dc = BindingContext.getCurrent().getDefaultDataControl();
// ApplicationModule am = (ApplicationModule)dc.getDataProvider();
ApplicationModule am = ADFUtils.getDCBindingContainer().getDataControl().getApplicationModule();
AppModuleImpl service = (AppModuleImpl)am;
service.deleteJob();
return null;
}

public String create_action() {
// DCDataControl dc = BindingContext.getCurrent().getDefaultDataControl();
// ApplicationModule am = (ApplicationModule)dc.getDataProvider();
ApplicationModule am = ADFUtils.getDCBindingContainer().getDataControl().getApplicationModule();
AppModuleImpl service = (AppModuleImpl)am;
service.createJob();
return null;
}

public String save_action() {
// DCDataControl dc = BindingContext.getCurrent().getDefaultDataControl();
// ApplicationModule am = (ApplicationModule)dc.getDataProvider();
ApplicationModule am = ADFUtils.getDCBindingContainer().getDataControl().getApplicationModule();
AppModuleImpl service = (AppModuleImpl)am;
service.saveJob();
return null;
}
}


4. 分别测试getTransaction().commit() 和getDBTransaction().commit()。
进入到数据库中查看,两次测试记录都被成功创建、删除和保存。


5. 结论
(1)使用getTransaction().commit()和getDBTransaction().commit(),数据库都提交了。
(2)一般情况下使用Transaction就可以了,除非你需要使用DBTransaction上的方法。

Project 下载:ADF_AM_Transaction_DBTransaction.7z

2012年6月26日星期二

ADF_148:Table 组件使用指南之十八:自定义Date类型字段过滤器

运行环境:JDeveloper 11.1.2.1.0 + Oracle Database 10g Express Edition 10.2.0.1。

Date类型的字段,如果使用默认的Table的Filter功能,其运行效果如下:

样例Project请参考《Table 组件使用指南之十一:列字段过滤功能》。
但是在实际使用中,遇到一个问题:当日期数据包含时分秒时,数据过滤不出来。
比如,把EMPLOYEE_ID = 200的日期数据改成带时分秒的格式:
UPDATE "HR"."EMPLOYEES" SET HIRE_DATE = TO_DATE('17-JUN-1987 19:32:36', 'DD-MON-YYYY HH24:MI:SS') WHERE EMPLOYEE_ID = 200;
commit;

然后,使用Filter功能查询日期为17-JUN-1987的记录,发现查询结果没有包括EMPLOYEE_ID = 200的记录。

测试完毕后恢复EMPLOYEE_ID = 200的原来的日期格式:
UPDATE "HR"."EMPLOYEES" SET HIRE_DATE = TO_DATE('17-JUN-87', 'DD-MON-RR') WHERE EMPLOYEE_ID = 200;
commit;

感觉这个问题是个BUG,默认的Date Filter功能既然不支持,那么就自定义吧。
自定义包括自定义查询组件,以及如何获取和处理Filter条件。

重要步骤说明:
1. 定义一个ViewCriteria,并且定义两个参数作为Filter条件

这里还可以指定查询的范围:是Database,还是缓存,还是二者兼而有之。
2. 修改页面代码
(1)在HireDate的filter facet中增加两个日期组件,查询在一段时间范围的记录。

<af:column sortProperty="#{bindings.EmployeesView1.hints.HireDate.name}" filterable="true"
sortable="true" headerText="#{bindings.EmployeesView1.hints.HireDate.label}" id="c6">
<f:facet name="filter">
<af:panelGroupLayout id="pgl2" layout="horizontal">
<af:panelLabelAndMessage label="From: " id="plam1">
<af:inputDate id="id2" value="#{vs.filterCriteria.HireDateStart}">
<af:convertDateTime pattern="#{bindings.allEmployees.hints.HireDate.format}"/>
</af:inputDate>
</af:panelLabelAndMessage>
<af:spacer width="5" height="5" id="s1"/>
<af:panelLabelAndMessage label="To:" id="plam2">
<af:inputDate id="id3" value="#{vs.filterCriteria.HireDateEnd}" required="false">
<af:convertDateTime pattern="#{bindings.allEmployees.hints.HireDate.format}"/>
</af:inputDate>
</af:panelLabelAndMessage>
</af:panelGroupLayout>
</f:facet>
<af:outputText value="#{row.HireDate}" id="ot6">
<af:convertDateTime pattern="#{bindings.EmployeesView1.hints.HireDate.format}"/>
</af:outputText>
</af:column>

说明:vs.filterCriteria.HireDateStart和vs.filterCriteria.HireDateEnd就是两个Filter条件。
你可以在这里直接创建任意名称的参数,不需要在其它地方定义,所有参数将会保存在一个map对象中。
(2)修改Table的 queryListener,从默认的"#{bindings.EmployeesView1Query.processQuery}" ,改成"#{myBackingBean.employeeQueryListener}",即指向一个Managed Bean。

3. 完整的Managed Bean代码

package view;

import java.util.Map;

import oracle.adf.view.rich.event.QueryEvent;
import oracle.adf.view.rich.model.FilterableQueryDescriptor;

import oracle.jbo.ApplicationModule;
import oracle.jbo.VariableValueManager;
import oracle.jbo.ViewCriteria;
import oracle.jbo.ViewCriteriaManager;
import oracle.jbo.ViewObject;

import view.util.ADFUtils;
import view.util.JSFUtils;


public class MyBackingBean {
public MyBackingBean() {
}

public void employeeQueryListener(QueryEvent queryEvent) {
FilterableQueryDescriptor fqd = (FilterableQueryDescriptor)queryEvent.getDescriptor();
Map map = fqd.getFilterCriteria();
Object hireDateStart = map.get("HireDateStart");
Object hireDateEnd = map.get("HireDateEnd");

ApplicationModule am = ADFUtils.getDCBindingContainer().getDataControl().getApplicationModule();
ViewObject vo = am.findViewObject("EmployeesView1");
ViewCriteriaManager vcm = vo.getViewCriteriaManager();
ViewCriteria vc = vcm.getViewCriteria("EmployeesViewCriteria");
VariableValueManager vvm = vc.ensureVariableManager();
vvm.setVariableValue("bv_hireDateStart", hireDateStart);
vvm.setVariableValue("bv_hireDateEnd", hireDateEnd);

//remove temporary attributes as they don't exist in the business service and would cause a NPE if passed with the query
map.remove("HireDateStart");
map.remove("HireDateEnd");

JSFUtils.invokeMethodExpression("#{bindings.EmployeesView1Query.processQuery}", Object.class, QueryEvent.class,
queryEvent);

// put values back so search filter is not empty
map.put("HireDateStart", hireDateStart);
map.put("HireDateEnd", hireDateEnd);
}
}

说明:基本逻辑是获取Filter参数后,赋值给ViewCriteria中绑定变量。

4. 运行效果
可以看出,带时分秒的记录也被正确地查出来了,说明通过ViewCriteria得到的查询结果比Table默认的Filter功能更准确。


Project 下载:ADF_Table_Filter(3).7z

参考文献:
1. http://www.oracle.com/technetwork/developer-tools/adf/learnmore/16-custom-table-filter-169145.pdf
2. http://www.oracle.com/technetwork/developer-tools/adf/learnmore/30-table-filter-queries-169172.pdf
3. http://www.oracle.com/technetwork/developer-tools/adf/learnmore/59-table-filter-by-data-range-176653.pdf
4. http://dkleppinger.blogspot.jp/2011/09/how-to-ignore-time-component-of-date.html
5. http://msdn.microsoft.com/zh-cn/library/ms186724.aspx

2012年6月25日星期一

ADF_147:Table 组件使用指南之十七:根据EO的状态设置Row的背景色

运行环境:JDeveloper 11.1.2.1.0 + Oracle Database 10g Express Edition 10.2.0.1。

用户在修改某一个行记录时,可以根据EO的状态显示不同的背景色。
这样用户可以清楚的知道哪些记录是正在修改的,哪些记录是新增的,哪些是已经提交的。

在Column的组件中增加inlineStyle属性如下:
inlineStyle="#{row.row.entities[0].entityState == 0 ? 'background-color:red;' : (row.row.entities[0].entityState == 2 ? 'background-color:orange;' : '')}"

说明:
(1)row - 代表每一个行Binding对象。
(2)row.row - 代表每一个行实例对象。
(3)row.row.entities[0] - 代表行实例对象对应的第1个实体对象,(一行可能对应多个EO,因为一个VO可能对应多个EO)
(4)EO的状态信息:0,新增的;1,未改动的; 2,改动的;-1,初始化的。

运行效果如下:
(1)修改一条记录,Row显示橘色。

(2)新增一条记录,Row显示红色。


Project 下载:ADF_Table(2).7z

参考文献:
1. https://blogs.oracle.com/adf/entry/highlighting_new_rows_in_adf
2. http://andrejusb.blogspot.com/2010/04/changed-row-highlighting-in-oracle-adf.html
3. http://www.oracle.com/technetwork/developer-tools/adf/learnmore/august2011-otn-harvest-457288.pdf

2012年6月24日星期日

ADF_146:Table 组件使用指南之十六:动态增加Column

运行环境:JDeveloper 11.1.2.2.0 + Oracle Database 10g Express Edition 10.2.0.1。

本实验来自一个客户的真实需求。
由于种种原因,Table的列在设计时无法确定,因此只能在运行时通过程序动态创建Column。

案例1:Table的前两列固定不变, 其后的列不确定。

(1)页面代码
<af:table var="row" rowBandingInterval="0" id="t1" value="#{viewScope.useCase1MB.rowsData}" varStatus="vs"
          binding="#{viewScope.useCase1MB.useCase1Table}">
    <af:column sortable="true" sortProperty="#{row.id}" headerText="id" id="c1">
        <af:outputText value="#{row.id}" id="ot1"/>
    </af:column>
    <af:column sortable="true" sortProperty="#{row.name}" headerText="Name" id="c2">
        <af:outputText value="#{row.name}" id="ot2"/>
    </af:column>
    <af:forEach begin="0" end="#{viewScope.useCase1MB.numberOfColsToAdd}" varStatus="index">
        <af:column sortable="false" headerText="#{viewScope.useCase1MB.columnsHeader[index.current]}"
                   id="c4">
            <af:outputText value="#{row.columnsData[index.current].cellValue}" id="ot4"/>
            <f:facet name="header">
                <af:outputText value="#{viewScope.useCase1MB.columnsHeader[index.current]}" id="ot3"/>
            </f:facet>
        </af:column>
    </af:forEach>
</af:table>

(2)Managed Bean代码
package view;

import java.util.ArrayList;
import java.util.List;

import model.type.usecase1.ColumnData;
import model.type.usecase1.RowData;

import oracle.adf.model.BindingContext;
import oracle.adf.model.OperationBinding;
import oracle.adf.model.binding.DCBindingContainer;

import oracle.adf.view.rich.component.rich.data.RichTable;

import oracle.binding.BindingContainer;

public class UseCase1ManagedBean {

    private RichTable useCase1Table;

    private List rowsData = new ArrayList();
    private int numberOfColsToAdd = 0;
    private List columnsHeader = new ArrayList();

    public UseCase1ManagedBean() {
        super();
        initData();
    }

    public BindingContainer getBindings() {
        return BindingContext.getCurrent().getCurrentBindingsEntry();
    }

    public void initData() {
        BindingContainer bindings = getBindings();
        oracle.binding.OperationBinding operationBinding = bindings.getOperationBinding("populateTableData");
        rowsData = (List)operationBinding.execute();
        for (int i = 0; i < rowsData.get(0).getColumnsData().size(); i++) {
            columnsHeader.add(rowsData.get(0).getColumnsData().get(i).getHeaderName());
        }

        if (rowsData.get(0).getColumnsData().size() > 0) {
            setNumberOfColsToAdd(rowsData.get(0).getColumnsData().size() - 1);
        }

        // useCase1Table.setColumnResizing("disabled");      
    }

    public void setRowsData(List rowsData) {
        this.rowsData = rowsData;
    }

    public List getRowsData() {
        return rowsData;
    }

    public void setNumberOfColsToAdd(int numberOfColsToAdd) {
        this.numberOfColsToAdd = numberOfColsToAdd;
    }

    public int getNumberOfColsToAdd() {
        return numberOfColsToAdd;
    }

    public void setColumnsHeader(List columnsName) {
        this.columnsHeader = columnsName;
    }

    public List getColumnsHeader() {
        return columnsHeader;
    }

   
    public void setUseCase1Table(RichTable useCase1Table) {
        this.useCase1Table = useCase1Table;
    }

    public RichTable getUseCase1Table() {
        return useCase1Table;
    }
}

(3)运行效果:
初始化Steve的数据,显示Steve's View:

初始化Mark的数据,显示Mark's View:

初始化Kim的数据,显示Kim's View:


案例2:每个Tab中有不确定的Table,每个Table中的列不确定。

(1)页面代码
<af:panelTabbed id="pt1" binding="#{viewScope.useCase2MB.panelTabbed}"/>
(2)Managed Bean代码
package view;


import java.util.ArrayList;
import java.util.List;


import javax.el.ELContext;
import javax.el.ExpressionFactory;

import javax.el.ValueExpression;

import javax.faces.application.Application;
import javax.faces.component.UIComponent;

import javax.faces.component.UIViewRoot;
import javax.faces.context.FacesContext;
import javax.faces.event.PhaseEvent;

import javax.faces.event.PhaseId;

import model.type.usecase2.ColumnData;
import model.type.usecase2.RowData;
import model.type.usecase2.TableData;
import model.type.usecase2.TabData;


import oracle.adf.model.BindingContext;
import oracle.adf.view.rich.component.rich.RichForm;
import oracle.adf.view.rich.component.rich.data.RichColumn;
import oracle.adf.view.rich.component.rich.data.RichTable;
import oracle.adf.view.rich.component.rich.input.RichChooseDate;
import oracle.adf.view.rich.component.rich.input.RichInputDate;
import oracle.adf.view.rich.component.rich.input.RichInputListOfValues;
import oracle.adf.view.rich.component.rich.input.RichInputText;
import oracle.adf.view.rich.component.rich.layout.RichPanelTabbed;
import oracle.adf.view.rich.component.rich.layout.RichShowDetailItem;
import oracle.adf.view.rich.component.rich.output.RichOutputText;
import oracle.adf.view.rich.context.AdfFacesContext;

import oracle.binding.BindingContainer;

import view.util.JSFUtils;

public class UseCase2ManagedBean {

    private RichTable useCase3Table;

    private List tabsData = new ArrayList();

    private RichPanelTabbed panelTabbed;

    public UseCase2ManagedBean() {
        super();
    }

    public BindingContainer getBindings() {
        return BindingContext.getCurrent().getCurrentBindingsEntry();
    }

    public void beforeRenderResponse(PhaseEvent phaseEvent) {
        if (phaseEvent.getPhaseId() == PhaseId.RENDER_RESPONSE) {
            FacesContext fctx = FacesContext.getCurrentInstance();
            AdfFacesContext adfFacesContext = AdfFacesContext.getCurrentInstance();

            boolean isInitialRender = adfFacesContext.isInitialRender();
            if (isInitialRender) {
                initTabsData();
                initTabsUI();
            }
        }
    }

    public void initTabsUI() {

        List panelTabbedChildren = panelTabbed.getChildren();
        for (int i = 0; i < tabsData.size(); i++) {
            RichShowDetailItem showDetailItem = new RichShowDetailItem();
            showDetailItem.setId("sdi" + (i + 1));
            showDetailItem.setText(tabsData.get(i).getTabName());
            List tablesData = tabsData.get(i).getTablesData();
            for (int j = 0; j < tablesData.size(); j++) {
                RichTable table = new RichTable();
                table.setId("t_" + (i + 1) + "_" + (j + 1));
                table.setVar("row");
                List rowsData = tablesData.get(j).getRowsData();
                table.setValue(rowsData);
                for (int k = 0; k < rowsData.get(0).getColumnsData().size(); k++) {
                    RichColumn column = new RichColumn();
                    column.setId("col_" + (i + 1) + "_" + (j + 1) + "_" + (k + 1));
                    column.setSortable(false);
                    column.setHeaderText(rowsData.get(0).getColumnsData().get(k).getHeaderName());
                    RichOutputText outputText = new RichOutputText();
                    outputText.setId("ot" + (i + 1) + "_" + (j + 1) + "_" + (k + 1));
                    FacesContext fctx = FacesContext.getCurrentInstance();
                    ELContext elctx = fctx.getELContext();
                    Application jsfApp = fctx.getApplication();
                    ExpressionFactory exprFactory = jsfApp.getExpressionFactory();
                    ValueExpression valueExpr =
                        exprFactory.createValueExpression(elctx, "#{row.columnsData[" + k + "].cellValue}",
                                                          Object.class);
                    outputText.setValueExpression("value", valueExpr);
                    column.getChildren().add(outputText);
                    table.getChildren().add(column);
                }
                RichOutputText outputText = new RichOutputText();
                outputText.setId("ot" + (i + 1) + "_" + (j + 1) );
                outputText.setValue(tablesData.get(j).getTableName());
                showDetailItem.getChildren().add(outputText);
                showDetailItem.getChildren().add(table);
            }
            panelTabbedChildren.add(showDetailItem);
        }
    }

    public void initTabsData() {
        BindingContainer bindings = getBindings();
        oracle.binding.OperationBinding operationBinding = bindings.getOperationBinding("populateTabsData");
        tabsData = (List)operationBinding.execute();
    }

    public void setUseCase3Table(RichTable useCase3Table) {
        this.useCase3Table = useCase3Table;
    }

    public RichTable getUseCase3Table() {
        return useCase3Table;
    }

    public void setPanelTabbed(RichPanelTabbed panelTabbed) {
        this.panelTabbed = panelTabbed;
    }

    public RichPanelTabbed getPanelTabbed() {
        return panelTabbed;
    }
}

(3)运行效果


案例3:Table的列不确定,且每个列的显示组件不同。

(1)页面代码
<af:table var="row" rowBandingInterval="0" id="t1" value="#{viewScope.useCase3MB.rowsData}" varStatus="vs"
binding="#{viewScope.useCase3MB.useCase3Table}"/>
(2)Managed Bean代码
package view;


import java.util.ArrayList;
import java.util.List;


import javax.el.ELContext;
import javax.el.ExpressionFactory;

import javax.el.ValueExpression;

import javax.faces.application.Application;
import javax.faces.component.UIComponent;

import javax.faces.component.UIViewRoot;
import javax.faces.context.FacesContext;
import javax.faces.event.PhaseEvent;

import javax.faces.event.PhaseId;

import model.type.usecase3.ColumnData;
import model.type.usecase3.RowData;

import oracle.adf.model.BindingContext;
import oracle.adf.view.rich.component.rich.RichForm;
import oracle.adf.view.rich.component.rich.data.RichColumn;
import oracle.adf.view.rich.component.rich.data.RichTable;
import oracle.adf.view.rich.component.rich.input.RichChooseDate;
import oracle.adf.view.rich.component.rich.input.RichInputDate;
import oracle.adf.view.rich.component.rich.input.RichInputListOfValues;
import oracle.adf.view.rich.component.rich.input.RichInputText;
import oracle.adf.view.rich.component.rich.output.RichOutputText;
import oracle.adf.view.rich.context.AdfFacesContext;

import oracle.binding.BindingContainer;

import view.util.JSFUtils;

public class UseCase3ManagedBean {

    private RichTable useCase3Table;

    private List rowsData = new ArrayList();

    public UseCase3ManagedBean() {
        super();

    }

    public BindingContainer getBindings() {
        return BindingContext.getCurrent().getCurrentBindingsEntry();
    }

    public void beforeRenderResponse(PhaseEvent phaseEvent) {
        if (phaseEvent.getPhaseId() == PhaseId.RENDER_RESPONSE) {
            FacesContext fctx = FacesContext.getCurrentInstance();
            AdfFacesContext adfFacesContext = AdfFacesContext.getCurrentInstance();

            boolean isInitialRender = adfFacesContext.isInitialRender();
            if (isInitialRender) {
                initTableData();
                initTableUI();
            }
        }
    }

    public void initTableUI() {
        List tableChildren = useCase3Table.getChildren();
        for (int i = 0; i < rowsData.get(0).getColumnsData().size(); i++) {
            RichColumn column = new RichColumn();
            column.setId("col" + (i + 1));
            column.setSortable(false);
            column.setHeaderText(rowsData.get(0).getColumnsData().get(i).getHeaderName());
            FacesContext fctx = FacesContext.getCurrentInstance();
            ELContext elctx = fctx.getELContext();
            Application jsfApp = fctx.getApplication();
            ExpressionFactory exprFactory = jsfApp.getExpressionFactory();
            ValueExpression valueExpr =
                exprFactory.createValueExpression(elctx, "#{row.columnsData[" + i + "].cellValue}", Object.class);
            String columnType = rowsData.get(0).getColumnsData().get(i).getColumnType();
            if (columnType.equals("DATEBOX")) {                
                RichInputDate inputDate = new RichInputDate();
                inputDate.setId("cd" + (i + 1));
                inputDate.setValueExpression("value", valueExpr);
                column.getChildren().add(inputDate);
            } else if (columnType.equals("INPUT_POPUP")) {
                RichInputListOfValues inputLOV = new RichInputListOfValues();
                inputLOV.setId("ilov" + (i + 1));
                inputLOV.setValueExpression("value", valueExpr);
                column.getChildren().add(inputLOV);
                column.setWidth("120");
            } else if (columnType.equals("HIDDEN")) {
                RichOutputText outputText = new RichOutputText();
                outputText.setId("ot" + (i + 1));
                outputText.setValueExpression("value", valueExpr);
                column.getChildren().add(outputText);
                column.setVisible(false);
            } else if (columnType.equals("INPUT_TEXT")) {
                RichInputText inputText = new RichInputText();
                inputText.setId("it" + (i + 1));
                inputText.setValueExpression("value", valueExpr);
                column.getChildren().add(inputText);
            } else {
                RichOutputText outputText = new RichOutputText();
                outputText.setId("ot" + (i + 1));
                outputText.setValueExpression("value", valueExpr);
                column.getChildren().add(outputText);
            }
            tableChildren.add(column);
        }
    }

    public void initTableData() {
        BindingContainer bindings = getBindings();
        oracle.binding.OperationBinding operationBinding = bindings.getOperationBinding("populateTableData");
        rowsData = (List)operationBinding.execute();
    }

    public void setUseCase3Table(RichTable useCase3Table) {
        this.useCase3Table = useCase3Table;
    }

    public RichTable getUseCase3Table() {
        return useCase3Table;
    }

    public void setRowsData(List rowsData) {
        this.rowsData = rowsData;
    }

    public List getRowsData() {
        return rowsData;
    }
}

(3)运行效果


Project 下载:ADF_Table_Dynamic_Column.7z

2012年6月23日星期六

ADF_145:Table 组件使用指南之十五:使用POJO绑定并实现排序与过滤功能

运行环境:JDeveloper 11.1.2.2.0 + Oracle Database 10g Express Edition 10.2.0.1。

接上一个实验,首先实现排序功能。
排序功能的实现出乎意料地简单,只要在每个column组件中,增加两个属性即可:sortable和sortProperty。
以employeeName column为例,增加sortable="true" sortProperty="employeeName",以此类推。
其中sortProperty的值要和Element Type(这里是Employee.java)的属性匹配。
运行效果如下:


过滤功能的实现出乎意料地复杂。
未完,待续。

参考文献:
1. https://forums.oracle.com/forums/thread.jspa?threadID=1073224&tstart=45#4302110
2. https://cn.forums.oracle.com/forums/thread.jspa?threadID=1096747

ADF_144:Table 组件使用指南之十四:使用POJO绑定

运行环境:JDeveloper 11.1.2.2.0 + Oracle Database 10g Express Edition 10.2.0.1。

由于种种原因,一些开发人员不太接受使用ADF-BC作为业务服务层技术,他们还是倾向于使用Java类作为业务服务层的主要技术。
那么,如何使用POJO类绑定到ADF Table组件呢?

1. 定义模型类和Managed Bean
(1)模型类:Employee.java

package model.type;


public class Employee {
public Employee() {
super();
}

private String employeeName;
private String employeeNumber;
private String departmentNumber;
private String manager;
private String hireDate;
private String salary;

public Employee(String employeeNumber, String employeeName, String manager, String hireDate, String salary,
String departmentNumber) {
super();
this.employeeNumber = employeeNumber;
this.employeeName = employeeName;
this.departmentNumber = departmentNumber;
this.manager = manager;
this.hireDate = hireDate;
this.salary = salary;
}

public void setEmployeeName(String employeeName) {
this.employeeName = employeeName;
}

public String getEmployeeName() {
return employeeName;
}

public void setEmployeeNumber(String employeeNumber) {
this.employeeNumber = employeeNumber;
}

public String getEmployeeNumber() {
return employeeNumber;
}

public void setDepartmentNumber(String departmentNumber) {
this.departmentNumber = departmentNumber;
}

public String getDepartmentNumber() {
return departmentNumber;
}

public void setManager(String manager) {
this.manager = manager;
}

public String getManager() {
return manager;
}

public void setHireDate(String hireDate) {
this.hireDate = hireDate;
}

public String getHireDate() {
return hireDate;
}

public void setSalary(String salary) {
this.salary = salary;
}

public String getSalary() {
return salary;
}
}

(2)Managed Bean类

package view;

import java.util.Arrays;
import java.util.List;

import model.type.Employee;


public class MyManagedBean {
public MyManagedBean() {
super();
}


private List rowsData =
Arrays.asList(new Employee[] { new Employee("7369", "SMITH ", "7902", "12/17/1980", "800", "20"),
new Employee("7499", "ALLEN ", "7698", "2/20/1981", "1600", "30"),
new Employee("7521", "WARD ", "7698", "2/22/1981", "1250", "30"),
new Employee("7566", "JONES ", "7839", "4/2/1981", "2975", "20"),
new Employee("7654", "MARTIN ", "7698", "9/28/1981", "1250", "30"),
new Employee("7698", "BLAKE ", "7839", "5/1/1981", "2850", "30"),
new Employee("7782", "CLARK ", "7839", "6/9/1981", "2450", "10"),
new Employee("7788", "SCOTT ", "7566", "12/9/1982", "3000", "20"),
new Employee("7839", "KING ", "", "11/17/1981", "5000", "10"),
new Employee("7844", "TURNER ", "7698", "9/8/1981", "1500", "30"),
new Employee("7876", "ADAMS ", "7788", "1/12/1983", "1100", "20"),
new Employee("7900", "JAMES ", "7698", "12/3/1981", "950", "30"),
new Employee("7902", "FORD ", "7566", "12/3/1981", "3000", "20"),
new Employee("7934", "MILLER ", "7782", "1/23/1982", "1300", "10"),
new Employee("7469", "SMITHY ", "7902", "12/17/1980", "900", "20"),
new Employee("7599", "FALLEN ", "7698", "2/20/1981", "1700", "30"),
new Employee("7621", "WARDY ", "7698", "2/22/1981", "1350", "30"),
new Employee("7766", "BONES ", "7839", "4/2/1981", "2775", "20"),
new Employee("7754", "JUSTIN ", "7698", "9/28/1981", "1350", "30"),
new Employee("7798", "DRAKE ", "7839", "5/1/1981", "2650", "30"),
new Employee("7882", "MARK ", "7839", "6/9/1981", "2350", "10"),
new Employee("7888", "SCOTTY ", "7566", "12/9/1982", "3100", "20") });

public void setRowsData(List rowsData) {
this.rowsData = rowsData;
}

public List getRowsData() {
return rowsData;
}
}

(3)在adfc-config.xml中注册该Managed Bean。

2. 绑定Managed Bean到ADF Table
(1)拖放ADF Table组件到页面

(2)拖放后会提示你选择绑定对象

(3)点击Create Managed Bean

(4)找到事先定义好的Managed Bean

(5)绑定到rowsData属性,这是一个集合对象。

(6)设置Element Type,指向Employee类,确定后,字段名称会自动匹配Employee类中的各个属性。

(7)设计时页面效果


3. 运行时页面效果


Project 下载:ADF_Table_POJO.7z

2012年6月22日星期五

ADF_143:Table 组件使用指南之十三:增加Column Footer Sum

运行环境:JDeveloper 11.1.2.2.0 + Oracle Database 10g Express Edition 10.2.0.1。

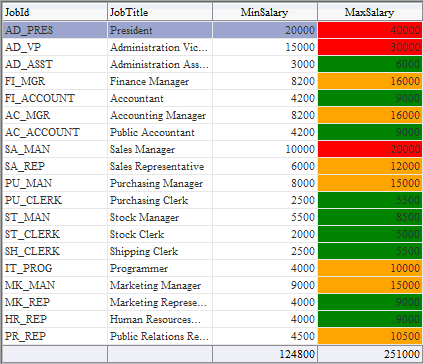
当Table中有些列需要求和时,我们希望在Table的最下面显示求和项,如下图:


重点步骤说明:

1. 为要求和的列增加footer facet
右键点击列,然后选择Facet-Column->footer


2. 在footer facet中间增加OutputText
其中的OutputText的Value是绑定到一个Managed Bean的属性上的。
最终完成的列字段代码如下:
<af:column sortProperty="#{bindings.JobsView1.hints.MinSalary.name}" sortable="false"
           headerText="#{bindings.JobsView1.hints.MinSalary.label}" id="c3" align="right">
    <af:outputText value="#{row.MinSalary}" id="ot3">
        <af:convertNumber groupingUsed="false" pattern="#{bindings.JobsView1.hints.MinSalary.format}"/>
    </af:outputText>
    <f:facet name="footer">
        <af:panelGroupLayout id="pgl1" layout="horizontal" halign="right">
            <af:outputText value="#{myBackingBean.minSalarySum}" id="ot5"/>
        </af:panelGroupLayout>
    </f:facet>
</af:column>


3. 完整的Managed Bean代码如下:
package view;

import oracle.adf.view.rich.component.rich.data.RichTable;

import oracle.jbo.Row;
import oracle.jbo.uicli.binding.JUCtrlHierNodeBinding;

public class MyBackingBean {
    private RichTable jobTable;
    private Integer minSalarySum;
    private Integer maxSalarySum;

    public MyBackingBean() {
    }

    public void setJobTable(RichTable jobTable) {
        this.jobTable = jobTable;
    }

    public RichTable getJobTable() {
        return jobTable;
    }

    public void setMinSalarySum(Integer minSalarySum) {
        this.minSalarySum = minSalarySum;
    }

    public Integer getMinSalarySum() {
        return calculateColumnSum("MinSalary");
    }

    public void setMaxSalarySum(Integer maxSalarySum) {
        this.maxSalarySum = maxSalarySum;
    }

    public Integer getMaxSalarySum() {
        return calculateColumnSum("MaxSalary");
    }

    public Integer calculateColumnSum(String columnName) {
        Integer result = 0;
        RichTable rt = this.getJobTable();
        for (int i = 0; i < rt.getRowCount(); i++) {
            JUCtrlHierNodeBinding rowData = (JUCtrlHierNodeBinding)rt.getRowData(i);
            Row row = rowData.getRow();
            result += (Integer)(row.getAttribute(columnName));
        }
        return result;
    }
}

其中方法calculateColumnSum循环累加Table中求和列字段。

4. 根据数值大小设置Cell的背景色
在MaxSalary Column上增加inlineStyle属性如下:
inlineStyle="#{row.MaxSalary >= 20000 ? 'background-color:red;' : (row.MaxSalary >= 10000 ? 'background-color:orange;' : 'background-color:green;')}"。
运行效果如下:


5. 让列头内容显示在中间,而数据靠右排列
在MinSalary Column上增加align和inlineStyle属性如下:align="center" inlineStyle="text-align:right;"
在MaxSalary Column上增加align和inlineStyle属性如下:align="center" inlineStyle="text-align:right;#{row.MaxSalary >= 20000 ? 'background-color:red;' : (row.MaxSalary >= 10000 ? 'background-color:orange;' : 'background-color:green;')}"
显示效果如下:


Project 下载:ADF_Table_UI(2).7z

参考文献:
1. http://www.baigzeeshan.com/2011/11/how-to-right-align-column-data-in.html
2. http://tanveeroracle.blogspot.kr/2011/12/table-column-sum-table-footer.html
3. http://branislavnemec.com/wp/aftable-how-to-show-totals-of-columns/
4. http://liveinadf.wordpress.com/2011/10/10/attribute-value-from-choice-list/
5. https://forums.oracle.com/forums/thread.jspa?messageID=10001717
6. http://jdevadf.oracle.com/adf-richclient-demo/faces/components/table/tableColumnFooter.jspx

2012年6月21日星期四

ADF_142:Table 组件使用指南之十二:定制列字段过滤组件

开发环境:JDeveloper 11.1.2.2.0 + Oracle XE Database 10gR2。

默认情况下,ADF Table使用InputText作为列字段过滤组件,你可以根据需要换成其它的组件。
基本的实现方法就是:右键点击要定制Column,选择为其增加Filter Facet:


1. 使用带tips的InputText
为LastName字段增加Filter Facet:InputText。

<f:facet name="filter">
<af:inputText id="it1" value="#{vs.filterCriteria.LastName}" shortDesc="Pls Input Filter for LastName"/>
</f:facet>

运行效果如下:


2. 使用selectOnceChoice
为DepartmentId字段增加Filter Facet:SelectOneChoice。
(1)Department下拉列表要用到Tree Binding,因此手工增加一个。

(2)Tree Binding的定义如下:

(3)为了一次取出所有的Department,设置DepartmentsView1Iterator的RangeSize=-1,表示一次全部读出。
注意,这只适用于记录比较少的情况,如果记录比较多,应该使用LOV。
(4)向DepartmentId字段的Filter Facet中放置SelectOneChoice

最终的代码如下:

<f:facet name="filter">
<af:selectOneChoice value="#{vs.filterCriteria.DepartmentId}" id="soc1">
<af:forEach var="listrow" items="#{bindings.DepartmentsView1.rangeSet}">
<f:selectItem id="si1" itemValue="#{listrow.DepartmentId}"
itemLabel="#{listrow.DepartmentName}"/>
</af:forEach>
</af:selectOneChoice>
</f:facet>

运行效果如下:

注意,这里有一个问题:第一次显示时,会有Blank Item,但是选择一个Department后,就没有Blank Item了。
这样用户就无法清空查询条件了,感觉是一个BUG。待查。

Project 下载:ADF_Table_Filter(2).7z

参考文献:
1. http://www.oracle.com/technetwork/developer-tools/adf/learnmore/16-custom-table-filter-169145.pdf
2. http://www.oracle.com/technetwork/developer-tools/adf/learnmore/nov2010-otn-harvest-190744.pdf