美国时间7月11日,甲骨文宣布WebLogic Server 12.1.2发布,与WebLogic Server12.1.2一同发布的还有Coherence 12.1.2。二者构成甲骨文云应用的基础平台。
使用甲骨文云应用的基础平台和开发工具(JDeveoper12.1.2.0),可以帮助用户开发下一代应用,包括手机应用,运行企业关键任务,简化应用管理和快速部署。
1. Oracle WebLogic Server 12.1.2 新特性
(1)利用动态集群实现云弹性和有效的资源管理与利用,简化JMS的管理。
(2)与Oracle Database 12c集成,支持可插拔数据库访问,提高数据的持续高可用性。
(3)支持使用Maven管理应用的生命周期,支持使用HTML5,Java,WebSockets开发富企业的跨平台应用,包括移动应用。
(4)支持使用声明式的JSON或XML,通过Oracle Toplink提供的REST服务访问企业数据源。
2. Oracle Coherence 12.1.2 新特性
(1)支持移动应用和云。
(2)通过Coherence,GoldenGate,HotCache实时自动更新应用数据,利用WebLogic Management Framework with Managed Coherence Servers提高集群的生命周期管理。
(3)使用Coherence Live Events增强用户体验,简化事件处理流程,利用动态代理线程池自适应用户峰值需求。
(4)通过配置高可用参数,在数据一致性和应用性能之间找到最佳平衡点,使用site-safe和 rack-safe特性提供多数据中心的解决方案。
参考文献:
1. https://blogs.oracle.com/WebLogicServer/entry/oracle_weblogic_server_12_1
2. http://www.oracle.com/us/corporate/press/1970426
2013年7月12日星期五
2012年10月18日星期四
WLS_083:WebLogic Server高级管理之十二:与Coherence*Web集成
开发运行环境:WebLogic Server 12c开发版(12.1.1.1.0)+ Coherence 3.7.1.0 Build 27797
WebLogic Server与Coherence*Web集成之后有如下好处:
(1)Session对象将托管给Coherence Cache Server管理,你可以根据需要使用不同的缓存拓扑结构。
(2)Session对象不再与WLS Server共享同一个JVM,使WLS Server有更多的Heap空间。
(3)即使重启WLS Server,也不会造成Session丢失。
这样的分工可以让WLS和Coherence在各自擅长的领域做各自专业的事情。
1. session-cache-server.cmd
这是Coherence Cache Server,用于保存所有Session对象。脚本如下:
setlocal
set COHERENCE_HOME=C:\Oracle\coherence
set COH_OPTS=%COH_OPTS% -server -cp %COHERENCE_HOME%\lib\coherence.jar;%COHERENCE_HOME%\lib\coherence-web.jar;
set COH_OPTS=%COH_OPTS% -Dtangosol.coherence.management.remote=true -Dtangosol.coherence.cacheconfig=session-cache-config.xml -Dtangosol.coherence.distributed.localstorage=true -Dtangosol.coherence.clusterport=7777 -Dtangosol.coherence.clusteraddress=231.1.1.1 -Dtangosol.coherence.session.localstorage=true -Dtangosol.coherence.cluster=CoherenceCluster
java %COH_OPTS% -Xms512m -Xmx512m -XX:MaxPermSize=256m com.tangosol.net.DefaultCacheServer
:exit
其中,session-cache-config.xml在coherence-web.jar中,其内容如下:
<?xml version="1.0"?>
<!-- - - - - - - - - - - - - - - - - - - - - - - - - - - - - - - - - - - - -->
<!-- -->
<!-- Cache configuration descriptor for Coherence*Web -->
<!-- -->
<!-- - - - - - - - - - - - - - - - - - - - - - - - - - - - - - - - - - - - -->
<cache-config xmlns:xsi="http://www.w3.org/2001/XMLSchema-instance"
xmlns="http://xmlns.oracle.com/coherence/coherence-cache-config"
xsi:schemaLocation="http://xmlns.oracle.com/coherence/coherence-cache-config coherence-cache-config.xsd">
<caching-scheme-mapping>
<!--
The clustered cache used to store Session management data.
-->
<cache-mapping>
<cache-name>session-management</cache-name>
<scheme-name>replicated</scheme-name>
</cache-mapping>
<!--
The clustered cache used to store ServletContext attributes.
-->
<cache-mapping>
<cache-name>servletcontext-storage</cache-name>
<scheme-name>replicated</scheme-name>
</cache-mapping>
<!--
The clustered cache used to store Session attributes.
-->
<cache-mapping>
<cache-name>session-storage</cache-name>
<scheme-name>session-near</scheme-name>
</cache-mapping>
<!--
The clustered cache used to store the "overflowing" (split-out due to size)
Session attributes. Only used for the "Split" model.
-->
<cache-mapping>
<cache-name>session-overflow</cache-name>
<scheme-name>session-distributed</scheme-name>
</cache-mapping>
<!--
The clustered cache used to store IDs of "recently departed" Sessions.
-->
<cache-mapping>
<cache-name>session-death-certificates</cache-name>
<scheme-name>session-certificate</scheme-name>
</cache-mapping>
<!--
The local cache used to store Sessions that are not yet distributed (if
there is a distribution controller).
-->
<cache-mapping>
<cache-name>local-session-storage</cache-name>
<scheme-name>unlimited-local</scheme-name>
</cache-mapping>
<!--
The local cache used to store Session attributes that are not distributed
(if there is a distribution controller or attributes are allowed to become
local when serialization fails).
-->
<cache-mapping>
<cache-name>local-attribute-storage</cache-name>
<scheme-name>unlimited-local</scheme-name>
</cache-mapping>
</caching-scheme-mapping>
<caching-schemes>
<!--
Replicated caching scheme used by the Session management and ServletContext
attribute caches.
-->
<replicated-scheme>
<scheme-name>replicated</scheme-name>
<service-name>ReplicatedSessionsMisc</service-name>
<request-timeout>30s</request-timeout>
<backing-map-scheme>
<local-scheme>
<scheme-ref>unlimited-local</scheme-ref>
</local-scheme>
</backing-map-scheme>
<autostart>true</autostart>
</replicated-scheme>
<!--
Near caching scheme used by the Session attribute cache. The front cache
uses a Local caching scheme and the back cache uses a Distributed caching
scheme.
-->
<near-scheme>
<scheme-name>session-near</scheme-name>
<front-scheme>
<local-scheme>
<scheme-ref>session-front</scheme-ref>
</local-scheme>
</front-scheme>
<back-scheme>
<distributed-scheme>
<scheme-ref>session-distributed</scheme-ref>
</distributed-scheme>
</back-scheme>
<invalidation-strategy>present</invalidation-strategy>
</near-scheme>
<local-scheme>
<scheme-name>session-front</scheme-name>
<eviction-policy>HYBRID</eviction-policy>
<high-units>1000</high-units>
<low-units>750</low-units>
</local-scheme>
<distributed-scheme>
<scheme-name>session-distributed</scheme-name>
<scheme-ref>session-base</scheme-ref>
<backing-map-scheme>
<local-scheme>
<scheme-ref>unlimited-local</scheme-ref>
</local-scheme>
<!-- for disk overflow use this backing scheme instead:
<overflow-scheme>
<scheme-ref>session-paging</scheme-ref>
</overflow-scheme>
-->
</backing-map-scheme>
</distributed-scheme>
<!--
Distributed caching scheme used by the "recently departed" Session cache.
-->
<distributed-scheme>
<scheme-name>session-certificate</scheme-name>
<scheme-ref>session-base</scheme-ref>
<backing-map-scheme>
<local-scheme>
<eviction-policy>HYBRID</eviction-policy>
<high-units>4000</high-units>
<low-units>3000</low-units>
<expiry-delay>86400</expiry-delay>
</local-scheme>
</backing-map-scheme>
</distributed-scheme>
<!--
"Base" Distributed caching scheme that defines common configuration.
-->
<distributed-scheme>
<scheme-name>session-base</scheme-name>
<service-name>DistributedSessions</service-name>
<thread-count>0</thread-count>
<lease-granularity>member</lease-granularity>
<local-storage system-property="tangosol.coherence.session.localstorage">false</local-storage>
<partition-count>257</partition-count>
<backup-count>1</backup-count>
<backup-storage>
<type>on-heap</type>
</backup-storage>
<request-timeout>30s</request-timeout>
<backing-map-scheme>
<local-scheme>
<scheme-ref>unlimited-local</scheme-ref>
</local-scheme>
</backing-map-scheme>
<autostart>true</autostart>
</distributed-scheme>
<!--
Disk-based Session attribute overflow caching scheme.
-->
<overflow-scheme>
<scheme-name>session-paging</scheme-name>
<front-scheme>
<local-scheme>
<scheme-ref>session-front</scheme-ref>
</local-scheme>
</front-scheme>
<back-scheme>
<external-scheme>
<bdb-store-manager/>
</external-scheme>
</back-scheme>
</overflow-scheme>
<!--
Local caching scheme definition used by all caches that do not require an
eviction policy.
-->
<local-scheme>
<scheme-name>unlimited-local</scheme-name>
<service-name>LocalSessionCache</service-name>
</local-scheme>
<!--
Clustered invocation service that manages sticky session ownership.
-->
<invocation-scheme>
<service-name>SessionOwnership</service-name>
<request-timeout>30s</request-timeout>
</invocation-scheme>
</caching-schemes>
</cache-config>
2. 在WebLogic Console中配置
(1)创建两个Managed Server:ServerA(端口8081)和ServerB(端口8083)
这里我并没有把ServerA和ServerB组成为一个集群,只是两个各自独立的Server。
(2)发布两个Shared Library到ServerA和ServerB上:coherence-web-spi.war和active-cache-1.0.jar。
其中coherence-web-spi.war位于[coherence_home]\lib目录下,active-cache-1.0.jar位于[wls_server]\common\deployable-libraries目录下。
(3)创建Coherence Cluster,Target到ServerA和ServerB上。


3. 创建应用:counter.war
(1)counter.jsp
<%@ page contentType="text/html;charset=UTF-8"%>
<html>
<body>
<h3>
Counter :
<%
Integer counter = new Integer(1);
HttpSession httpsession = request.getSession(true);
if (httpsession.isNew()) {
httpsession.setAttribute("count", counter);
out.println(counter);
} else {
int count = ((Integer) httpsession.getAttribute("count")).
intValue();
httpsession.setAttribute("count", new Integer(++count));
out.println(count);
}
%>
</h3>
</body>
</html>
(2)weblogic.xml
<?xml version="1.0" encoding="UTF-8" ?>
<weblogic-web-app xmlns="http://xmlns.oracle.com/weblogic/weblogic-web-app"
xmlns:xsi="http://www.w3.org/2001/XMLSchema-instance"
xsi:schemaLocation="http://xmlns.oracle.com/weblogic/weblogic-web-app http://www.oracle.com/technology/weblogic/weblogic-web-app/1.1/weblogic-web-app.xsd">
<library-ref>
<library-name>coherence-web-spi</library-name>
</library-ref>
<coherence-cluster-ref>
<coherence-cluster-name>CoherenceCluster</coherence-cluster-name>
</coherence-cluster-ref>
</weblogic-web-app>
(3)manifest.mf
Extension-List: active-cache
active-cache-Extension-Name: active-cache
active-cache-Specification-Version: 1.0
active-cache-Implementation-Version: 1.0
(4)复制coherence.jar到WEB-INF/lib目录下
(5)counter应用目录结构如下:
/
/counter.jsp
/META-INF/manifest.mf
/WEB-INF/web.xml
/WEB-INF/weblogic.xml
/WEB-INF/lib/coherence.jar
(6)发布counter.war到ServerA和ServerB上。
4. 测试
(1)运行session-cache-server.cmd,启动Coherence Cache Server。
(2)启动Admin Server
(3)启动Managed Server:ServerA和ServerB。
(4)启动counter应用
这时,在ServerA和ServerB的Console中会输出如下信息:
2012-10-18 15:39:09.907/108.408 Oracle Coherence 3.7.1.0 <Info> (thread=[ACTIVE] ExecuteThread: '0' for queue: 'weblogic.kernel.Default (self-tuning)', member=n
/a): Loaded operational configuration from "zip:C:/Oracle/wls1211_dev/user_projects/domains/dev_domain/servers/ServerA/tmp/_WL_user/counter/m4egcu/war/WEB-INF/l
ib/coherence.jar!/tangosol-coherence.xml"
2012-10-18 15:39:10.143/108.644 Oracle Coherence 3.7.1.0 <Info> (thread=[ACTIVE] ExecuteThread: '0' for queue: 'weblogic.kernel.Default (self-tuning)', member=n
/a): Loaded operational overrides from "zip:C:/Oracle/wls1211_dev/user_projects/domains/dev_domain/servers/ServerA/tmp/_WL_user/counter/m4egcu/war/WEB-INF/lib/c
oherence.jar!/tangosol-coherence-override-dev.xml"
2012-10-18 15:39:10.145/108.646 Oracle Coherence 3.7.1.0 <D5> (thread=[ACTIVE] ExecuteThread: '0' for queue: 'weblogic.kernel.Default (self-tuning)', member=n/a
): Optional configuration override "/tangosol-coherence-override.xml" is not specified
2012-10-18 15:39:10.213/108.714 Oracle Coherence 3.7.1.0 <D5> (thread=[ACTIVE] ExecuteThread: '0' for queue: 'weblogic.kernel.Default (self-tuning)', member=n/a
): Optional configuration override "/custom-mbeans.xml" is not specified
Oracle Coherence Version 3.7.1.0 Build 27797
Grid Edition: Development mode
Copyright (c) 2000, 2011, Oracle and/or its affiliates. All rights reserved.
2012-10-18 15:39:11.114/109.615 Oracle Coherence GE 3.7.1.0 <Info> (thread=[ACTIVE] ExecuteThread: '0' for queue: 'weblogic.kernel.Default (self-tuning)', membe
r=n/a): Loaded cache configuration from "zip:C:/Oracle/wls1211_dev/user_projects/domains/dev_domain/servers/ServerA/tmp/_WL_user/coherence-web-spi/14iuoc/WEB-IN
F/lib/coherence-web.jar!/session-cache-config.xml"
2012-10-18 15:39:12.659/111.160 Oracle Coherence GE 3.7.1.0 <Info> (thread=[ACTIVE] ExecuteThread: '0' for queue: 'weblogic.kernel.Default (self-tuning)', membe
r=n/a): Loaded Reporter configuration from "zip:C:/Oracle/wls1211_dev/user_projects/domains/dev_domain/servers/ServerA/tmp/_WL_user/counter/m4egcu/war/WEB-INF/l
ib/coherence.jar!/reports/report-group.xml"
<Oct 18, 2012 3:39:14 PM CST> <Warning> <com.oracle.wls> <BEA-000000> <2012-10-18 15:39:14.624/113.125 Oracle Coherence GE 3.7.1.0 <Warning> (thread=Cluster, me
mber=n/a): This member is configured with a multicast TTL of 0; the senior Member(Id=1, Timestamp=2012-10-18 15:36:33.028, Address=10.191.10.83:8088, MachineId=
46446, Location=site:,machine:PMMA-CN,process:6384, Role=CoherenceServer) is configured with a TTL of 4. It is strongly recommended to use the same TTL setting
for all cluster members.>
<Oct 18, 2012 3:39:15 PM CST> <Warning> <WorkManager> <BEA-002919> <Unable to find a Work Manager with name wm/CoherenceWorkManager. Dispatch policy wm/Coherenc
eWorkManager will map to the default Work Manager for the application counter>
Oct 18, 2012 3:39:16 PM com.tangosol.coherence.servlet.AbstractHttpSessionCollection configure
INFO: Configured session model "SplitHttpSessionCollection":
Clustered Session Cache Name=session-storage
Local Session Cache Name=local-session-storage
Local Session Attribute Cache Name=local-attribute-storage
Death Certificate Cache Name=session-death-certificates
SessionDistributionController Class Name=
AttributeScopeController Class Name=com.tangosol.coherence.servlet.AbstractHttpSessionCollection$ApplicationScopeController
Maximum Session Inactive Seconds=3600
Session ID Character Length=52
Session Locking Enforced=false
Member Session Locking Enforced=false
Application Session Locking Enforced=false
Thread Session Locking Enforced=false
Session Get Lock Timeout=300
Suspect Attribute Detection=true
Strict "Servlet Specification" Exception Handling=true
Sticky Session Ownership=false
Sticky Session Ownership Service Name=SessionOwnership
Assume Session Locality for Reaping=false
Parallel Session Reaping=true
Allow Local Attributes=false
Use Default Session ID Decoding=true
Use Default Session ID Encoding=false
Session ID Affinity Token=null
Session Expiry Filter Factory=
Session Access Debug Logging Enabled=false
Session Access Debug Logging Filter=
Oct 18, 2012 3:39:16 PM com.tangosol.coherence.servlet.SessionHelper registerMBean
INFO: Registering MBean using object name "type=WebLogicHttpSessionManager,nodeId=2,appId=countercounter.war"
Project 下载:counter(coherence).war
参考文献:
1. Tutorial for Oracle Coherence Release 3.7.1 之 Caching Sessions with Coherence and WebLogic Server
2. http://blog.ipnweb.com/2012/02/member-specified-cluster-name-which-did.html
WebLogic Server与Coherence*Web集成之后有如下好处:
(1)Session对象将托管给Coherence Cache Server管理,你可以根据需要使用不同的缓存拓扑结构。
(2)Session对象不再与WLS Server共享同一个JVM,使WLS Server有更多的Heap空间。
(3)即使重启WLS Server,也不会造成Session丢失。
这样的分工可以让WLS和Coherence在各自擅长的领域做各自专业的事情。
1. session-cache-server.cmd
这是Coherence Cache Server,用于保存所有Session对象。脚本如下:
setlocal
set COHERENCE_HOME=C:\Oracle\coherence
set COH_OPTS=%COH_OPTS% -server -cp %COHERENCE_HOME%\lib\coherence.jar;%COHERENCE_HOME%\lib\coherence-web.jar;
set COH_OPTS=%COH_OPTS% -Dtangosol.coherence.management.remote=true -Dtangosol.coherence.cacheconfig=session-cache-config.xml -Dtangosol.coherence.distributed.localstorage=true -Dtangosol.coherence.clusterport=7777 -Dtangosol.coherence.clusteraddress=231.1.1.1 -Dtangosol.coherence.session.localstorage=true -Dtangosol.coherence.cluster=CoherenceCluster
java %COH_OPTS% -Xms512m -Xmx512m -XX:MaxPermSize=256m com.tangosol.net.DefaultCacheServer
:exit
其中,session-cache-config.xml在coherence-web.jar中,其内容如下:
<?xml version="1.0"?>
<!-- - - - - - - - - - - - - - - - - - - - - - - - - - - - - - - - - - - - -->
<!-- -->
<!-- Cache configuration descriptor for Coherence*Web -->
<!-- -->
<!-- - - - - - - - - - - - - - - - - - - - - - - - - - - - - - - - - - - - -->
<cache-config xmlns:xsi="http://www.w3.org/2001/XMLSchema-instance"
xmlns="http://xmlns.oracle.com/coherence/coherence-cache-config"
xsi:schemaLocation="http://xmlns.oracle.com/coherence/coherence-cache-config coherence-cache-config.xsd">
<caching-scheme-mapping>
<!--
The clustered cache used to store Session management data.
-->
<cache-mapping>
<cache-name>session-management</cache-name>
<scheme-name>replicated</scheme-name>
</cache-mapping>
<!--
The clustered cache used to store ServletContext attributes.
-->
<cache-mapping>
<cache-name>servletcontext-storage</cache-name>
<scheme-name>replicated</scheme-name>
</cache-mapping>
<!--
The clustered cache used to store Session attributes.
-->
<cache-mapping>
<cache-name>session-storage</cache-name>
<scheme-name>session-near</scheme-name>
</cache-mapping>
<!--
The clustered cache used to store the "overflowing" (split-out due to size)
Session attributes. Only used for the "Split" model.
-->
<cache-mapping>
<cache-name>session-overflow</cache-name>
<scheme-name>session-distributed</scheme-name>
</cache-mapping>
<!--
The clustered cache used to store IDs of "recently departed" Sessions.
-->
<cache-mapping>
<cache-name>session-death-certificates</cache-name>
<scheme-name>session-certificate</scheme-name>
</cache-mapping>
<!--
The local cache used to store Sessions that are not yet distributed (if
there is a distribution controller).
-->
<cache-mapping>
<cache-name>local-session-storage</cache-name>
<scheme-name>unlimited-local</scheme-name>
</cache-mapping>
<!--
The local cache used to store Session attributes that are not distributed
(if there is a distribution controller or attributes are allowed to become
local when serialization fails).
-->
<cache-mapping>
<cache-name>local-attribute-storage</cache-name>
<scheme-name>unlimited-local</scheme-name>
</cache-mapping>
</caching-scheme-mapping>
<caching-schemes>
<!--
Replicated caching scheme used by the Session management and ServletContext
attribute caches.
-->
<replicated-scheme>
<scheme-name>replicated</scheme-name>
<service-name>ReplicatedSessionsMisc</service-name>
<request-timeout>30s</request-timeout>
<backing-map-scheme>
<local-scheme>
<scheme-ref>unlimited-local</scheme-ref>
</local-scheme>
</backing-map-scheme>
<autostart>true</autostart>
</replicated-scheme>
<!--
Near caching scheme used by the Session attribute cache. The front cache
uses a Local caching scheme and the back cache uses a Distributed caching
scheme.
-->
<near-scheme>
<scheme-name>session-near</scheme-name>
<front-scheme>
<local-scheme>
<scheme-ref>session-front</scheme-ref>
</local-scheme>
</front-scheme>
<back-scheme>
<distributed-scheme>
<scheme-ref>session-distributed</scheme-ref>
</distributed-scheme>
</back-scheme>
<invalidation-strategy>present</invalidation-strategy>
</near-scheme>
<local-scheme>
<scheme-name>session-front</scheme-name>
<eviction-policy>HYBRID</eviction-policy>
<high-units>1000</high-units>
<low-units>750</low-units>
</local-scheme>
<distributed-scheme>
<scheme-name>session-distributed</scheme-name>
<scheme-ref>session-base</scheme-ref>
<backing-map-scheme>
<local-scheme>
<scheme-ref>unlimited-local</scheme-ref>
</local-scheme>
<!-- for disk overflow use this backing scheme instead:
<overflow-scheme>
<scheme-ref>session-paging</scheme-ref>
</overflow-scheme>
-->
</backing-map-scheme>
</distributed-scheme>
<!--
Distributed caching scheme used by the "recently departed" Session cache.
-->
<distributed-scheme>
<scheme-name>session-certificate</scheme-name>
<scheme-ref>session-base</scheme-ref>
<backing-map-scheme>
<local-scheme>
<eviction-policy>HYBRID</eviction-policy>
<high-units>4000</high-units>
<low-units>3000</low-units>
<expiry-delay>86400</expiry-delay>
</local-scheme>
</backing-map-scheme>
</distributed-scheme>
<!--
"Base" Distributed caching scheme that defines common configuration.
-->
<distributed-scheme>
<scheme-name>session-base</scheme-name>
<service-name>DistributedSessions</service-name>
<thread-count>0</thread-count>
<lease-granularity>member</lease-granularity>
<local-storage system-property="tangosol.coherence.session.localstorage">false</local-storage>
<partition-count>257</partition-count>
<backup-count>1</backup-count>
<backup-storage>
<type>on-heap</type>
</backup-storage>
<request-timeout>30s</request-timeout>
<backing-map-scheme>
<local-scheme>
<scheme-ref>unlimited-local</scheme-ref>
</local-scheme>
</backing-map-scheme>
<autostart>true</autostart>
</distributed-scheme>
<!--
Disk-based Session attribute overflow caching scheme.
-->
<overflow-scheme>
<scheme-name>session-paging</scheme-name>
<front-scheme>
<local-scheme>
<scheme-ref>session-front</scheme-ref>
</local-scheme>
</front-scheme>
<back-scheme>
<external-scheme>
<bdb-store-manager/>
</external-scheme>
</back-scheme>
</overflow-scheme>
<!--
Local caching scheme definition used by all caches that do not require an
eviction policy.
-->
<local-scheme>
<scheme-name>unlimited-local</scheme-name>
<service-name>LocalSessionCache</service-name>
</local-scheme>
<!--
Clustered invocation service that manages sticky session ownership.
-->
<invocation-scheme>
<service-name>SessionOwnership</service-name>
<request-timeout>30s</request-timeout>
</invocation-scheme>
</caching-schemes>
</cache-config>
2. 在WebLogic Console中配置
(1)创建两个Managed Server:ServerA(端口8081)和ServerB(端口8083)
这里我并没有把ServerA和ServerB组成为一个集群,只是两个各自独立的Server。
(2)发布两个Shared Library到ServerA和ServerB上:coherence-web-spi.war和active-cache-1.0.jar。
其中coherence-web-spi.war位于[coherence_home]\lib目录下,active-cache-1.0.jar位于[wls_server]\common\deployable-libraries目录下。
(3)创建Coherence Cluster,Target到ServerA和ServerB上。
3. 创建应用:counter.war
(1)counter.jsp
<%@ page contentType="text/html;charset=UTF-8"%>
<html>
<body>
<h3>
Counter :
<%
Integer counter = new Integer(1);
HttpSession httpsession = request.getSession(true);
if (httpsession.isNew()) {
httpsession.setAttribute("count", counter);
out.println(counter);
} else {
int count = ((Integer) httpsession.getAttribute("count")).
intValue();
httpsession.setAttribute("count", new Integer(++count));
out.println(count);
}
%>
</h3>
</body>
</html>
(2)weblogic.xml
<?xml version="1.0" encoding="UTF-8" ?>
<weblogic-web-app xmlns="http://xmlns.oracle.com/weblogic/weblogic-web-app"
xmlns:xsi="http://www.w3.org/2001/XMLSchema-instance"
xsi:schemaLocation="http://xmlns.oracle.com/weblogic/weblogic-web-app http://www.oracle.com/technology/weblogic/weblogic-web-app/1.1/weblogic-web-app.xsd">
<library-ref>
<library-name>coherence-web-spi</library-name>
</library-ref>
<coherence-cluster-ref>
<coherence-cluster-name>CoherenceCluster</coherence-cluster-name>
</coherence-cluster-ref>
</weblogic-web-app>
(3)manifest.mf
Extension-List: active-cache
active-cache-Extension-Name: active-cache
active-cache-Specification-Version: 1.0
active-cache-Implementation-Version: 1.0
(4)复制coherence.jar到WEB-INF/lib目录下
(5)counter应用目录结构如下:
/
/counter.jsp
/META-INF/manifest.mf
/WEB-INF/web.xml
/WEB-INF/weblogic.xml
/WEB-INF/lib/coherence.jar
(6)发布counter.war到ServerA和ServerB上。
4. 测试
(1)运行session-cache-server.cmd,启动Coherence Cache Server。
(2)启动Admin Server
(3)启动Managed Server:ServerA和ServerB。
(4)启动counter应用
这时,在ServerA和ServerB的Console中会输出如下信息:
2012-10-18 15:39:09.907/108.408 Oracle Coherence 3.7.1.0 <Info> (thread=[ACTIVE] ExecuteThread: '0' for queue: 'weblogic.kernel.Default (self-tuning)', member=n
/a): Loaded operational configuration from "zip:C:/Oracle/wls1211_dev/user_projects/domains/dev_domain/servers/ServerA/tmp/_WL_user/counter/m4egcu/war/WEB-INF/l
ib/coherence.jar!/tangosol-coherence.xml"
2012-10-18 15:39:10.143/108.644 Oracle Coherence 3.7.1.0 <Info> (thread=[ACTIVE] ExecuteThread: '0' for queue: 'weblogic.kernel.Default (self-tuning)', member=n
/a): Loaded operational overrides from "zip:C:/Oracle/wls1211_dev/user_projects/domains/dev_domain/servers/ServerA/tmp/_WL_user/counter/m4egcu/war/WEB-INF/lib/c
oherence.jar!/tangosol-coherence-override-dev.xml"
2012-10-18 15:39:10.145/108.646 Oracle Coherence 3.7.1.0 <D5> (thread=[ACTIVE] ExecuteThread: '0' for queue: 'weblogic.kernel.Default (self-tuning)', member=n/a
): Optional configuration override "/tangosol-coherence-override.xml" is not specified
2012-10-18 15:39:10.213/108.714 Oracle Coherence 3.7.1.0 <D5> (thread=[ACTIVE] ExecuteThread: '0' for queue: 'weblogic.kernel.Default (self-tuning)', member=n/a
): Optional configuration override "/custom-mbeans.xml" is not specified
Oracle Coherence Version 3.7.1.0 Build 27797
Grid Edition: Development mode
Copyright (c) 2000, 2011, Oracle and/or its affiliates. All rights reserved.
2012-10-18 15:39:11.114/109.615 Oracle Coherence GE 3.7.1.0 <Info> (thread=[ACTIVE] ExecuteThread: '0' for queue: 'weblogic.kernel.Default (self-tuning)', membe
r=n/a): Loaded cache configuration from "zip:C:/Oracle/wls1211_dev/user_projects/domains/dev_domain/servers/ServerA/tmp/_WL_user/coherence-web-spi/14iuoc/WEB-IN
F/lib/coherence-web.jar!/session-cache-config.xml"
2012-10-18 15:39:12.659/111.160 Oracle Coherence GE 3.7.1.0 <Info> (thread=[ACTIVE] ExecuteThread: '0' for queue: 'weblogic.kernel.Default (self-tuning)', membe
r=n/a): Loaded Reporter configuration from "zip:C:/Oracle/wls1211_dev/user_projects/domains/dev_domain/servers/ServerA/tmp/_WL_user/counter/m4egcu/war/WEB-INF/l
ib/coherence.jar!/reports/report-group.xml"
<Oct 18, 2012 3:39:14 PM CST> <Warning> <com.oracle.wls> <BEA-000000> <2012-10-18 15:39:14.624/113.125 Oracle Coherence GE 3.7.1.0 <Warning> (thread=Cluster, me
mber=n/a): This member is configured with a multicast TTL of 0; the senior Member(Id=1, Timestamp=2012-10-18 15:36:33.028, Address=10.191.10.83:8088, MachineId=
46446, Location=site:,machine:PMMA-CN,process:6384, Role=CoherenceServer) is configured with a TTL of 4. It is strongly recommended to use the same TTL setting
for all cluster members.>
<Oct 18, 2012 3:39:15 PM CST> <Warning> <WorkManager> <BEA-002919> <Unable to find a Work Manager with name wm/CoherenceWorkManager. Dispatch policy wm/Coherenc
eWorkManager will map to the default Work Manager for the application counter>
Oct 18, 2012 3:39:16 PM com.tangosol.coherence.servlet.AbstractHttpSessionCollection configure
INFO: Configured session model "SplitHttpSessionCollection":
Clustered Session Cache Name=session-storage
Local Session Cache Name=local-session-storage
Local Session Attribute Cache Name=local-attribute-storage
Death Certificate Cache Name=session-death-certificates
SessionDistributionController Class Name=
AttributeScopeController Class Name=com.tangosol.coherence.servlet.AbstractHttpSessionCollection$ApplicationScopeController
Maximum Session Inactive Seconds=3600
Session ID Character Length=52
Session Locking Enforced=false
Member Session Locking Enforced=false
Application Session Locking Enforced=false
Thread Session Locking Enforced=false
Session Get Lock Timeout=300
Suspect Attribute Detection=true
Strict "Servlet Specification" Exception Handling=true
Sticky Session Ownership=false
Sticky Session Ownership Service Name=SessionOwnership
Assume Session Locality for Reaping=false
Parallel Session Reaping=true
Allow Local Attributes=false
Use Default Session ID Decoding=true
Use Default Session ID Encoding=false
Session ID Affinity Token=null
Session Expiry Filter Factory=
Session Access Debug Logging Enabled=false
Session Access Debug Logging Filter=
Oct 18, 2012 3:39:16 PM com.tangosol.coherence.servlet.SessionHelper registerMBean
INFO: Registering MBean using object name "type=WebLogicHttpSessionManager,nodeId=2,appId=countercounter.war"
同时,在session-cache-server.cmd的Console会输出如下信息:
2012-10-18 15:39:14.624/164.404 Oracle Coherence GE 3.7.1.0 <D5> (thread=Cluster, member=1): Member(Id=2, Timestamp=2012-10-18 15:39:14.632, Address=10.191.10.8
3:8090, MachineId=46446, Location=site:,machine:PMMA-CN,process:7608, Role=WeblogicServer) joined Cluster with senior member 1
2012-10-18 15:39:14.749/164.529 Oracle Coherence GE 3.7.1.0 <D5> (thread=Cluster, member=1): Member 2 joined Service Management with senior member 1
2012-10-18 15:39:15.217/164.997 Oracle Coherence GE 3.7.1.0 <D5> (thread=Cluster, member=1): Member(Id=3, Timestamp=2012-10-18 15:39:15.014, Address=10.191.10.8
3:8092, MachineId=46446, Location=site:,machine:PMMA-CN,process:296, Role=WeblogicServer) joined Cluster with senior member 1
2012-10-18 15:39:15.326/165.106 Oracle Coherence GE 3.7.1.0 <D5> (thread=Cluster, member=1): Member 3 joined Service Management with senior member 1
2012-10-18 15:39:15.904/165.684 Oracle Coherence GE 3.7.1.0 <D5> (thread=Cluster, member=1): Member 3 joined Service DistributedSessions with senior member 1
2012-10-18 15:39:15.966/165.746 Oracle Coherence GE 3.7.1.0 <D5> (thread=Cluster, member=1): Member 2 joined Service DistributedSessions with senior member 1
如果看到如上信息说明ServerA和ServerB已经作为Client成员加入到Coherence集群中了。
(5)访问http://localhost:8081/counter/counter.jsp,显示Counter:1。刷新页面数字会跟着增长。
(6)访问http://localhost:8083/counter/counter.jsp,会接着显示下一个增长的数字。
这说明ServerA和ServerB上的counter应用的Session是共享的,尽管我没有把ServerA和ServerB组成一个集群。
(7)重启ServerA和ServerB。
(8)再次访问http://localhost:8081/counter/counter.jsp,会接着显示下一个增长的数字。
这说明Session对象是保留在Coherence Cache Server中的,所以即使停掉ServerA和ServerB,Session对象也不会丢失。参考文献:
1. Tutorial for Oracle Coherence Release 3.7.1 之 Caching Sessions with Coherence and WebLogic Server
2. http://blog.ipnweb.com/2012/02/member-specified-cluster-name-which-did.html
2012年10月12日星期五
WLS_082:WebLogic Server高级管理之十一:使用SAML2.0配置SSO
运行环境:WebLogic Server 12c开发版(12.1.1.1.0)
本实验前五步跟《使用SAML1.1配置SSO》一样,我从第六步开始介绍。
6. 在dev_domain中配置SAML2CredentialMapper
SAML2CredentialMapper的角色是SAML security assertions的Provider,即作为断言的提供方。


7. 在dev_domain中,为Admin Server配置SAML 2.0 Indentity Provider
Enabled:勾上
Login URL:/saml2/idp/login
POST Binding Enabled:勾上
Redirect Binding Enabled:勾上
Artifact Binding Enabled:勾上

8. 在dev_domain中,为Admin Server配置SAML 2.0 General
Contact Person Given Name:Ping
Contact Person Surname:Ma
Contact Person Type:technical
Contact Person Company:Oracle
Contact Person Telephone Number:
Contact Person Email Address:
Organization Name:
Organization URL:http://www.oracle.com
Published Site URL:http://localhost:7001/saml2
Entity ID:SAML2CredentialMapper
Recipient Check Enabled:勾上
Transport Layer Security Key Alias:server
Transport Layer Security Key Passphrase:123456
ConfirmTransport Layer Security Key Passphrase:123456
Only Accept Signed Artifact Request:勾上
Artifact Cache Size:10000
Artifact Cache Timeout:300
Single Sign-on Signing Key Alias:server
Single Sign-on Signing Key Pass Phrase:123456
Confirm Single Sign-on Signing Key Pass Phrase:123456

 点击Publish Meta Data按钮,导出dev_metadata.xml。

9. 在dev2_domain中,为Admin Server配置SAML2.0 Identity Asserter


Enabled:勾上
Always Sign Authentication Requests:勾上
Force Authentication:勾上
Only Accept Signed Assertions:勾上
Authentication Request Cache Size:10000
Authentication Request Cache Timeout:300
POST One Use Check Enabled:勾上
POST Binding Enabled:勾上
Artifact Binding Enabled:勾上

11. 在dev2_domain中,为Admin Server配置SAML 2.0 General
Contact Person Given Name:Ping
Contact Person Surname:Ma
Contact Person Type:technical
Contact Person Company:Oracle
Contact Person Telephone Number:
Contact Person Email Address:
Organization Name:
Organization URL:http://www.oracle.com
Published Site URL:http://localhost:8001/saml2
Entity ID:SAML2IdentityAsserter
Recipient Check Enabled:勾上
Transport Layer Security Key Alias:server
Transport Layer Security Key Passphrase:123456
ConfirmTransport Layer Security Key Passphrase:123456
Only Accept Signed Artifact Request:勾上
Artifact Cache Size:10000
Artifact Cache Timeout:300
Single Sign-on Signing Key Alias:server
Single Sign-on Signing Key Pass Phrase:123456
Confirm Single Sign-on Signing Key Pass Phrase:123456
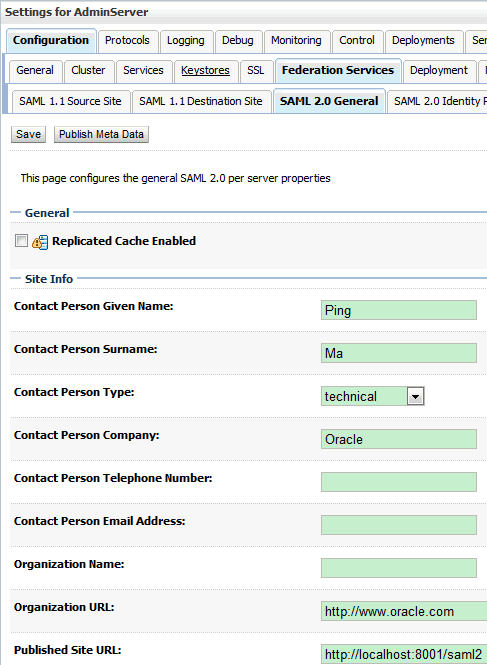

点击Publish Meta Data按钮,导出dev2_metadata.xml。

12. 在dev_domain中,为SAML2CredentialMapper导入Service Provider Partners:dev2_metadata.xml
(1)点击New,选择New Web Single Sign-On Service Proider Partner


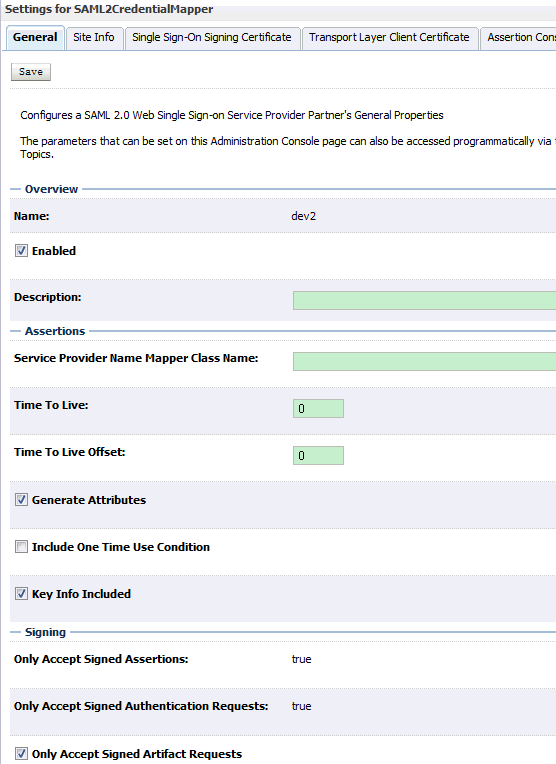
13. 在dev2_domain中,为SAML2IdentityAsserter导入Identity Provider Partners:dev_metadata.xml
(1)点击New,选择New Web Single Sign-On Indentity Provider Partner


 14. 测试
(1)先访问http://localhost:8001/appB,会提示你将会到localhost:7001去验证用户名和口令:
在浏览器地址栏中,会显示http://localhost:7001/saml2/idp/sso/artifact?SAMLart=AAQAAJOmtVL6FtyvtF02ooeKW%2FAD3soLMJdjuZGJDRHo4cMvocoWDOQWKxg%3D。
输入ssouser/welcome1,显示 http://localhost:8001/appB/admin/services.jsp 。
说明:因为这里我没有使用SSL端口处理SAML2的请求,因此口令将以明文方式发送。

(2)先访问http://localhost:7001/appA,会出现欢迎页面,输入ssouser/welcome1,成功登陆后
点击链接:Application - appB on domainB,会直接进入http://localhost:8001/appB/admin/services.jsp页面,无需再次提供用户名/口令。
参考文献:
1. http://biemond.blogspot.com/2009/09/sso-with-weblogic-1031-and-saml2.html
本实验前五步跟《使用SAML1.1配置SSO》一样,我从第六步开始介绍。
SAML2CredentialMapper的角色是SAML security assertions的Provider,即作为断言的提供方。
(1)创建SAML2CredentialMapper
选择myrealm,Providers,CredentialMapping,点击New,Type选择SAML2CredntialMapper
(2)配置Provider Specific
Issuer URI:http://www.oracle.com/demoSAML
Name Qualifier:oracle.com
Default Time To Live:120
Default Time To Live Offset:-5
Web Service Assertion Signing Key Alias:server
Web Service Assertion Signing Key Pass Phrase:123456
Enabled:勾上
Login URL:/saml2/idp/login
POST Binding Enabled:勾上
Redirect Binding Enabled:勾上
Artifact Binding Enabled:勾上
Contact Person Given Name:Ping
Contact Person Surname:Ma
Contact Person Type:technical
Contact Person Company:Oracle
Contact Person Telephone Number:
Contact Person Email Address:
Organization Name:
Organization URL:http://www.oracle.com
Published Site URL:http://localhost:7001/saml2
Entity ID:SAML2CredentialMapper
Recipient Check Enabled:勾上
Transport Layer Security Key Alias:server
Transport Layer Security Key Passphrase:123456
ConfirmTransport Layer Security Key Passphrase:123456
Only Accept Signed Artifact Request:勾上
Artifact Cache Size:10000
Artifact Cache Timeout:300
Single Sign-on Signing Key Alias:server
Single Sign-on Signing Key Pass Phrase:123456
Confirm Single Sign-on Signing Key Pass Phrase:123456
(1)创建SAML2IdentityAsserter
选择myrealm,Providers,Authentication,点击New,Type选择SAML2IdentityAsserter
10. 在dev2_domain中,为Admin Server配置SAML 2.0 Service Provider
Always Sign Authentication Requests:勾上
Force Authentication:勾上
Only Accept Signed Assertions:勾上
Authentication Request Cache Size:10000
Authentication Request Cache Timeout:300
POST One Use Check Enabled:勾上
POST Binding Enabled:勾上
Artifact Binding Enabled:勾上

11. 在dev2_domain中,为Admin Server配置SAML 2.0 General
Contact Person Given Name:Ping
Contact Person Surname:Ma
Contact Person Type:technical
Contact Person Company:Oracle
Contact Person Telephone Number:
Contact Person Email Address:
Organization Name:
Organization URL:http://www.oracle.com
Published Site URL:http://localhost:8001/saml2
Entity ID:SAML2IdentityAsserter
Recipient Check Enabled:勾上
Transport Layer Security Key Alias:server
Transport Layer Security Key Passphrase:123456
ConfirmTransport Layer Security Key Passphrase:123456
Only Accept Signed Artifact Request:勾上
Artifact Cache Size:10000
Artifact Cache Timeout:300
Single Sign-on Signing Key Alias:server
Single Sign-on Signing Key Pass Phrase:123456
Confirm Single Sign-on Signing Key Pass Phrase:123456
点击Publish Meta Data按钮,导出dev2_metadata.xml。
12. 在dev_domain中,为SAML2CredentialMapper导入Service Provider Partners:dev2_metadata.xml
(1)点击New,选择New Web Single Sign-On Service Proider Partner
(2)选择dev2_metadata.xml
(2)点击dev2,配置如下:
Enabled:勾上
Key Info Included:勾上
Only Accept Signed Artifact Requests:勾上
13. 在dev2_domain中,为SAML2IdentityAsserter导入Identity Provider Partners:dev_metadata.xml
(1)点击New,选择New Web Single Sign-On Indentity Provider Partner
(2)选择dev_metadata.xml
(3)点击dev,配置如下:
Enabled:勾上
Redirect URIs:/appB/admin/services.jsp
Only Accept Signed Artifact Requests:勾上
(1)先访问http://localhost:8001/appB,会提示你将会到localhost:7001去验证用户名和口令:
在浏览器地址栏中,会显示http://localhost:7001/saml2/idp/sso/artifact?SAMLart=AAQAAJOmtVL6FtyvtF02ooeKW%2FAD3soLMJdjuZGJDRHo4cMvocoWDOQWKxg%3D。
输入ssouser/welcome1,显示 http://localhost:8001/appB/admin/services.jsp 。
说明:因为这里我没有使用SSL端口处理SAML2的请求,因此口令将以明文方式发送。
点击链接:Application - appB on domainB,会直接进入http://localhost:8001/appB/admin/services.jsp页面,无需再次提供用户名/口令。
参考文献:
1. http://biemond.blogspot.com/2009/09/sso-with-weblogic-1031-and-saml2.html
2012年10月11日星期四
WLS_081:WebLogic Server高级管理之十:使用SAML1.1配置SSO
运行环境:WebLogic Server 12c开发版(12.1.1.1.0)
1. 开发应用
(1)appA
这是appA的web.xml文件内容:
<?xml version="1.0" encoding="UTF-8"?>
<web-app id="WebApp_ID" version="2.4" xmlns="http://java.sun.com/xml/ns/j2ee" xmlns:xsi="http://www.w3.org/2001/XMLSchema-instance" xsi:schemaLocation="http://java.sun.com/xml/ns/j2ee/web-app_2_4.xsd">
<display-name>Saml Source Site Application</display-name>
<welcome-file-list>
<welcome-file>index.jsp</welcome-file>
</welcome-file-list>
<security-constraint>
<web-resource-collection>
<web-resource-name>SecurePages</web-resource-name>
<description>These pages are only accessible by authorized users.</description>
<url-pattern>/admin/*</url-pattern>
<http-method>GET</http-method>
</web-resource-collection>
<auth-constraint>
<description>These are the roles who have access.</description>
<role-name>admin</role-name>
</auth-constraint>
<user-data-constraint>
<description>This is how the user data must be transmitted.</description>
<transport-guarantee>NONE</transport-guarantee>
</user-data-constraint>
</security-constraint>
<login-config>
<auth-method>FORM</auth-method>
<realm-name>myrealm</realm-name>
<form-login-config>
<form-login-page>/login.jsp</form-login-page>
<form-error-page>/fail_login.htm</form-error-page>
</form-login-config>
</login-config>
<security-role>
<description>These are the roles who have access</description>
<role-name>admin</role-name>
</security-role>
</web-app>
这是appA的weblogic.xml文件内容:
<?xml version='1.0' encoding='UTF-8'?>
<weblogic-web-app xmlns="http://www.bea.com/ns/weblogic/90"
xmlns:xsi="http://www.w3.org/2001/XMLSchema-instance">
<security-role-assignment>
<role-name>admin</role-name>
<principal-name>ssouser</principal-name>
</security-role-assignment>
<context-root>/appA</context-root>
</weblogic-web-app>
(2)appB
这是appB的web.xml文件内容:
<?xml version="1.0" encoding="UTF-8"?>
<web-app id="WebApp_ID" version="2.4" xmlns="http://java.sun.com/xml/ns/j2ee" xmlns:xsi="http://www.w3.org/2001/XMLSchema-instance" xsi:schemaLocation="http://java.sun.com/xml/ns/j2ee http://java.sun.com/xml/ns/j2ee/web-app_2_4.xsd">
<display-name>SAML Destination Site Application</display-name>
<welcome-file-list>
<welcome-file>index.jsp</welcome-file>
</welcome-file-list>
<security-constraint>
<web-resource-collection>
<web-resource-name>SecurePages</web-resource-name>
<description>These pages are only accessible by authorized users.</description>
<url-pattern>/admin/*</url-pattern>
<http-method>GET</http-method>
</web-resource-collection>
<auth-constraint>
<description>These are the roles who have access.</description>
<role-name>admin</role-name>
</auth-constraint>
<user-data-constraint>
<description>This is how the user data must be transmitted.</description>
<transport-guarantee>NONE</transport-guarantee>
</user-data-constraint>
</security-constraint>
<login-config>
<auth-method>CLIENT-CERT</auth-method>
<realm-name>myrealm</realm-name>
</login-config>
<security-role>
<description>These are the roles who have access.</description>
<role-name>admin</role-name>
</security-role>
</web-app>
这是appB的weblogic.xml文件内容:
<?xml version='1.0' encoding='UTF-8'?>
<weblogic-web-app xmlns="http://www.bea.com/ns/weblogic/90"
xmlns:xsi="http://www.w3.org/2001/XMLSchema-instance">
<security-role-assignment>
<role-name>admin</role-name>
<principal-name>ssouser</principal-name>
</security-role-assignment>
<context-root>/appB</context-root>
</weblogic-web-app>
2. 创建Domain
(1)创建dev_domain,作为SAML的source一方。
(2)创建dev2_domain,作为SAML的target一方。
3. 创建用户
(1)在dev_domain中Security Realms的myRealm创建用户ssouser/welcome1。
(2)在dev2_domain中Security Realms的myRealm创建用户ssouser/welcome1。
说明:这里只是出于测试的目的,分别在dev_domain和dev2_domain中创建了相同的用户。
实际使用时,一般两个Domain会使用同一个身份认证提供者,比如LDAP或数据库。
3. 部署应用
(1)部署appA 到dev_domain的Admin Server上 。
(2)部署appB 到dev2_domain的Admin Server上 。
4. 测试应用
访问http://localhost:7001/appA,会出现欢迎页面,输入ssouser/welcome1,成功登陆后
点击链接:Application - appB on domainB,会报错,这是因为appB需要通过数字证书认证,因为没有得到相关信息所以报错。
1. 开发应用
(1)appA
这是appA的web.xml文件内容:
<?xml version="1.0" encoding="UTF-8"?>
<web-app id="WebApp_ID" version="2.4" xmlns="http://java.sun.com/xml/ns/j2ee" xmlns:xsi="http://www.w3.org/2001/XMLSchema-instance" xsi:schemaLocation="http://java.sun.com/xml/ns/j2ee/web-app_2_4.xsd">
<display-name>Saml Source Site Application</display-name>
<welcome-file-list>
<welcome-file>index.jsp</welcome-file>
</welcome-file-list>
<security-constraint>
<web-resource-collection>
<web-resource-name>SecurePages</web-resource-name>
<description>These pages are only accessible by authorized users.</description>
<url-pattern>/admin/*</url-pattern>
<http-method>GET</http-method>
</web-resource-collection>
<auth-constraint>
<description>These are the roles who have access.</description>
<role-name>admin</role-name>
</auth-constraint>
<user-data-constraint>
<description>This is how the user data must be transmitted.</description>
<transport-guarantee>NONE</transport-guarantee>
</user-data-constraint>
</security-constraint>
<login-config>
<auth-method>FORM</auth-method>
<realm-name>myrealm</realm-name>
<form-login-config>
<form-login-page>/login.jsp</form-login-page>
<form-error-page>/fail_login.htm</form-error-page>
</form-login-config>
</login-config>
<security-role>
<description>These are the roles who have access</description>
<role-name>admin</role-name>
</security-role>
</web-app>
这是appA的weblogic.xml文件内容:
<?xml version='1.0' encoding='UTF-8'?>
<weblogic-web-app xmlns="http://www.bea.com/ns/weblogic/90"
xmlns:xsi="http://www.w3.org/2001/XMLSchema-instance">
<security-role-assignment>
<role-name>admin</role-name>
<principal-name>ssouser</principal-name>
</security-role-assignment>
<context-root>/appA</context-root>
</weblogic-web-app>
(2)appB
这是appB的web.xml文件内容:
<?xml version="1.0" encoding="UTF-8"?>
<web-app id="WebApp_ID" version="2.4" xmlns="http://java.sun.com/xml/ns/j2ee" xmlns:xsi="http://www.w3.org/2001/XMLSchema-instance" xsi:schemaLocation="http://java.sun.com/xml/ns/j2ee http://java.sun.com/xml/ns/j2ee/web-app_2_4.xsd">
<display-name>SAML Destination Site Application</display-name>
<welcome-file-list>
<welcome-file>index.jsp</welcome-file>
</welcome-file-list>
<security-constraint>
<web-resource-collection>
<web-resource-name>SecurePages</web-resource-name>
<description>These pages are only accessible by authorized users.</description>
<url-pattern>/admin/*</url-pattern>
<http-method>GET</http-method>
</web-resource-collection>
<auth-constraint>
<description>These are the roles who have access.</description>
<role-name>admin</role-name>
</auth-constraint>
<user-data-constraint>
<description>This is how the user data must be transmitted.</description>
<transport-guarantee>NONE</transport-guarantee>
</user-data-constraint>
</security-constraint>
<login-config>
<auth-method>CLIENT-CERT</auth-method>
<realm-name>myrealm</realm-name>
</login-config>
<security-role>
<description>These are the roles who have access.</description>
<role-name>admin</role-name>
</security-role>
</web-app>
这是appB的weblogic.xml文件内容:
<?xml version='1.0' encoding='UTF-8'?>
<weblogic-web-app xmlns="http://www.bea.com/ns/weblogic/90"
xmlns:xsi="http://www.w3.org/2001/XMLSchema-instance">
<security-role-assignment>
<role-name>admin</role-name>
<principal-name>ssouser</principal-name>
</security-role-assignment>
<context-root>/appB</context-root>
</weblogic-web-app>
2. 创建Domain
(1)创建dev_domain,作为SAML的source一方。
(2)创建dev2_domain,作为SAML的target一方。
3. 创建用户
(1)在dev_domain中Security Realms的myRealm创建用户ssouser/welcome1。
(2)在dev2_domain中Security Realms的myRealm创建用户ssouser/welcome1。
说明:这里只是出于测试的目的,分别在dev_domain和dev2_domain中创建了相同的用户。
实际使用时,一般两个Domain会使用同一个身份认证提供者,比如LDAP或数据库。
3. 部署应用
(1)部署appA 到dev_domain的Admin Server上 。
(2)部署appB 到dev2_domain的Admin Server上 。
4. 测试应用
访问http://localhost:7001/appA,会出现欢迎页面,输入ssouser/welcome1,成功登陆后
点击链接:Application - appB on domainB,会报错,这是因为appB需要通过数字证书认证,因为没有得到相关信息所以报错。
当配置好SSO后,点击该链接应该可以进入appB中的受保护页面。
5. 配置SSL
(1) 在dev_domain中,为Admin Server 配置SSL。
(2) 在dev2_domain中,为Admin Server 配置SSL。
具体步骤请参考《配置双向SSL认证》,这里我配置的是单向SSL认证:Two Way Client Cert Behavior:Client Certs Not Required。
6. 在dev_domain中配置SAMLCredentialMapper
SAMLCredentialMapper的角色是SAML security assertions的Provider,即作为断言的提供方。
 (1)创建SAMLCredentialMapper
选择myrealm,Providers,CredentialMapping,点击New,Type选择SAMLCredntialMapperV2

Name Qualifier:bea.com
Default Time To Live:120
Default Time To Live Offset:0
Signing Key Alias:server
Signing Key Pass Phrase:123456
Confirm Signing Key Pass Phrase:123456
 (3)配置Management->Certificates
这里我导入了两个数字证书:ca.der和server.der。
 生成ca.der
keytool -keystore truststore.jks -keypass 123456 -storepass 123456 -alias ca-import -trustcacerts -file certs/ca.cer
keytool -export -keystore truststore.jks -storepass 123456 -alias ca -file ca.der

生成server.der
keytool -keystore truststore.jks -keypass 123456 -storepass 123456 -alias server -import -trustcacerts -file certs/server.cer
keytool -export -keystore truststore.jks -storepass 123456 -alias server -file server.der
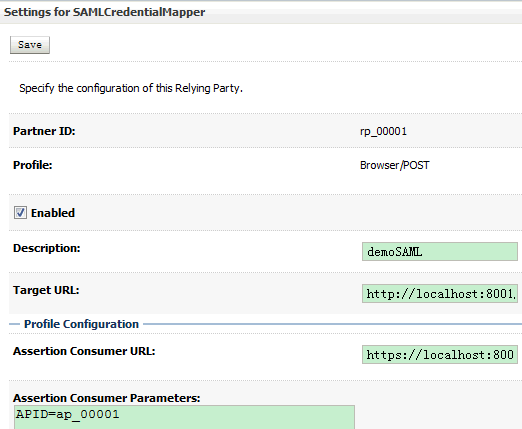
(4)配置Management->Relying Parties
 Enabled:勾上
Description:demoSAML
Target URL:http://localhost:8001/appB/admin/services.jsp
Assertion Consumer URL:https://localhost:8002/samlacs/acs
Assertion Consumer Parameters:APID=ap_00001
Signature Required:勾上
Include Keyinfo:勾上

7. 在dev_domain中,为Admin Server配置SAML 1.1 Source Site
选择Federation Services,SAML 1.1 Source Site
Source Site Enabled:勾上
Source Site URL:http://localhost:7001/appA
Signing Key Alias:server
Signing Key Passphrase:123456
Intersite Transfer URIS:/samlits_ba/its
/samlits_ba/its/post
/samlits_ba/its/artifact
/samlits_cc/its
/samlits_cc/its/post
/samlits_cc/its/artifact
ITS Requires SSL:勾上
Assertion Retrieval URIs:/samlars/ars
ARS Requires SSL:勾上


 (2)配置Management->Certificates
这里我导入了两个数字证书:ca.der和server.der,步骤同6(3)。


2. http://biemond.blogspot.jp/2009/05/sso-with-weblogic-103-and-saml.html
5. 配置SSL
(1) 在dev_domain中,为Admin Server 配置SSL。
(2) 在dev2_domain中,为Admin Server 配置SSL。
具体步骤请参考《配置双向SSL认证》,这里我配置的是单向SSL认证:Two Way Client Cert Behavior:Client Certs Not Required。
6. 在dev_domain中配置SAMLCredentialMapper
SAMLCredentialMapper的角色是SAML security assertions的Provider,即作为断言的提供方。
选择myrealm,Providers,CredentialMapping,点击New,Type选择SAMLCredntialMapperV2
(2)配置Provider Specific
Issuer URI:http://www.bea.com/demoSAMLName Qualifier:bea.com
Default Time To Live:120
Default Time To Live Offset:0
Signing Key Alias:server
Signing Key Pass Phrase:123456
Confirm Signing Key Pass Phrase:123456
这里我导入了两个数字证书:ca.der和server.der。
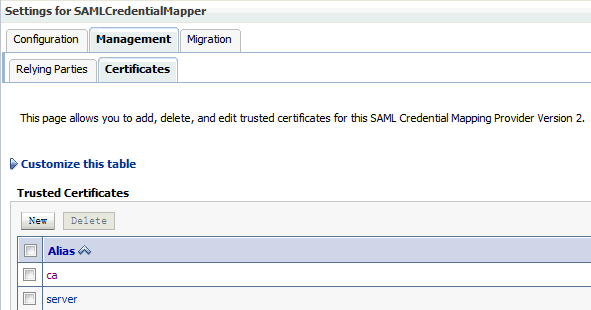
keytool -keystore truststore.jks -keypass 123456 -storepass 123456 -alias ca-import -trustcacerts -file certs/ca.cer
keytool -export -keystore truststore.jks -storepass 123456 -alias ca -file ca.der
生成server.der
keytool -keystore truststore.jks -keypass 123456 -storepass 123456 -alias server -import -trustcacerts -file certs/server.cer
keytool -export -keystore truststore.jks -storepass 123456 -alias server -file server.der
(4)配置Management->Relying Parties
Description:demoSAML
Target URL:http://localhost:8001/appB/admin/services.jsp
Assertion Consumer URL:https://localhost:8002/samlacs/acs
Assertion Consumer Parameters:APID=ap_00001
Signature Required:勾上
Include Keyinfo:勾上
7. 在dev_domain中,为Admin Server配置SAML 1.1 Source Site
选择Federation Services,SAML 1.1 Source Site
Source Site Enabled:勾上
Source Site URL:http://localhost:7001/appA
Signing Key Alias:server
Signing Key Passphrase:123456
Intersite Transfer URIS:/samlits_ba/its
/samlits_ba/its/post
/samlits_ba/its/artifact
/samlits_cc/its
/samlits_cc/its/post
/samlits_cc/its/artifact
ITS Requires SSL:勾上
Assertion Retrieval URIs:/samlars/ars
ARS Requires SSL:勾上
8. 在dev2_domain中配置SAMLIdentityAsserter
SAMLIdentityAsserter的角色是SAML security assertions的Consumer,即作为断言的消费方。
它负责验证断言是否正确有效。
(1)创建SAMLIdentityAsserter
选择myrealm,Providers,Authentication,点击New,Type选择SAMLIdentityAsserterV2
这里我导入了两个数字证书:ca.der和server.der,步骤同6(3)。
(3)配置Management->Asserting Parties
Enabled:勾上
Description:demoSAML
Target URL:http://localhost:7001/appA
POST Signing Certificate Alias:server
Source Site Redirect URIs:/appB/admin/services.jsp
Source Site ITS URL:https://localhost:7002/samlits_ba/its
Source Site ITS Parameters:RPID=rp_00001
Issuer URI:http://www.bea.com/demoSAML
Signature Required:勾上
Asserting Signing Certificate Alias:server
9. 在dev2_domain中,为Admin Server配置SAML 1.1 Target Site
选择Federation Services,SAML 1.1 Target Site
Destination Site Enabled:勾上
Assertion Consumer URIs:/samlacs/acs
ACS Requires SSL:勾上
SSL Client Identity Alias:server
SSL Client Identity Pass Phrase:123456
POST Recipient Check Enabled:勾上
POST one Use Check Enabled:勾上
Used Assertion Cache Properties:APID=ap_00001
10. 测试
(1)先访问http://localhost:8001/appB,会提示你将会到localhost:7002去验证用户名和口令:
在浏览器地址栏中,会显示https://localhost:7002/samlits_ba/its?RPID=rp_00001&TARGET=http://localhost:8001/appB/admin/services.jsp,说明验证通过后会导航到services.jsp页面。
输入ssouser/welcome1,显示
http://localhost:8001/appB/admin/services.jsp 。
(2)先访问http://localhost:7001/appA,会出现欢迎页面,输入ssouser/welcome1,成功登陆后
点击链接:Application - appB on domainB,会直接进入http://localhost:8001/appB/admin/services.jsp页面,无需再次提供用户名/口令。
Project 下载:sso-with-saml1.1.7z
参考文献:
1. http://www.oracle.com/technetwork/articles/entarch/sso-with-saml-099684.html2. http://biemond.blogspot.jp/2009/05/sso-with-weblogic-103-and-saml.html
2012年10月10日星期三
WLS_080:WebLogic Server高级管理之九:配置双向SSL认证
运行环境:WebLogic Server 12c开发版(12.1.1.1.0)
关于如何配置SSL单向认证,请参考《WebLogic Server基本管理之十:配置单向SSL认证》。
完成本实验前,请先完成数字证书的创建,请参考《使用OpenSSL创建数字证书》。
1. 创建信任库:truststore.jks
keytool -keystore truststore.jks -keypass 123456 -storepass 123456 -alias ca -import -trustcacerts -file certs/ca.cer
说明:这里导入的是CA的数字证书文件:ca.cer,不包含CA私钥信息。
查看信任库信息,运行 keytool -list -v -keystore truststore.jks -storepass 123456,输出如下:
Keystore type: JKS
Keystore provider: SUN
Your keystore contains 1 entry
Alias name: ca
Creation date: Oct 9, 2012
Entry type: trustedCertEntry
Owner: CN=ca, OU=JavaNeverDie, O=JavaNeverDie, L=BJ, ST=BJ, C=CN
Issuer: CN=ca, OU=JavaNeverDie, O=JavaNeverDie, L=BJ, ST=BJ, C=CN
Serial number: f83f9ce81e66bc8c
Valid from: Tue Oct 09 14:27:26 CST 2012 until: Sat Feb 25 14:27:26 CST 2040
Certificate fingerprints:
MD5: 2C:97:99:72:EA:B3:CF:BC:15:77:BB:82:E9:65:CC:D0
SHA1: F6:45:5A:D7:A4:8F:CA:B0:5E:20:8E:31:EF:33:F7:07:CF:15:BF:62
Signature algorithm name: SHA1withRSA
Version: 1
*******************************************
*******************************************
说明:Entry type是 trustedCertEntry,表明这是一个数字证书。
2. 复制server.p12和truststore.jks到[domain_name]目录下
3. 在Managed Server中配置
3.1 Keystores Tab
(1)Keystores:Custom Identity and Custom Trust
(2)Custom Identity Keystore:server.p12
(3):PKCS12
(4):123456
(5):123456
(6):truststore.jks
(7):JKS
(8):123456
(9):123456

3.2 SSL Tab
(1)Private Key Location:from Custom Identity Keystore
(2)Private Key Alias:server
(3)Private Key Passphrase:123456
(4)Confirm Private Key Passphrase:123456


关于如何配置SSL单向认证,请参考《WebLogic Server基本管理之十:配置单向SSL认证》。
完成本实验前,请先完成数字证书的创建,请参考《使用OpenSSL创建数字证书》。
1. 创建信任库:truststore.jks
keytool -keystore truststore.jks -keypass 123456 -storepass 123456 -alias ca -import -trustcacerts -file certs/ca.cer
说明:这里导入的是CA的数字证书文件:ca.cer,不包含CA私钥信息。
查看信任库信息,运行 keytool -list -v -keystore truststore.jks -storepass 123456,输出如下:
Keystore type: JKS
Keystore provider: SUN
Your keystore contains 1 entry
Alias name: ca
Creation date: Oct 9, 2012
Entry type: trustedCertEntry
Owner: CN=ca, OU=JavaNeverDie, O=JavaNeverDie, L=BJ, ST=BJ, C=CN
Issuer: CN=ca, OU=JavaNeverDie, O=JavaNeverDie, L=BJ, ST=BJ, C=CN
Serial number: f83f9ce81e66bc8c
Valid from: Tue Oct 09 14:27:26 CST 2012 until: Sat Feb 25 14:27:26 CST 2040
Certificate fingerprints:
MD5: 2C:97:99:72:EA:B3:CF:BC:15:77:BB:82:E9:65:CC:D0
SHA1: F6:45:5A:D7:A4:8F:CA:B0:5E:20:8E:31:EF:33:F7:07:CF:15:BF:62
Signature algorithm name: SHA1withRSA
Version: 1
*******************************************
*******************************************
说明:Entry type是 trustedCertEntry,表明这是一个数字证书。
3. 在Managed Server中配置
3.1 Keystores Tab
(1)Keystores:Custom Identity and Custom Trust
(2)Custom Identity Keystore:server.p12
(3):PKCS12
(4):123456
(5):123456
(6):truststore.jks
(7):JKS
(8):123456
(9):123456
说明:
Custom Trust Keystore要求必须是只包含数字证书,也就是说Entry type必须是trustedCertEntry才行。
3.2 SSL Tab
(1)Private Key Location:from Custom Identity Keystore
(2)Private Key Alias:server
(3)Private Key Passphrase:123456
(4)Confirm Private Key Passphrase:123456
点开Advanced,
(5)Two Way Client Cert Behavior:Client Certs Requested and Enforced
3.3 General Tab
(1)勾上SSL Listen Port Enabled
(2)SSL Listen Port:8082

4. 重启Admin Server 和Managed Server
Console中输出如下内容:
5. 为IE安装Client证书


(1)勾上SSL Listen Port Enabled
(2)SSL Listen Port:8082
4. 重启Admin Server 和Managed Server
Console中输出如下内容:
Loading the identity certificate and private key stored under the alias server from the PKCS12 keystore file C:\Oracle\wls1211_dev\user_projects\domains\dev_domain\server.p12.
Loading trusted certificates from the JKS keystore file C:\Oracle\wls1211_dev\user_projects\domains\dev_domain\truststore.jks.
如果看到上述信息,说明成功装载了server.p12和truststore.jks。5. 为IE安装Client证书
双击client.p12,将证书存储到个人中。
如果不做此步,访问https://localhost:8082/counter/counter.jsp时,会报告无法连接。
如果不做此步,访问https://localhost:8082/counter/counter.jsp时,会报告无法连接。
6. 为IE安装CA证书
双击ca.p12,将证书存储到受信任的根证书颁发机构。
如果不做此步,访问https://localhost:8082/counter/counter.jsp时,地址栏中会有红色,提示证书不受信任,问你是否继续访问。


7. 部署Web应用,测试。
访问https://localhost:8082/counter/counter.jsp,应该会显示如下内容:
Project 下载:counter.war
订阅:
博文 (Atom)