2012年10月30日星期二

ADF_201:使用ADF Mobile开发Android手机On-Device应用

开发运行环境:JDeveloper 11.1.2.3.0 + Android SDK 20.0.3

1. 下载并安装Android SDK for Windows
(1)下载地址:http://developer.android.com/sdk/index.html
(2)双击installer_r20.0.3-windows.exe安装。
(3)运行Android\android-sdk\tools\android.bat,安装其它必要软件,比如不同版本的Android API。
(4)运行Android\android-sdk\AVD Manager.exe,新建一个Android 模拟器

点击Start,启动模拟器,注意Android模拟器非常慢,我这里启动大概需要1分钟。
2. 下载并安装ADF Mobile Extension
此步比较简单,从略。 

3. 在JDeveloper中配置Android

 4. 开发On-Device手机应用
关于如何使用ADF Mobile开发手机Web应用,请参考《使用ADF Mobile开发手机Web应用》。
(1)新建应用,选择Mobile Application (ADF)
 (2)配置文件:adfmf-feature.xml
adfmf-feature.xml文件是ADF On-Device手机应用的入口文件
 (3)在adfmf-feature.xml中指向了其它Task Flow。
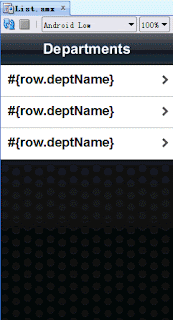
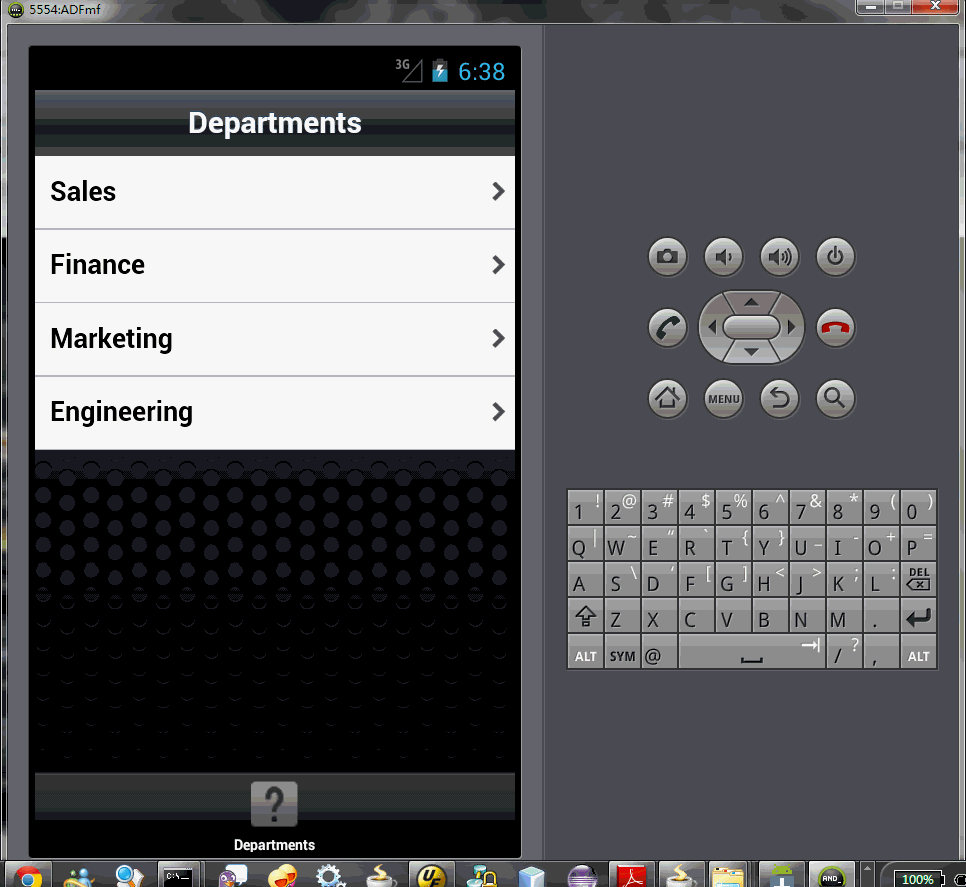
 (4)应用的画面
这里使用的是Java类生成的DataControl,然后拖放生成界面,这一点跟ADF一样。


(5)发布应用
右键应用选择Deploy,然后选择ADF Mobile for Android。
我发布时遇到一个错误:ApplicationController Project中LifeCycleListenerImpl.java编译不通过。
经检查发现是因为没有增加ADF Mobile Library。
右键ApplicationController Project,选择属性,然后再Features中点击Reconcile,就好了。


  5. 在模拟器中看运行效果
(1)
 (2)
 (3)

Project 下载:HRDemo.7z (文件有点大:41M,主要是因为包括deploy的东东)

参考文献:
1. http://docs.oracle.com/cd/E18941_01/tutorials/MobileTutorial/jdtut_11r2_54_2.html
2. http://www.oracle.com/ocom/groups/public/@otn/documents/webcontent/1866641.pdf

Tools_018:使用SOUGOU拼音输入韩文

1. 使用标准的韩文输入法
(1)在控制面板中的区域和语言中添加朝鲜语(韩国)
 (2)添加完成后的样子
(2)按照韩文标准键盘字母对照表输入韩文

2. 使用SOUGOU拼音输入韩文使用标准输入法要记住韩文元音和辅音在键盘上的位置,不太方便。能不能根据发音来输入韩文呢,就像使用拼音输入中文一样?这样会读韩文就能够打出韩文,岂不非常方便?
(1)下载并安装:sougouhanyu.zip
(2)按照罗马音的发音输入韩文
比如韩语单元音[ㅏㅓㅗㅣㅜㅡㅐㅔ]对应的输入方法是:[a eo o i u eu ae e]。
再如韩语双元音[ㅑㅕㅛㅠㅒㅖ]对应的输入方法是:[ya yeo yo yu yae ye ] 。
3. 韩语罗马音标记法
(1)ㄱ
가 ga  각 gak  간 gan  갈 gal  감 gam  갑 gap  갓 gat  강 gang  개 gae  객 gaek  거 geo  건 geon  걸 geol  검 geom  겁 geop  게 ge  겨 gyeo  격 gyeok  견 gyeon  결 gyeol  겸 gyeom  겹 gyeop  경 gyeong  계 gye  고 go  곡 gok  곤 gon  골 gol  곳 got  공 gong  곶 got  과 gwa  곽 gwak  관 gwan  괄 gwal  광 gwang  괘 gwae  괴 goe  굉 goeng  교 gyo  구 gu  국 guk  군 gun  굴 gul  굿 gut  궁 gung  권 gwon  궐 gwol  귀 gwi  규 gyu  균 gyun  귤 gyul  그 geu  극 geuk  근 geun  글 geul  금 geum  급 geup  긍 geung  기 gi  긴 gin  길 gil  김 gim  까 kka  깨 kkae  꼬 kko  꼭 kkok  꽃 kkot  꾀 kkoe  꾸 kku  꿈 kkum  끝 kkeut  끼 kki   

(2)ㄴ
나 na 낙 nak     난 nan  날 nal  남 nam  납 nap  낭 nang  내 nae  냉 naeng  너 neo  널 neol  네 ne  녀 nyeo  녁 nyeok  년 nyeon  념 nyeom  녕 nyeong  노 no  녹 nok  논 non  놀 nol  농 nong  뇌 noe  누 nu  눈 nun  눌 nul  느 neu  늑 neuk  늠 neum  능 neung  늬 nui  니 ni  닉 nik  닌 nin  닐 nil  님 nim  

(3)ㄷ
다 da     단 dan  달 dal  담 dam  답 dap  당 dang  대 dae  댁 daek  더 deo  덕 deok  도 do  독 dok  돈 don  돌 dol  동 dong  돼 dwae  되 doe  된 doen  두 du  둑 duk  둔 dun  뒤 dwi  드 deu  득 deuk  들 deul  등 deung  디 di  따 tta  땅 ttang  때 ttae  또 tto  뚜 ttu  뚝 ttuk  뜨 tteu  띠 tti  

(4)ㄹ
라 ra     락 rak  란 ran  람 ram  랑 rang  래 rae  랭 raeng  량 ryang  렁 reong  레 re  려 ryeo  력 ryeok  련 ryeon  렬 ryeol  렴 ryeom  렵 ryeop  령 ryeong  례 rye  로 ro  록 rok  론 ron  롱 rong  뢰 roe  료 ryo  룡 ryong  루 ru  류 ryu  륙 ryuk  륜 ryun  률 ryul  륭 ryung  르 reu  륵 reuk  른 reun  름 reum  릉 reung  리 ri  린 rin  림 rim  립 rip  

(5)ㅁ
마 ma     막 mak  만 man  말 mal  망 mang  매 mae  맥 maek  맨 maen  맹 maeng  머 meo  먹 meok  메 me  며 myeo  멱 myeok  면 myeon  멸 myeol  명 myeong  모 mo  목 mok  몰 mol  못 mot  몽 mong  뫼 moe  묘 myo  무 mu  묵 muk  문 mun  물 mul  므 meu  미 mi  민 min  밀 mil    

(6)ㅂ
바 ba  박 bak  반 ban  발 bal   밥 bap  방 bang  배 bae  백 baek  뱀 baem  버 beo  번 beon  벌 beol  범 beom  법 beop  벼 byeo  벽 byeok  변 byeon  별 byeol  병 byeong  보 bo  복 bok  본 bon  봉 bong  부 bu  북 buk  분 bun  불 bul  붕 bung  비 bi  빈 bin  빌 bil  빔 bim  빙 bing  빠 ppa  빼 ppae  뻐 ppeo  뽀 ppo  뿌 ppu  쁘 ppeu  삐 ppi     

(7)ㅅ
사 sa  삭 sak  산 san  살 sal   삼 sam  삽 sap  상 sang  샅 sat  새 sae  색 saek  생 saeng  서 seo  석 seok  선 seon  설 seol  섬 seom  섭 seop  성 seong  세 se  셔 syeo  소 so  속 sok  손 son  솔 sol  솟 sot  송 song  쇄 swae  쇠 soe  수 su  숙 suk  순 sun  술 sul  숨 sum  숭 sung  쉬 swi  스 seu  슬 seul  슴 seum  습 seup  승 seung  시 si  식 sik  신 sin  실 sil  심 sim  십 sip  싱 sing  싸 ssa  쌍 ssang  쌔 ssae  쏘 sso  쑥 ssuk  씨 ssi  

(8)ㅇ
아 a   악 ak  안 an  알 al  암 am  압 ap  앙 ang  앞 ap  애 ae  액 aek  앵 aeng  야 ya  약 yak  얀 yan  양 yang  어 eo  억 eok  언 eon  얼 eol  엄 eom  업 eop  에 e  여 yeo  역 yeok  연 yeon  열 yeol  염 yeom  엽 yeop  영 yeong  예 ye  오 o  옥 ok  온 on  올 ol  옴 om  옹 ong  와 wa  완 wan  왈 wal  왕 wang  왜 wae  외 oe  왼 oen  요 yo  욕 yok  용 yong  우 u  욱 uk  운 un  울 ul  움 um  웅 ung  워 wo  원 won  월 wol  위 wi  유 yu  육 yuk  윤 yun  율 yul  융 yung  윷 yut  으 eu  은 eun  을 eul  음 eum  읍 eup  응 eung  의 ui  이 i  익 ik  인 in  일 il  임 im  입 ip  잉 ing 

(9)ㅈ
자 ja  작 jak  잔 jan  잠 jam  잡 jap  장 jang  재 jae  쟁 jaeng  저 jeo  적 jeok  전 jeon  절 jeol  점 jeom  접 jeop  정 jeong  제 je  조 jo  족 jok  존 jon  졸 jol  종 jong  좌 jwa  죄 joe  주 ju  죽 juk  준 jun  줄 jul  중 jung  쥐 jwi  즈 jeu  즉 jeuk  즐 jeul  즘 jeum  즙 jeup  증 jeung  지 ji  직 jik  진 jin  질 jil  짐 jim  집 jip  징 jing  짜 jja  째 jjae  쪼 jjo  찌 jji   
  
(10)ㅊ
차 cha  착 chak  찬 chan  찰 chal   참 cham  창 chang  채 chae  책 chaek  처 cheo  척 cheok  천 cheon  철 cheol  첨 cheom  첩 cheop  청 cheong  체 che  초 cho  촉 chok  촌 chon  총 chong  최 choe  추 chu  축 chuk  춘 chun  출 chul  춤 chum  충 chung  측 cheuk  층 cheung  치 chi  칙 chik  친 chin  칠 chil  침 chim  칩 chip  칭 ching     칩 chip  칭 ching    

(11)ㅋ
코 ko  쾌 kwae  크 keu  큰 keun  키 ki

(12)ㅌ
타 ta 탁 tak  탄 tan      탈 tal  탐 tam  탑 tap  탕 tang  태 tae  택 taek  탱 taeng  터 teo  테 te  토 to  톤 ton  톨 tol  통 tong  퇴 toe  투 tu  퉁 tung  튀 twi  트 teu  특 teuk  틈 teum  티 ti     

(13)ㅍ
파 pa  판 pan  팔 pal  패 pae   팽 paeng  퍼 peo  페 pe  펴 pyeo  편 pyeon  폄 pyeom  평 pyeong  폐 pye  포 po  폭 pok  표 pyo  푸 pu  품 pum  풍 pung  프 peu  피 pi  픽 pik  필 pil  핍 pip  

(14)ㅎ
하 ha   학 hak  한 han  할 hal  함 ham  합 hap  항 hang  해 hae  핵 haek  행 haeng  향 hyang  허 heo  헌 heon  험 heom  헤 he  혀 hyeo  혁 hyeok  현 hyeon  혈 hyeol  혐 hyeom  협 hyeop  형 hyeong  혜 hye  호 ho  혹 hok  혼 hon  홀 hol  홉 hop  홍 hong  화 hwa  확 hwak  환 hwan  활 hwal  황 hwang  홰 hwae  횃 hwaet  회 hoe  획 hoek  횡 hoeng  효 hyo  후 hu  훈 hun  훤 hwon  훼 hwe  휘 hwi  휴 hyu  휼 hyul  흉 hyung  흐 heu  흑 heuk  흔 heun  흘 heul  흠 heum  흡 heup  흥 heung  희 hui  흰 huin  히 hi  힘 him  
参考文献:
1. http://kr.hujiang.com/new/p152243/
2. http://kr.hujiang.com/new/p60924

2012年10月18日星期四

WLS_083:WebLogic Server高级管理之十二:与Coherence*Web集成

开发运行环境:WebLogic Server 12c开发版(12.1.1.1.0)+  Coherence 3.7.1.0 Build 27797

WebLogic Server与Coherence*Web集成之后有如下好处:
(1)Session对象将托管给Coherence Cache Server管理,你可以根据需要使用不同的缓存拓扑结构。
(2)Session对象不再与WLS Server共享同一个JVM,使WLS Server有更多的Heap空间。
(3)即使重启WLS Server,也不会造成Session丢失。
这样的分工可以让WLS和Coherence在各自擅长的领域做各自专业的事情。

1. session-cache-server.cmd
这是Coherence Cache Server,用于保存所有Session对象。脚本如下:
setlocal

set COHERENCE_HOME=C:\Oracle\coherence

set COH_OPTS=%COH_OPTS% -server -cp %COHERENCE_HOME%\lib\coherence.jar;%COHERENCE_HOME%\lib\coherence-web.jar;

set COH_OPTS=%COH_OPTS% -Dtangosol.coherence.management.remote=true -Dtangosol.coherence.cacheconfig=session-cache-config.xml -Dtangosol.coherence.distributed.localstorage=true -Dtangosol.coherence.clusterport=7777 -Dtangosol.coherence.clusteraddress=231.1.1.1 -Dtangosol.coherence.session.localstorage=true -Dtangosol.coherence.cluster=CoherenceCluster

java %COH_OPTS% -Xms512m -Xmx512m -XX:MaxPermSize=256m com.tangosol.net.DefaultCacheServer

:exit

其中,session-cache-config.xml在coherence-web.jar中,其内容如下:

<?xml version="1.0"?>
<!-- - - - - - - - - - - - - - - - - - - - - - - - - - - - - - - - - - - - -->
<!--                                                                       -->
<!--      Cache configuration descriptor for Coherence*Web                 -->
<!--                                                                       -->
<!-- - - - - - - - - - - - - - - - - - - - - - - - - - - - - - - - - - - - -->

<cache-config xmlns:xsi="http://www.w3.org/2001/XMLSchema-instance"
              xmlns="http://xmlns.oracle.com/coherence/coherence-cache-config"
              xsi:schemaLocation="http://xmlns.oracle.com/coherence/coherence-cache-config coherence-cache-config.xsd">

  <caching-scheme-mapping>
    <!--
    The clustered cache used to store Session management data.
    -->
    <cache-mapping>
      <cache-name>session-management</cache-name>
      <scheme-name>replicated</scheme-name>
    </cache-mapping>

    <!--
    The clustered cache used to store ServletContext attributes.
    -->
    <cache-mapping>
      <cache-name>servletcontext-storage</cache-name>
      <scheme-name>replicated</scheme-name>
    </cache-mapping>

    <!--
    The clustered cache used to store Session attributes.
    -->
    <cache-mapping>
      <cache-name>session-storage</cache-name>
      <scheme-name>session-near</scheme-name>
    </cache-mapping>

    <!--
    The clustered cache used to store the "overflowing" (split-out due to size)
    Session attributes. Only used for the "Split" model.
    -->
    <cache-mapping>
      <cache-name>session-overflow</cache-name>
      <scheme-name>session-distributed</scheme-name>
    </cache-mapping>

    <!--
    The clustered cache used to store IDs of "recently departed" Sessions.
    -->
    <cache-mapping>
      <cache-name>session-death-certificates</cache-name>
      <scheme-name>session-certificate</scheme-name>
    </cache-mapping>

    <!--
    The local cache used to store Sessions that are not yet distributed (if
    there is a distribution controller).
    -->
    <cache-mapping>
      <cache-name>local-session-storage</cache-name>
      <scheme-name>unlimited-local</scheme-name>
    </cache-mapping>

    <!--
    The local cache used to store Session attributes that are not distributed
    (if there is a distribution controller or attributes are allowed to become
    local when serialization fails).
    -->
    <cache-mapping>
      <cache-name>local-attribute-storage</cache-name>
      <scheme-name>unlimited-local</scheme-name>
    </cache-mapping>
  </caching-scheme-mapping>

  <caching-schemes>
    <!--
    Replicated caching scheme used by the Session management and ServletContext
    attribute caches.
    -->
    <replicated-scheme>
      <scheme-name>replicated</scheme-name>
      <service-name>ReplicatedSessionsMisc</service-name>
      <request-timeout>30s</request-timeout>
      <backing-map-scheme>
        <local-scheme>
          <scheme-ref>unlimited-local</scheme-ref>
        </local-scheme>
      </backing-map-scheme>
      <autostart>true</autostart>
    </replicated-scheme>

    <!--
    Near caching scheme used by the Session attribute cache. The front cache
    uses a Local caching scheme and the back cache uses a Distributed caching
    scheme.
    -->
    <near-scheme>
      <scheme-name>session-near</scheme-name>
      <front-scheme>
        <local-scheme>
          <scheme-ref>session-front</scheme-ref>
        </local-scheme>
      </front-scheme>
      <back-scheme>
        <distributed-scheme>
          <scheme-ref>session-distributed</scheme-ref>
        </distributed-scheme>
      </back-scheme>
      <invalidation-strategy>present</invalidation-strategy>
    </near-scheme>

    <local-scheme>
      <scheme-name>session-front</scheme-name>
      <eviction-policy>HYBRID</eviction-policy>
      <high-units>1000</high-units>
      <low-units>750</low-units>
    </local-scheme>

    <distributed-scheme>
      <scheme-name>session-distributed</scheme-name>
      <scheme-ref>session-base</scheme-ref>
      <backing-map-scheme>
        <local-scheme>
          <scheme-ref>unlimited-local</scheme-ref>
        </local-scheme>
        <!-- for disk overflow use this backing scheme instead:
        <overflow-scheme>
          <scheme-ref>session-paging</scheme-ref>
        </overflow-scheme>
        -->
      </backing-map-scheme>
    </distributed-scheme>

    <!--
    Distributed caching scheme used by the "recently departed" Session cache.
    -->
    <distributed-scheme>
      <scheme-name>session-certificate</scheme-name>
      <scheme-ref>session-base</scheme-ref>
      <backing-map-scheme>
        <local-scheme>
          <eviction-policy>HYBRID</eviction-policy>
          <high-units>4000</high-units>
          <low-units>3000</low-units>
          <expiry-delay>86400</expiry-delay>
        </local-scheme>
      </backing-map-scheme>
    </distributed-scheme>

    <!--
    "Base" Distributed caching scheme that defines common configuration.
    -->
    <distributed-scheme>
      <scheme-name>session-base</scheme-name>
      <service-name>DistributedSessions</service-name>
      <thread-count>0</thread-count>
      <lease-granularity>member</lease-granularity>
      <local-storage system-property="tangosol.coherence.session.localstorage">false</local-storage>
      <partition-count>257</partition-count>
      <backup-count>1</backup-count>
      <backup-storage>
        <type>on-heap</type>
      </backup-storage>
      <request-timeout>30s</request-timeout>
      <backing-map-scheme>
        <local-scheme>
          <scheme-ref>unlimited-local</scheme-ref>
        </local-scheme>
      </backing-map-scheme>
      <autostart>true</autostart>
    </distributed-scheme>

    <!--
    Disk-based Session attribute overflow caching scheme.
    -->
    <overflow-scheme>
      <scheme-name>session-paging</scheme-name>
      <front-scheme>
        <local-scheme>
          <scheme-ref>session-front</scheme-ref>
        </local-scheme>
      </front-scheme>
      <back-scheme>
        <external-scheme>
          <bdb-store-manager/>
        </external-scheme>
      </back-scheme>
    </overflow-scheme>

    <!--
    Local caching scheme definition used by all caches that do not require an
    eviction policy.
    -->
    <local-scheme>
      <scheme-name>unlimited-local</scheme-name>
      <service-name>LocalSessionCache</service-name>
    </local-scheme>

    <!--
    Clustered invocation service that manages sticky session ownership.
    -->
    <invocation-scheme>
      <service-name>SessionOwnership</service-name>
      <request-timeout>30s</request-timeout>
    </invocation-scheme>
  </caching-schemes>
</cache-config>

2. 在WebLogic Console中配置
(1)创建两个Managed Server:ServerA(端口8081)和ServerB(端口8083)
这里我并没有把ServerA和ServerB组成为一个集群,只是两个各自独立的Server。
(2)发布两个Shared Library到ServerA和ServerB上:coherence-web-spi.war和active-cache-1.0.jar。
其中coherence-web-spi.war位于[coherence_home]\lib目录下,active-cache-1.0.jar位于[wls_server]\common\deployable-libraries目录下。
(3)创建Coherence Cluster,Target到ServerA和ServerB上。


3. 创建应用:counter.war
(1)counter.jsp
<%@ page contentType="text/html;charset=UTF-8"%>
<html>
    <body>
        <h3>
            Counter :
            <%
                Integer counter = new Integer(1);
                HttpSession httpsession = request.getSession(true);
                if (httpsession.isNew()) {
                    httpsession.setAttribute("count", counter);
                    out.println(counter);
                } else {
                    int count = ((Integer) httpsession.getAttribute("count")).
                    intValue();
                    httpsession.setAttribute("count", new Integer(++count));
                    out.println(count);
                }
            %>
        </h3>
    </body>
</html>
(2)weblogic.xml
<?xml version="1.0" encoding="UTF-8" ?>
<weblogic-web-app xmlns="http://xmlns.oracle.com/weblogic/weblogic-web-app"
                  xmlns:xsi="http://www.w3.org/2001/XMLSchema-instance"
                  xsi:schemaLocation="http://xmlns.oracle.com/weblogic/weblogic-web-app http://www.oracle.com/technology/weblogic/weblogic-web-app/1.1/weblogic-web-app.xsd">
    <library-ref>
        <library-name>coherence-web-spi</library-name>
    </library-ref>
    <coherence-cluster-ref>
        <coherence-cluster-name>CoherenceCluster</coherence-cluster-name>
    </coherence-cluster-ref>
</weblogic-web-app>
(3)manifest.mf
Extension-List: active-cache
active-cache-Extension-Name: active-cache
active-cache-Specification-Version: 1.0
active-cache-Implementation-Version: 1.0
(4)复制coherence.jar到WEB-INF/lib目录下
(5)counter应用目录结构如下:
/
/counter.jsp
/META-INF/manifest.mf
/WEB-INF/web.xml
/WEB-INF/weblogic.xml
/WEB-INF/lib/coherence.jar
(6)发布counter.war到ServerA和ServerB上。

4. 测试
(1)运行session-cache-server.cmd,启动Coherence Cache Server。
(2)启动Admin Server
(3)启动Managed Server:ServerA和ServerB。
(4)启动counter应用
这时,在ServerA和ServerB的Console中会输出如下信息:
2012-10-18 15:39:09.907/108.408 Oracle Coherence 3.7.1.0 <Info> (thread=[ACTIVE] ExecuteThread: '0' for queue: 'weblogic.kernel.Default (self-tuning)', member=n
/a): Loaded operational configuration from "zip:C:/Oracle/wls1211_dev/user_projects/domains/dev_domain/servers/ServerA/tmp/_WL_user/counter/m4egcu/war/WEB-INF/l
ib/coherence.jar!/tangosol-coherence.xml"
2012-10-18 15:39:10.143/108.644 Oracle Coherence 3.7.1.0 <Info> (thread=[ACTIVE] ExecuteThread: '0' for queue: 'weblogic.kernel.Default (self-tuning)', member=n
/a): Loaded operational overrides from "zip:C:/Oracle/wls1211_dev/user_projects/domains/dev_domain/servers/ServerA/tmp/_WL_user/counter/m4egcu/war/WEB-INF/lib/c
oherence.jar!/tangosol-coherence-override-dev.xml"
2012-10-18 15:39:10.145/108.646 Oracle Coherence 3.7.1.0 <D5> (thread=[ACTIVE] ExecuteThread: '0' for queue: 'weblogic.kernel.Default (self-tuning)', member=n/a
): Optional configuration override "/tangosol-coherence-override.xml" is not specified
2012-10-18 15:39:10.213/108.714 Oracle Coherence 3.7.1.0 <D5> (thread=[ACTIVE] ExecuteThread: '0' for queue: 'weblogic.kernel.Default (self-tuning)', member=n/a
): Optional configuration override "/custom-mbeans.xml" is not specified

Oracle Coherence Version 3.7.1.0 Build 27797
 Grid Edition: Development mode
Copyright (c) 2000, 2011, Oracle and/or its affiliates. All rights reserved.

2012-10-18 15:39:11.114/109.615 Oracle Coherence GE 3.7.1.0 <Info> (thread=[ACTIVE] ExecuteThread: '0' for queue: 'weblogic.kernel.Default (self-tuning)', membe
r=n/a): Loaded cache configuration from "zip:C:/Oracle/wls1211_dev/user_projects/domains/dev_domain/servers/ServerA/tmp/_WL_user/coherence-web-spi/14iuoc/WEB-IN
F/lib/coherence-web.jar!/session-cache-config.xml"
2012-10-18 15:39:12.659/111.160 Oracle Coherence GE 3.7.1.0 <Info> (thread=[ACTIVE] ExecuteThread: '0' for queue: 'weblogic.kernel.Default (self-tuning)', membe
r=n/a): Loaded Reporter configuration from "zip:C:/Oracle/wls1211_dev/user_projects/domains/dev_domain/servers/ServerA/tmp/_WL_user/counter/m4egcu/war/WEB-INF/l
ib/coherence.jar!/reports/report-group.xml"
<Oct 18, 2012 3:39:14 PM CST> <Warning> <com.oracle.wls> <BEA-000000> <2012-10-18 15:39:14.624/113.125 Oracle Coherence GE 3.7.1.0 <Warning> (thread=Cluster, me
mber=n/a): This member is configured with a multicast TTL of 0; the senior Member(Id=1, Timestamp=2012-10-18 15:36:33.028, Address=10.191.10.83:8088, MachineId=
46446, Location=site:,machine:PMMA-CN,process:6384, Role=CoherenceServer) is configured with a TTL of 4. It is strongly recommended to use the same TTL setting
for all cluster members.>
<Oct 18, 2012 3:39:15 PM CST> <Warning> <WorkManager> <BEA-002919> <Unable to find a Work Manager with name wm/CoherenceWorkManager. Dispatch policy wm/Coherenc
eWorkManager will map to the default Work Manager for the application counter>
Oct 18, 2012 3:39:16 PM com.tangosol.coherence.servlet.AbstractHttpSessionCollection configure
INFO: Configured session model "SplitHttpSessionCollection":
  Clustered Session Cache Name=session-storage
  Local Session Cache Name=local-session-storage
  Local Session Attribute Cache Name=local-attribute-storage
  Death Certificate Cache Name=session-death-certificates
  SessionDistributionController Class Name=
  AttributeScopeController Class Name=com.tangosol.coherence.servlet.AbstractHttpSessionCollection$ApplicationScopeController
  Maximum Session Inactive Seconds=3600
  Session ID Character Length=52
  Session Locking Enforced=false
  Member Session Locking Enforced=false
  Application Session Locking Enforced=false
  Thread Session Locking Enforced=false
  Session Get Lock Timeout=300
  Suspect Attribute Detection=true
  Strict "Servlet Specification" Exception Handling=true
  Sticky Session Ownership=false
  Sticky Session Ownership Service Name=SessionOwnership
  Assume Session Locality for Reaping=false
  Parallel Session Reaping=true
  Allow Local Attributes=false
  Use Default Session ID Decoding=true
  Use Default Session ID Encoding=false
  Session ID Affinity Token=null
  Session Expiry Filter Factory=
  Session Access Debug Logging Enabled=false
  Session Access Debug Logging Filter=
Oct 18, 2012 3:39:16 PM com.tangosol.coherence.servlet.SessionHelper registerMBean
INFO: Registering MBean using object name "type=WebLogicHttpSessionManager,nodeId=2,appId=countercounter.war"

同时,在session-cache-server.cmd的Console会输出如下信息:
2012-10-18 15:39:14.624/164.404 Oracle Coherence GE 3.7.1.0 <D5> (thread=Cluster, member=1): Member(Id=2, Timestamp=2012-10-18 15:39:14.632, Address=10.191.10.8
3:8090, MachineId=46446, Location=site:,machine:PMMA-CN,process:7608, Role=WeblogicServer) joined Cluster with senior member 1
2012-10-18 15:39:14.749/164.529 Oracle Coherence GE 3.7.1.0 <D5> (thread=Cluster, member=1): Member 2 joined Service Management with senior member 1
2012-10-18 15:39:15.217/164.997 Oracle Coherence GE 3.7.1.0 <D5> (thread=Cluster, member=1): Member(Id=3, Timestamp=2012-10-18 15:39:15.014, Address=10.191.10.8
3:8092, MachineId=46446, Location=site:,machine:PMMA-CN,process:296, Role=WeblogicServer) joined Cluster with senior member 1
2012-10-18 15:39:15.326/165.106 Oracle Coherence GE 3.7.1.0 <D5> (thread=Cluster, member=1): Member 3 joined Service Management with senior member 1
2012-10-18 15:39:15.904/165.684 Oracle Coherence GE 3.7.1.0 <D5> (thread=Cluster, member=1): Member 3 joined Service DistributedSessions with senior member 1
2012-10-18 15:39:15.966/165.746 Oracle Coherence GE 3.7.1.0 <D5> (thread=Cluster, member=1): Member 2 joined Service DistributedSessions with senior member 1

如果看到如上信息说明ServerA和ServerB已经作为Client成员加入到Coherence集群中了。
(5)访问http://localhost:8081/counter/counter.jsp,显示Counter:1。刷新页面数字会跟着增长。
(6)访问http://localhost:8083/counter/counter.jsp,会接着显示下一个增长的数字。
这说明ServerA和ServerB上的counter应用的Session是共享的,尽管我没有把ServerA和ServerB组成一个集群。
(7)重启ServerA和ServerB。
(8)再次访问http://localhost:8081/counter/counter.jsp,会接着显示下一个增长的数字。
这说明Session对象是保留在Coherence Cache Server中的,所以即使停掉ServerA和ServerB,Session对象也不会丢失。

Project 下载:counter(coherence).war

参考文献:
1. Tutorial for Oracle Coherence Release 3.7.1 之 Caching Sessions with Coherence and WebLogic Server
2. http://blog.ipnweb.com/2012/02/member-specified-cluster-name-which-did.html

2012年10月16日星期二

JDev_036:使用HTTP Analyzer观察HTTP请求和响应

开发运行环境:JDeveloper 11.1.2.3

开发Web应用和WebService时,经常需要观察HTTP请求和响应。
如果你平时使用JDeveloper做开发,可以使用其中的一个小工具:HTTP Analyzer。

1. 设置HTTP Analyzer
(1)选择Tools,选择Preferences,选择Http Analyzer,设置监听的主机和端口
默认是localhost和8099。
 (2)选择Tools,选择HTTP Analyzer,打开HTTP Analyzer界面。
 (3)点击绿色的三角按钮,启动HTTP Analyzer。
 2. 设置Firefox的Proxy代理
 (1)选择网络,点击设置。

  (2)选择手动配置代理,指向Http Analyzer监听的主机和端口。
说明:如果你不想影响平时Firefox的正常使用,可以用命令行启动Debug模式下的Firefox:
"C:\Program Files (x86)\Mozilla Firefox\firefox.exe" -no-remote -P Debugging。
然后增加一个Profile,这样区分开Debug模式的Firefox和平时正常使用的Firefox,二者互不影响。

  3. 在Firefox中访问应用
会发现随着你的访问,所有的请求和响应都被HTTP Analyzer记录下来了。
你可以点击某一次访问,查看详细的请求和响应信息,并且可以在这里手工修改参数,然后重新发送请求。

4. 观察WebService的请求和响应
HTTP Analyzer除了可以观察HTTP请求和响应,还可以作为一个WebService测试客户端,观察WebService的请求和响应。
该功能类似SOAPUI,但是没有SOAPUI那么强大。
使用方法请参考《用JDeveloper使开发WebService之一:元注释驱动POJO(1)》。

参考文献:
1. http://nickaiva.blogspot.jp/2010/10/jdeveloper-11g-making-use-of-http.html
2. https://blogs.oracle.com/shay/entry/monitoring_adf_pages_round_trips

2012年10月12日星期五

WLS_082:WebLogic Server高级管理之十一:使用SAML2.0配置SSO

运行环境:WebLogic Server 12c开发版(12.1.1.1.0)

本实验前五步跟《使用SAML1.1配置SSO》一样,我从第六步开始介绍。

6. 在dev_domain中配置SAML2CredentialMapper
SAML2CredentialMapper的角色是SAML security assertions的Provider,即作为断言的提供方。
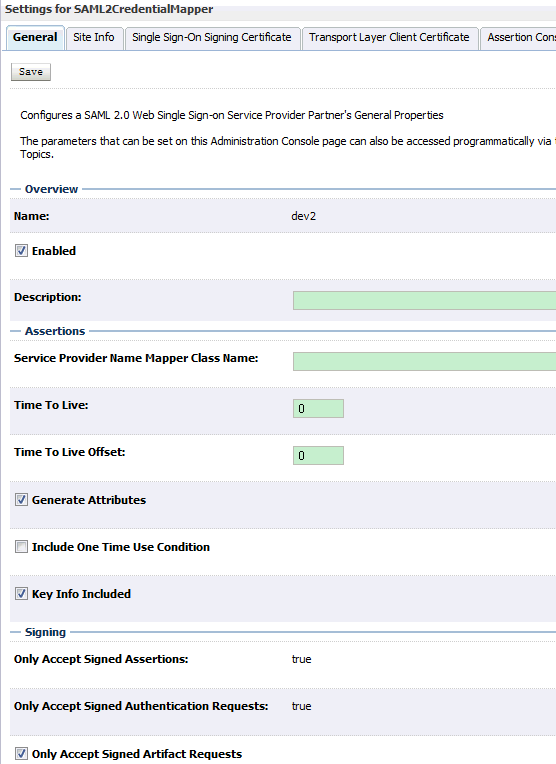
(1)创建SAML2CredentialMapper
选择myrealm,Providers,CredentialMapping,点击New,Type选择SAML2CredntialMapper
(2)配置Provider Specific
Issuer URI:http://www.oracle.com/demoSAML
Name Qualifier:oracle.com
Default Time To Live:120
Default Time To Live Offset:-5
Web Service Assertion Signing Key Alias:server
Web Service Assertion Signing Key Pass Phrase:123456 


 7. 在dev_domain中,为Admin Server配置SAML 2.0 Indentity Provider 
Enabled:勾上
Login URL:/saml2/idp/login
POST Binding Enabled:勾上
Redirect Binding Enabled:勾上
Artifact Binding Enabled:勾上

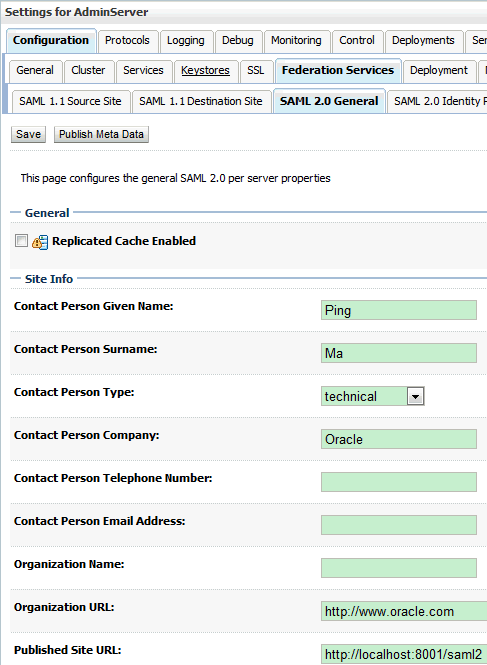
 8. 在dev_domain中,为Admin Server配置SAML 2.0 General
Contact Person Given Name:Ping
Contact Person Surname:Ma
Contact Person Type:technical
Contact Person Company:Oracle
Contact Person Telephone Number:
Contact Person Email Address:
Organization Name:
Organization URL:http://www.oracle.com
Published Site URL:http://localhost:7001/saml2
Entity ID:SAML2CredentialMapper
Recipient Check Enabled:勾上
Transport Layer Security Key Alias:server
Transport Layer Security Key Passphrase:123456
ConfirmTransport Layer Security Key Passphrase:123456
Only Accept Signed Artifact Request:勾上
Artifact Cache Size:10000
Artifact Cache Timeout:300
Single Sign-on Signing Key Alias:server
Single Sign-on Signing Key Pass Phrase:123456
Confirm Single Sign-on Signing Key Pass Phrase:123456

 点击Publish Meta Data按钮,导出dev_metadata.xml。

9. 在dev2_domain中,为Admin Server配置SAML2.0 Identity Asserter 

(1)创建SAML2IdentityAsserter
选择myrealm,Providers,Authentication,点击New,Type选择SAML2IdentityAsserter

 10. 在dev2_domain中,为Admin Server配置SAML 2.0 Service Provider 
Enabled:勾上
Always Sign Authentication Requests:勾上
Force Authentication:勾上
Only Accept Signed Assertions:勾上
Authentication Request Cache Size:10000
Authentication Request Cache Timeout:300
POST One Use Check Enabled:勾上
POST Binding Enabled:勾上
Artifact Binding Enabled:勾上

 11. 在dev2_domain中,为Admin Server配置SAML 2.0 General
Contact Person Given Name:Ping
Contact Person Surname:Ma
Contact Person Type:technical
Contact Person Company:Oracle
Contact Person Telephone Number:
Contact Person Email Address:
Organization Name:
Organization URL:http://www.oracle.com
Published Site URL:http://localhost:8001/saml2
Entity ID:SAML2IdentityAsserter
Recipient Check Enabled:勾上
Transport Layer Security Key Alias:server
Transport Layer Security Key Passphrase:123456
ConfirmTransport Layer Security Key Passphrase:123456
Only Accept Signed Artifact Request:勾上
Artifact Cache Size:10000
Artifact Cache Timeout:300
Single Sign-on Signing Key Alias:server
Single Sign-on Signing Key Pass Phrase:123456
Confirm Single Sign-on Signing Key Pass Phrase:123456

点击Publish Meta Data按钮,导出dev2_metadata.xml。


 12. 在dev_domain中,为SAML2CredentialMapper导入Service Provider Partners:dev2_metadata.xml
(1)点击New,选择New Web Single Sign-On Service Proider Partner
(2)选择dev2_metadata.xml
(2)点击dev2,配置如下:
Enabled:勾上
Key Info Included:勾上
Only Accept Signed Artifact Requests:勾上


 13. 在dev2_domain中,SAML2IdentityAsserter导入Identity Provider Partners:dev_metadata.xml
(1)点击New,选择New Web Single Sign-On Indentity Provider Partner
(2)选择dev_metadata.xml
(3)点击dev,配置如下:
Enabled:勾上
Redirect URIs:/appB/admin/services.jsp
Only Accept Signed Artifact Requests:勾上


14. 测试
(1)先访问http://localhost:8001/appB,会提示你将会到localhost:7001去验证用户名和口令:
在浏览器地址栏中,会显示http://localhost:7001/saml2/idp/sso/artifact?SAMLart=AAQAAJOmtVL6FtyvtF02ooeKW%2FAD3soLMJdjuZGJDRHo4cMvocoWDOQWKxg%3D。
输入ssouser/welcome1,显示 http://localhost:8001/appB/admin/services.jsp 。
说明:因为这里我没有使用SSL端口处理SAML2的请求,因此口令将以明文方式发送。

(2)先访问http://localhost:7001/appA,会出现欢迎页面,输入ssouser/welcome1,成功登陆后
点击链接:Application - appB on domainB,会直接进入http://localhost:8001/appB/admin/services.jsp页面,无需再次提供用户名/口令。

参考文献:
1.  http://biemond.blogspot.com/2009/09/sso-with-weblogic-1031-and-saml2.html
2012年10月11日星期四

WLS_081:WebLogic Server高级管理之十:使用SAML1.1配置SSO

运行环境:WebLogic Server 12c开发版(12.1.1.1.0)

1. 开发应用
(1)appA
这是appA的web.xml文件内容:
<?xml version="1.0" encoding="UTF-8"?>
<web-app id="WebApp_ID" version="2.4" xmlns="http://java.sun.com/xml/ns/j2ee" xmlns:xsi="http://www.w3.org/2001/XMLSchema-instance" xsi:schemaLocation="http://java.sun.com/xml/ns/j2ee/web-app_2_4.xsd">
<display-name>Saml Source Site Application</display-name>
<welcome-file-list>
<welcome-file>index.jsp</welcome-file>
</welcome-file-list>
<security-constraint>
<web-resource-collection>
<web-resource-name>SecurePages</web-resource-name>
<description>These pages are only accessible by authorized users.</description>
            <url-pattern>/admin/*</url-pattern>          
            <http-method>GET</http-method>
</web-resource-collection>
<auth-constraint>
<description>These are the roles who have access.</description>          
<role-name>admin</role-name>
</auth-constraint>
<user-data-constraint>
<description>This is how the user data must be transmitted.</description>
<transport-guarantee>NONE</transport-guarantee>      
</user-data-constraint>
</security-constraint>
<login-config>
<auth-method>FORM</auth-method>
<realm-name>myrealm</realm-name>
<form-login-config>
<form-login-page>/login.jsp</form-login-page>
<form-error-page>/fail_login.htm</form-error-page>
</form-login-config>  
</login-config>
<security-role>
<description>These are the roles who have access</description>      
<role-name>admin</role-name>
</security-role>
</web-app>
这是appA的weblogic.xml文件内容:
<?xml version='1.0' encoding='UTF-8'?>
<weblogic-web-app xmlns="http://www.bea.com/ns/weblogic/90"
xmlns:xsi="http://www.w3.org/2001/XMLSchema-instance">
<security-role-assignment>
<role-name>admin</role-name>
<principal-name>ssouser</principal-name>
</security-role-assignment>
<context-root>/appA</context-root>
</weblogic-web-app>
(2)appB
这是appB的web.xml文件内容:
<?xml version="1.0" encoding="UTF-8"?>
<web-app id="WebApp_ID" version="2.4" xmlns="http://java.sun.com/xml/ns/j2ee" xmlns:xsi="http://www.w3.org/2001/XMLSchema-instance" xsi:schemaLocation="http://java.sun.com/xml/ns/j2ee http://java.sun.com/xml/ns/j2ee/web-app_2_4.xsd">
<display-name>SAML Destination Site Application</display-name>
<welcome-file-list>
<welcome-file>index.jsp</welcome-file>
</welcome-file-list>
<security-constraint>
<web-resource-collection>
<web-resource-name>SecurePages</web-resource-name>
<description>These pages are only accessible by authorized users.</description>
            <url-pattern>/admin/*</url-pattern>          
            <http-method>GET</http-method>
</web-resource-collection>
<auth-constraint>
<description>These are the roles who have access.</description>          
<role-name>admin</role-name>
</auth-constraint>
<user-data-constraint>
<description>This is how the user data must be transmitted.</description>
<transport-guarantee>NONE</transport-guarantee>      
</user-data-constraint>
</security-constraint>
<login-config>
<auth-method>CLIENT-CERT</auth-method>
<realm-name>myrealm</realm-name>
</login-config>
<security-role>
<description>These are the roles who have access.</description>      
<role-name>admin</role-name>
</security-role>
</web-app>
这是appB的weblogic.xml文件内容:
<?xml version='1.0' encoding='UTF-8'?>
<weblogic-web-app xmlns="http://www.bea.com/ns/weblogic/90"
xmlns:xsi="http://www.w3.org/2001/XMLSchema-instance">
<security-role-assignment>
<role-name>admin</role-name>
<principal-name>ssouser</principal-name>
</security-role-assignment>
<context-root>/appB</context-root>
</weblogic-web-app>

2. 创建Domain
(1)创建dev_domain,作为SAML的source一方。
(2)创建dev2_domain,作为SAML的target一方。

3. 创建用户
(1)在dev_domain中Security Realms的myRealm创建用户ssouser/welcome1。
(2)在dev2_domain中Security Realms的myRealm创建用户ssouser/welcome1。
说明:这里只是出于测试的目的,分别在dev_domain和dev2_domain中创建了相同的用户。
实际使用时,一般两个Domain会使用同一个身份认证提供者,比如LDAP或数据库。

3. 部署应用
(1)部署appA 到dev_domain的Admin Server上 。
(2)部署appB 到dev2_domain的Admin Server上 。

4. 测试应用
访问http://localhost:7001/appA,会出现欢迎页面,输入ssouser/welcome1,成功登陆后
点击链接:Application - appB on domainB,会报错,这是因为appB需要通过数字证书认证,因为没有得到相关信息所以报错。
当配置好SSO后,点击该链接应该可以进入appB中的受保护页面。

5. 配置SSL
(1) 在dev_domain中,为Admin Server 配置SSL
(2) 在dev2_domain中,为Admin Server 配置SSL
具体步骤请参考《配置双向SSL认证》,这里我配置的是单向SSL认证:Two Way Client Cert Behavior:Client Certs Not Required。

6. 在dev_domain中配置SAMLCredentialMapper
SAMLCredentialMapper的角色是SAML security assertions的Provider,即作为断言的提供方。
(1)创建SAMLCredentialMapper
选择myrealm,Providers,CredentialMapping,点击New,Type选择SAMLCredntialMapperV2


(2)配置Provider Specific
Issuer URI:http://www.bea.com/demoSAML
Name Qualifier:bea.com
Default Time To Live:120
Default Time To Live Offset:0
Signing Key Alias:server
Signing Key Pass Phrase:123456
Confirm Signing Key Pass Phrase:123456
(3)配置Management->Certificates
这里我导入了两个数字证书:ca.der和server.der。
生成ca.der
keytool -keystore truststore.jks -keypass 123456 -storepass 123456 -alias ca-import -trustcacerts -file certs/ca.cer
keytool -export -keystore truststore.jks -storepass 123456 -alias ca -file ca.der

生成server.der
keytool -keystore truststore.jks -keypass 123456 -storepass 123456 -alias server -import -trustcacerts -file certs/server.cer
keytool -export -keystore truststore.jks -storepass 123456 -alias server -file server.der
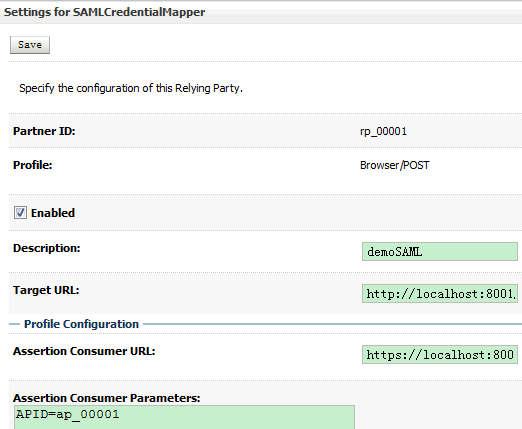
(4)配置Management->Relying Parties
Enabled:勾上
Description:demoSAML
Target URL:http://localhost:8001/appB/admin/services.jsp
Assertion Consumer URL:https://localhost:8002/samlacs/acs
Assertion Consumer Parameters:APID=ap_00001
Signature Required:勾上
Include Keyinfo:勾上

7. 在dev_domain中,为Admin Server配置SAML 1.1 Source Site
选择Federation Services,SAML 1.1 Source Site
Source Site Enabled:勾上
Source Site URL:http://localhost:7001/appA
Signing Key Alias:server
Signing Key Passphrase:123456
Intersite Transfer URIS:/samlits_ba/its
                                       /samlits_ba/its/post
                                       /samlits_ba/its/artifact
                                       /samlits_cc/its
                                       /samlits_cc/its/post
                                       /samlits_cc/its/artifact
ITS Requires SSL:勾上
Assertion Retrieval URIs:/samlars/ars
ARS Requires SSL:勾上

8. 在dev2_domain中配置SAMLIdentityAsserter
SAMLIdentityAsserter的角色是SAML security assertions的Consumer,即作为断言的消费方。
它负责验证断言是否正确有效。
(1)创建SAMLIdentityAsserter
选择myrealm,Providers,Authentication,点击New,Type选择SAMLIdentityAsserterV2
(2)配置Management->Certificates
这里我导入了两个数字证书:ca.der和server.der,步骤同6(3)。
(3)配置Management->Asserting Parties
Enabled:勾上
Description:demoSAML
Target URL:http://localhost:7001/appA
POST Signing Certificate Alias:server
Source Site Redirect URIs:/appB/admin/services.jsp
Source Site ITS URL:https://localhost:7002/samlits_ba/its
Source Site ITS Parameters:RPID=rp_00001
Issuer URI:http://www.bea.com/demoSAML
Signature Required:勾上
Asserting Signing Certificate Alias:server


9. 在dev2_domain中,为Admin Server配置SAML 1.1 Target Site
选择Federation Services,SAML 1.1 Target Site
Destination Site Enabled:勾上
Assertion Consumer URIs:/samlacs/acs
ACS Requires SSL:勾上
SSL Client Identity Alias:server
SSL Client Identity Pass Phrase:123456
POST Recipient Check Enabled:勾上
POST one Use Check Enabled:勾上
Used Assertion Cache Properties:APID=ap_00001


10. 测试
(1)先访问http://localhost:8001/appB,会提示你将会到localhost:7002去验证用户名和口令:
在浏览器地址栏中,会显示https://localhost:7002/samlits_ba/its?RPID=rp_00001&TARGET=http://localhost:8001/appB/admin/services.jsp,说明验证通过后会导航到services.jsp页面。
输入ssouser/welcome1,显示 http://localhost:8001/appB/admin/services.jsp 。
(2)先访问http://localhost:7001/appA,会出现欢迎页面,输入ssouser/welcome1,成功登陆后
点击链接:Application - appB on domainB,会直接进入http://localhost:8001/appB/admin/services.jsp页面,无需再次提供用户名/口令。


Project 下载:sso-with-saml1.1.7z

参考文献:
1. http://www.oracle.com/technetwork/articles/entarch/sso-with-saml-099684.html
2. http://biemond.blogspot.jp/2009/05/sso-with-weblogic-103-and-saml.html